Set Property Values
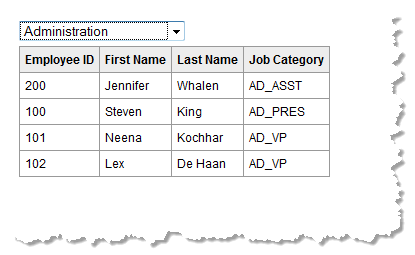
This example is a simple custom app that runs a mashup to retrieve a set of employees and render them in a table. It is very similar to the custom table app shown in .
In this case, the app uses a job category that users choose to select employees. Initially, it opens with just a list of job categories.
When a user selects a job category, this value updates a property in the app. This is then used as an input parameter to the mashup to retrieve employee information and render the table.
The name of this sample custom app is
EmployeesByJobArea. See
HTML and CSS for the Sample Employee App for the basic structure and styles used in this custom app.
The App Specification has configuration to define the custom property used to track the current job category. It also adds the jQuery Templating Library which is used to render the app. See the
Properties and Libraries for the Sample Employee App
Specification section for details.
The remaining implementation details for this sample app are handled in the JavaScript library js/app.js. This includes:
HTML and CSS for the Sample Employee App
The EmployeesByJobCategory/html/app.html file defines the HTML elements needed to render the app. It is wrapped by a <div> element with an ID assigned for easy access. It contains a <select> element to define the pull-down list of job categories and a table to render the employee information from the mashup results:
<div
>
<div
>
<select id="dept"
>
<option value="none">Select a Job Category</option>
<option value="AD">Administration</option>
<option value="AC">Customer Service</option>
<option value="FI">Finance</option>
<option value="IT">Information Technology</option>
<option value="MK">Marketing</option>
<option value="PU">Purchasing</option>
<option value="SA">Sales</option>
<option value="SH">Shipping</option>
<option value="ST">Warehouse</option>
</select>
</div>
<table
>
<thead>
<tr>
<th>Employee ID</th>
<th>First Name</th>
<th>Last Name</th>
<th>Job Category</th>
</tr>
</thead>
<tbody
></tbody>
</table>
</div>
The EmployeesByJobCategory/css/app.css file defines the CSS styles for the app:
div.sampleEmployees { font-family: Arial, Helvetica, sans-serif;
font-size: 9pt; margin-top: 5px; margin-bottom: 5px; }
table.myTable {border: 1px solid #999999; border-collapse: collapse; }
table.myTable thead {background-color: #ededed;}
table.myTable th, table.myTable td {padding: 5px; border: 1px solid #999999;
font-size: 9pt;}
Properties and Libraries for the Sample Employee App Specification
The EmployeesByJobCategory/app.xml file is the App Specification:
<?xml version="1.0" encoding="UTF-8"?>
<app id="EmployeesByJobArea" name="EmployeesByJobArea"
jsclass="Sample.EmpsByJobArea"
width="400" height="400" draggable="false" minimizable="false">
<title>Employees by Job Area</title>
<description>A sample App illustrating input parameters used as App properties and setting properties.</description>
<properties>
<property datatype="string" label="Choose a job prefix" name="jobPrefix">
<description>Job prefix to retrieving employees</description>
</property>
</properties>
<presto-meta name="presto.desktopCompatible" type="text">true</presto-meta>
<presto-meta name="presto.phoneCompatible" type="text">false</presto-meta>
<presto-meta name="presto.tabletCompatible" type="text">false</presto-meta>
<requires>
<require name="jquery-tmpl" type="library" version="1.0"/>
<require src="js/app.js" type="script"/>
<require src="css/app.css" type="css"/>
<require src="html/app.html" type="html"/>
</requires>
</app>
In addition to the name, title, description, ID, JavaScript class and device compatibility flags, two areas of the App Specification have configuration pertinent to this sample:
 Required resources
 in
<requires> has the list of basic resources (the
<require> declarations for
js/app.js,
html/app.html and
css/app.css) for the app.
It also has a declaration for the jQuery Templating library which is added by name (the
<require> declaration for
jquery-tmpl). You can also add resources for an app for any file in the app folders or using fully qualified URLs. For more information, see the
<requires> or <require> topic.
 Properties
 has a declaration for
jobPrefix which will track the job category that users choose in the app.
Create the App Constructor Using onLoad
The EmployeesByJobCategory/js/app.js file is the last resource needed for this custom app. It defines the constructor function and all of the behavior for the app.
It begins by defining the namespace for this app using the Presto.namespace function. Defining the class for an app in a separate namespace ensures there are no JavaScript conflicts with other apps or with the containing page where apps are deployed.
Presto.namespace("Sample");
Sample.EmpsByJobArea = function( app ) {
};
This is followed by the constructor method for the app. The App Framework uses this constructor to instantiate the app and passes a reference to the app to the constructor.
In this case, the constructor also makes use of the onLoad(app) method from the MashZone NextGen App API. onLoad is the load event handler for the App Framework. It is called once all resources for an app and the DOM have fully loaded and receives a reference to the app just as the app constructor does.
Presto.namespace("Sample");
Sample.EmpsByJobArea = function( app ) {
this.app = app;
var self = this;
//constructor called when DOM and all resources are loaded
this.onLoad = function(app) {};
};
You can use onLoad to complete any initialization steps just as you do with the constructor. This example first gets a reference to the DOM node that wraps the app, using the getRootElement() method and also gets the default connection to the MashZone NextGen Server using getConnection():
Presto.namespace("Sample");
Sample.EmpsByJobArea = function( app ) {
this.app = app;
var self = this;
//constructor called when DOM and all resources are loaded
this.onLoad = function(app) {
this.rootDiv = jQuery(this.app.getRootElement);
this.myTbl = this.rootDiv.find('.myTable');
this.dept = this.rootDiv.find('.deptOptions');
var curPrefix = this.dept.val();
//hide table initially until job category selected
if (curPrefix = 'none') {
self.myTbl.hide();
} else {
self.getEmployees();
}
this.connection = this.app.getConnection();
this.requestBody = '';
};
};
If there is no job category selected, this onLoad example also initially hides the table that will eventually display selected employee information.
Create the jQuery Template for Table Rows
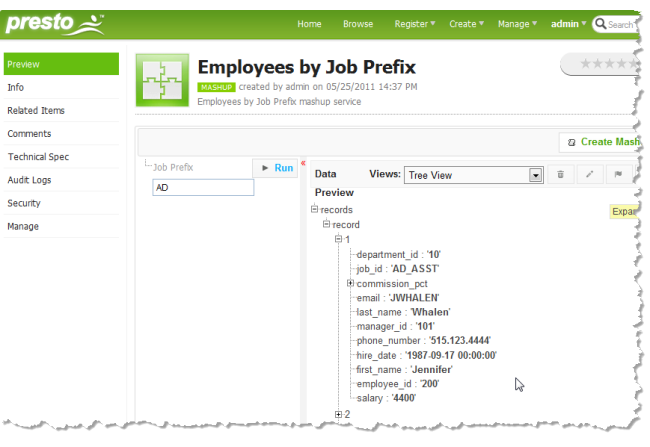
The next step in the onLoad defines a jQuery template that will generate the HTML for each table row based on the results of the mashup. To create this template, you first need to see the actual structure of results for the mashable or mashup that will be populating data in the template. You can see this structure using the Tree View in the Preview tab of the artifact page for the mashup or mashable, such as this:
The mashup has a repeating record item that contains the employee fields that will populate the app’s table. The template simply needs the appropriate HTML tags for one table row combined with the jQuery templating syntax to map to the appropriate result fields, such as this:
...
//constructor called when DOM and all resources are loaded
this.onLoad = function(app) {
this.rootDiv = jQuery(this.app.getRootElement);
this.myTbl = this.rootDiv.find('.myTable');
this.dept = this.rootDiv.find('.deptOptions');
var curPrefix = this.dept.val();
//hide table initially until job category selected
if (curPrefix = 'none') {
self.myTbl.hide();
} else {
self.getEmployees();
}
this.connection = this.app.getConnection();
this.requestBody = '';
var rowMarkup = "<tr><td>${employee_id}</td><td>${first_name}</td><td>${last_name}</td><td>${job_id}</td></tr>";
jQuery.template("rowTemplate", rowMarkup);
}
};
The jQuery.template() function compiles the template with rowTemplate as its name.
Bind a Handler to the Job Category List and Update the App Property
Next, the app constructor needs a handler to receive the event when users choose a job category. This function must:

Set the jobPrefix property for the app

Invoke the mashup, passing the appropriate job prefix as an input parameter

Use the results to render the table with employee information
To bind the handler, the app class gets a reference to the <select> DOM node and binds the handler to the change event:
...
this.onLoad = function(app) {
...
jQuery.template("rowTemplate", rowMarkup);
//bind handler for select
this.dept.change(function() {});
}
};
To set the app property, the handler uses the setProperty(name,value) method:
...
this.onLoad = function(app) {
...
jQuery.template("rowTemplate", rowMarkup);
//bind handler for select
this.dept.change(function() {
var jobs = self.dept.val();
self.app.setPropertyValue('jobPrefix',jobs);
self.getEmployees();
}
);
};
};
And then calls the getEmployees method to handle the invocation of the mashup and rendering the table.
Invoke the Mashup and Render the Table
The getEmployees method handles the last two tasks for the selection handler: invoke the mashup and render the table:
...
this.onLoad = function(app) {
...
};
//invokes mashup, renders table with employee results
this.getEmployees = function(){
var jobs = this.app.getPropertyValue('jobPrefix');
if (jobs != 'none') {
var prestoUrl = "/presto/edge/api/rest/Employees_by_Job_Prefix/runMashup?x-presto-resultFormat=json&inputparam_3=" + jobs;
this.connection.request({
url: prestoUrl,
type: "get",
contentType: "application/x-www-form-urlencoded",
data: this.requestBody
},
{ onSuccess: function(response, responseHeaders) {
self.myTbl.show();
var result = response;
if (result.records.record) {
jQuery(".tblBody").empty();
var employees = result.records.record;
jQuery.tmpl("rowTemplate", employees).appendTo(".tblBody");
} else {
self.rootDiv.html("no results found");
}
},
onFailure: function(e) {
self.rootDiv.html(e.message);
}
});
} else {
self.myTbl.hide();
}
};
};
To invoke the mashup, the handler uses the default connection and the request(reqConfig,callbacks) method in PC4JS.
The onSuccess callback must use a successful response to render the table. It displays the table, removes any existing rows (from previous selections) and uses the jQuery template to render new rows based on the results.
The onFailure callback handles any error responses from invoking the mashup.
The complete JavaScript library is:
Presto.namespace("Sample");
Sample.EmpsByJobArea = function( app ) {
this.app = app;
var self = this;
//constructor called when DOM and all resources are loaded
this.onLoad = function(app) {
this.rootDiv = jQuery(this.app.getRootElement);
this.myTbl = this.rootDiv.find('.myTable');
this.dept = this.rootDiv.find('.deptOptions');
var curPrefix = this.dept.val();
//hide table initially until job category selected
if (curPrefix = 'none') {
self.myTbl.hide();
} else {
self.getEmployees();
}
this.connection = this.app.getConnection();
this.requestBody = '';
var rowMarkup = "<tr><td>${employee_id}</td><td>${first_name}</td><td>${last_name}</td><td>${job_id}</td></tr>";
jQuery.template("rowTemplate", rowMarkup);
//bind handler for select
this.dept.change(function() {
var jobs = self.dept.val();
self.app.setPropertyValue('jobPrefix',jobs);
self.getEmployees();
}
);
};
//invokes mashup, renders table with employee results
this.getEmployees = function(){
var jobs = this.app.getPropertyValue('jobPrefix');
if (jobs != 'none') {
var prestoUrl = "/presto/edge/api/rest/Employees_by_Job_Prefix/runMashup?x-presto-resultFormat=json&inputparam_3=" + jobs;
this.connection.request({
url: prestoUrl,
type: "get",
contentType: "application/x-www-form-urlencoded",
data: this.requestBody
},
{ onSuccess: function(response, responseHeaders) {
self.myTbl.show();
var result = response;
if (result.records.record) {
jQuery(".tblBody").empty();
var employees = result.records.record;
jQuery.tmpl("rowTemplate", employees).appendTo(".tblBody");
} else {
self.rootDiv.html("no results found");
}
},
onFailure: function(e) {
self.rootDiv.html(e.message);
}
});
} else {
self.myTbl.hide();
}
};
};


