Assign XML data source
You can assign a XML data source to a dashboard component.
If you have defined one or more input parameters for the selected component the
Insert input parameter button is available for the
XML operator. By clicking the button you can insert a defined input parameter at the cursor position. Click on the inserted parameter for more options. See
Create Input Parameters.
Procedure
2. Click the XML button in the Add a data source area.
3. Enter the URL to the XML file in the Source field.
You can also enter MashZone NextGen Mashups and Mashables in the field. As soon as you start typing, all supported MashZone NextGen Mashups and Mashables will be auto suggested. By selecting one of them, the URL of that artifact will be set.
4. If required, you can upload XML files to the MashZone NextGen Repository. For this, click on Upload a file to open the File Resources administration area of the Admin Console.
To upload a file to the MashZone NextGen Repository administration privileges are required.
If you use an absolute URL, e.g. http://anyhost:8080/presto/files/admin_xml?1454486242000, then an authentication has to be set. All requests to the uploaded file will be made with the specified user / password combination.
If you us a relative URL, e.g. /presto/files/admin_xml?1454486242000, then an authentication is not required. All requests to the uploaded file will be made with the current logged in user.
In some cases, it might be necessary to grant view permission for a user. This can be done with the API console, e.g.:
{
"version":"1.1",
"sid":"PolicyService",
"svcVersion":"0.1",
"oid":"addPermissions",
"params":[
"fileName","type.entity.file","VIEW",
[{"principalId":"userID","principalTypeId":"User"}]]
}
 fileName
 is the name that was specified while uploading the file.
userID is the id of the user, who should get the permission.
5. Click on the  Refresh Rate icon and select a refresh rate in the drop-down menu. The Refresh Rate specifies the time until the source file is read in again. Default value is 30 sec.
 6. You can optionally add HTTP headers to the URL. Click HTTP Headers and select a header in the drop-down menu and insert a parameter in the input field.
7. You can optionally add a HTTP basic access authentication. Click Authentication and enter a user name in the User input box. Enter the Password of the user and click Save Changes.
8. Specify the Repeating element of your data source in the corresponding input box. You can click Repeating element: Detect to read out the repeating element automatically and edit it in the input box. A repeating element already set by a user will not be considered. The repeating element will be displayed corresponding to the hierarchy of the xml elements, e. g. <element>/<repeating element>. Depending on the repeating element, the requested columns will be displayed in the Columns box.
9. You can edit the list of requested columns of the data source.
a. Click Columns: Detect to read out the columns of the data source automatically. The requested columns list will be displayed, based on the specified repeating element.
b. Click Edit to configure the columns list.
c. You can edit a column name in theName input field.
d. You can assign a new Data type to a column.
e. You can edit a column path in the Path input field.
f. Click the Delete icon to remove a column from the list.
g. Click Add new colum to add a new data source column.
h. Click Copy to clipboard to copy the column configuration in text form to clipboard.
i. Click Insert new colum config to enter a column configuration in text form. If you click OK then all column configurations will be overwritten.
j. Click Ok to save your changes.
10. Click Next.
The data source is assigned to the selected dashboard component.
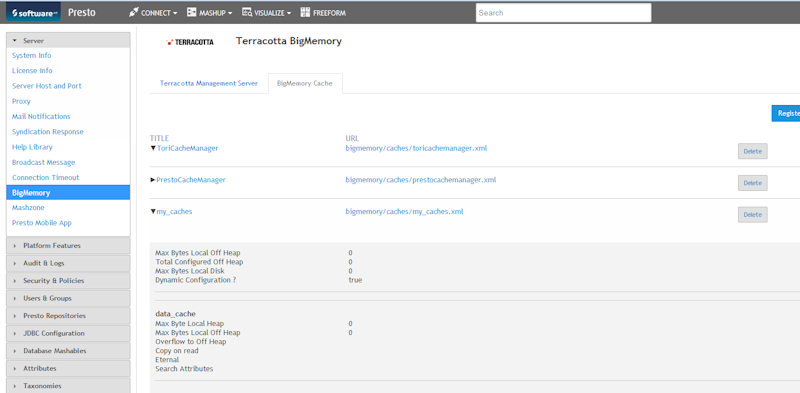
Example: BigMemory Data source
To use the RAQL source operator, you have to configure a BigMemory connection in
MashZone NextGen in advance, see
BigMemory connection in Presto.
To use the RAQL BigMemory operator you have to follow these conventions. The Cache Alias pattern is <configuration name>.<cache name>. <cache name>. <configuration name> is the Title you specified as name for the configuration, <cache name> is one of the caches available in the configuration. In this example, the Cache Alias is "my_caches.data_cache".
In the statement field, you can enter the RAQL statement. If you refer to a cache within the configuration, you just specify the cache name (i. e. without the configuration name). In the above example, if you wanted to address the "data_cache" cache, you would formulate your RAQL statement similar to this:
SELECT description FROM data_cache
You can display a preview of the source data. Click the
 Calculate peview
 icon of the operator.
In addition to the data source operator you can add further operators to transform the source data. See
Data transformation operators for details.