Register a Custom Security Profile
Once you have implemented a security profile client, compiled it and tested it, you must deploy this in Presto and then register the security profile to make this profile available to users when they register mashables.
1. Deploy your custom security profile client class, individually or in a JAR, to the Presto Server in one of these locations:
Important: | Deploying extensions to Presto in an external configuration folder simplifies future deployments or management of Presto Server clusters. |
 web-apps-home/presto/WEB-INF/classes
 for individual classes. This is the default location, but is not recommended as it complicates
Presto Server deployments.
web-apps-home/presto/WEB-INF/lib for a JAR file. This is the default location, but is not recommended as it complicates
Presto Server deployments.
2. Click  Admin Console in the Presto Hub main menu.
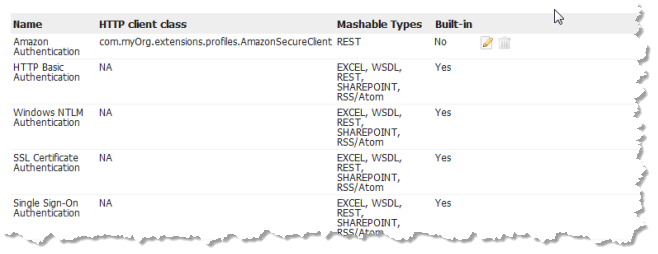
 3. Expand the Security and Policies section and click Security Profiles. A list of all registered security profiles appears:
You cannot edit or delete the Presto built-in profiles.
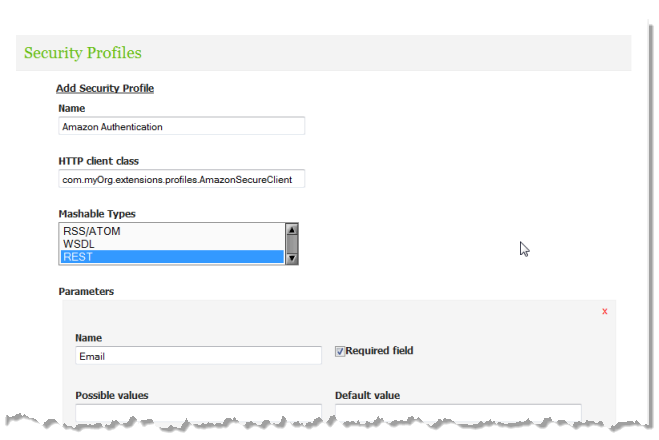
4. Click Add new Security Profile.
5. Enter a Name for this profile. This is the name that users will select when they register mashables.
6. Enter the fully qualified class name for your custom security profile client class (SecureServiceClient implementation or BaseSecureServiceClient extension) as the HTTP client class. For example:
com.myOrg.extensions.profiles.myCustomSecureServiceClient
7. Choose all the types of mashable information sources that can use a security profile of this type.
When users register mashables, this profile will appear only for mashables of these types.
8. If users must supply credentials or other security information for a profile of this type, follow these steps for each security property:
a. Click Add a parameter.
b. Enter a Name for the parameter. This is the label that users will see when they register mashables with this type of security profile.
c. Set the Required field option if users must provide this information in all security profiles of this type.
d. Optionally, enter a list of Possible values that users should select from for this property. Separate values with commas.
e. Optionally, enter a Default value for this property.
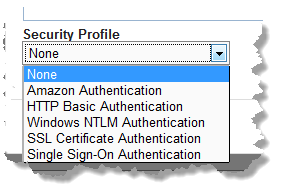
When users register a mashable and choose this security profile, fields appear for each security property you add:
9. Click Save this security profile.