Modifying Clusters
The Universal Messaging Enterprise Manager enables you to modify clusters. By 'Modify' we mean adding new realms to the cluster or removing existing cluster members.
To add a new realm to a cluster, you must first of all ensure that you have connected to (see
Connecting to Multiple Realms) the realm you wish to add. Removing realms is accomplished by selecting the realm you wish to remove from the cluster. This will be discussed in more detail further on.
If for example, you have a cluster with two realms, and wish to add a third realm to the cluster, it is possible to do so. Similarly, if you have a cluster with three (or any number of realms) and wish to remove a realm from the cluster, this is also possible.
Adding Cluster Members
In order to add a realm to a cluster, you must first ensure that you have created a cluster (see
Creating a Cluster). Once you have a cluster, then also ensure you have connected to (see
Connecting to Multiple Realms) the realm you wish to add to your cluster. Select the cluster node from the namespace and right-click on the node. This will present you with a pop-up menu. Select the menu item labelled 'Modify Cluster Members'.
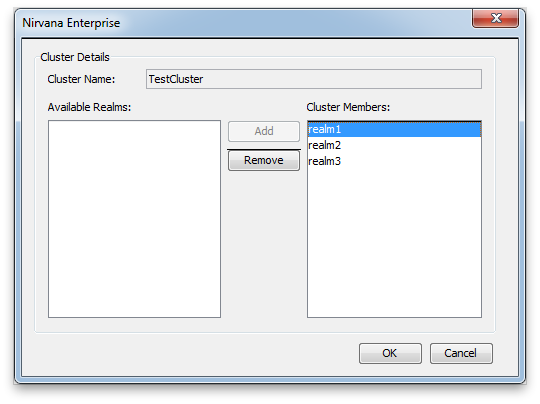
The dialog this presents you displays the current members of your cluster as well as any realms you are not connected to that are not cluster members. This dialog is shown below:
The dialog shows the name of the cluster, a list of realms which are not currently members of the cluster (shown as a list on the left hand side), and a list of current cluster members (on the right hand side).
As you can see from the above example, currently there are three realms within the cluster 'TestCluster'.
Double-clicking on any non-member realm, or selecting it from the list and clicking the 'Add' button will enable you to add the realm as a member.
Note:
If the realm has local stores with names matching any store on the cluster, the realm will not be added to the cluster. This is to prevent naming clashes on the cluster.
When you have added the realms you wish to add as cluster members, click on the button labelled 'OK'. This will add all realms in the right-hand list to the cluster. All cluster resources will also be created on the newly added realms once the realms have successfully been added to the cluster.
Removing Cluster Members
Removing cluster realms is achieved by again selecting the cluster node, right-clicking on the node and choosing the 'Modify Cluster Members' menu item. This presents the same dialog as shown above.
To remove a realm, double-click on the realm from the 'Cluster Members' list or select the realm and click the 'Remove' button. This will remove the realm from the list and add it back into the non-members list.
Clicking on the button labelled 'OK' will then prompt you to answer a question. This question allows you to select one of 2 options:

Delete all cluster wide resources from each the removed realm members
Convert all cluster wide resources to local within the removed realm members
Choosing to delete all cluster resources will not remove any locally created channels, only those created for the cluster within the realms you are removing.
Choosing to convert each one to local, will keep any data that may be contained within the cluster resources for the realms you wish to remove.
Adding and Removing Cluster Members
Cluster members can be added and removed in the same operation. For example, if you have a cluster with 'realm1' and 'realm2' but want to remove 'realm2' and add 'realm3', you would simply remove 'realm2' and add 'realm3' from the 'Cluster Members' list in the 'Modify Cluster' dialog. The Enterprise Manager will work out which realms to add and which to remove for you and perform the necessary channel conversion and deletions you choose.