Creating a Cluster
This section describes the process of creating a Universal Messaging Cluster. Clusters allow a group of Universal Messaging Realm Servers to replicate resources between them, and to maintain the state for those objects across all realms within the cluster.
Creating a cluster of Universal Messaging realms ensures that applications which publish/subscribe to channels, or which push/pop events from queues, can connect to any of the realms and view the same state. If one of the realms in the cluster is unavailable, client applications can automatically reconnect to any of the other cluster realms and carry on from where they were.
Universal Messaging's clustering technology provides an unsurpassed level of reliability. Client applications can seamlessly switch between any cluster realm if any problems - such as network or hardware failures - occur with the realm to which they are connected. This also provides an exceptional ability to load balance clients between realm servers.
Tip:
Since the underlying purpose of a cluster is to provide resilience and high availability, we advise against running all the servers in a cluster on a single physical or virtual machine in a production environment.
Important:
The Enterprise Manager does not support working with two clusters that have the same name.
Viewing Clusters in Enterprise Manager
The Enterprise Manager's top level view shows a tree node labelled "Universal Messaging Enterprise" (see
Enterprise Summary). One level below this is a tree node labelled "
Clusters", which contains any known clusters.
If you use the Enterprise Manager to connect to a realm which is a member of an existing cluster, then the cluster will automatically be displayed under the above-mentioned "
Clusters" tree node. When a cluster node is found, the Enterprise Manager will also automatically connect to all of the cluster member realms (if not already connected by default as a result of having loaded realm connection information in a custom Enterprise Manager Connection Profile). See
Connecting to Multiple Realms for related information.
Preparing to Create a Cluster
Firstly, before a cluster can be created, the Enterprise Manager needs to connect to those realms (see
Connecting to Multiple Realms) that will form the cluster. If any realms cannot be connected to, or you receive a 'Security Alert' message when you click on the realm node, you may want to check that the realm is running, and check the permissions (see
Realm Entitlements) on the realm. If the realms you are connecting to are running on different machines, you need to ensure that all realm machines are given full permissions to connect to the other realms in the cluster. Each realm communicates with the other cluster realms via its own connection. The subject of each connection is as follows:
realm-realmname@ip_address
For example, in the following example, there are 3 realms that will form part of a cluster, each realm subject needs to exists in the ACLs of the other realms. The following realm subjects need to be added to the ACL for each realm in our example:
realm-realm1@10.140.1.1 realm-realm2@10.140.1.2 realm-realm3@10.140.1.3
The permissions given for each realm need to be 'Access Realm'. As well as this, each realm must have a valid entry for the user@host that corresponds to the user that will create the cluster using the Enterprise Manager. The permissions for this user must be sufficient in order to create the cluster object. Temporarily it is often better to provide the *@* default subject 'Full' privileges to facilitate setting up a realm and clusters.
Creating a cluster
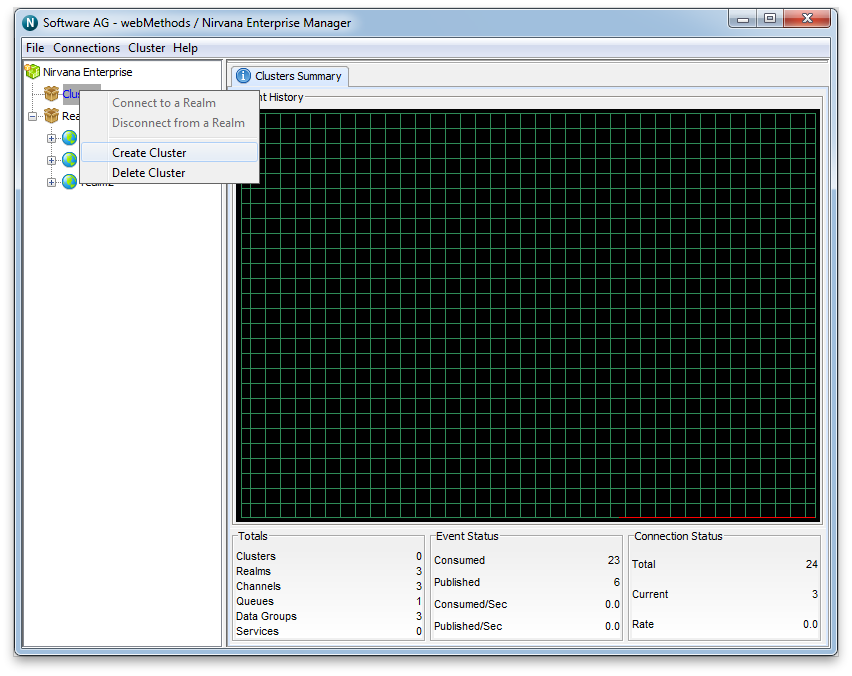
If you select the 'Clusters' node under the 'Universal Messaging Enterprise' node, you will be shown a pop up menu with a number of options. One of the options is to create a cluster. The image below shows this menu option as described.
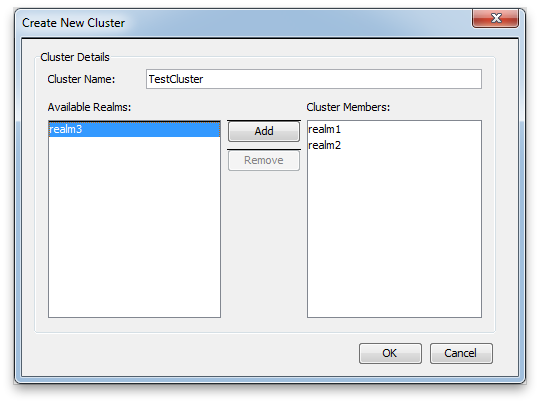
When you select the 'Create Cluster' menu option, you are presented with the cluster dialog. The cluster dialog allows you to select which of the realms that the Enterprise Manager is connected to will become members of the cluster. One of the selected realms will become the master during the cluster creation. The master realm will control synchronizing the state between the other realms, and acts as the authoritative source for this information.
The cluster dialog contains a text box for you to input the name of the cluster. Below the name are the details of the cluster members. The available realms are shown on the left hand side of the dialog. The right hand side shows those realms that are members. When you double-click on a realm name in the Available Realms list, or click on a realm name and click on the Add button, the realm will be added to the Cluster Members list. You can remove any realm from the Cluster Members list by either double clicking on the realm from the list or by selecting the realm name, and clicking on the Remove Button.
When you have finished selecting your cluster members, clicking on the 'OK' button presents you with the local store migration dialog. This dialog allows you to select whether to migrate local stores to cluster-wide stores. Selecting the Yes button will convert any local stores (channels, queues, etc.) on the realms being added to the cluster into cluster-wide stores. These stores will then be present on all realms in the cluster when cluster creation completes. If the name of a local store is the same as the name of an existing cluster store, clicking the Yes button will cause the cluster creation to fail due to a name clash. Clicking the No button will keep these stores local to the realms, and they will not be present on other realms in the cluster when creation is completed.
If the cluster creation is successful, a new cluster node will appear under the Clusters node, and the realms that have been selected as members will be shown beneath the cluster.
Checking the cluster state
When a cluster has been created, you can monitor its state by selecting the cluster node. The 'Cluster Summary' tab will show the state of all cluster members, and which realm is current cluster master. The image below shows the state of a cluster when it has been created and all realms within the cluster are fully online.
Creating cluster channels (see
Cluster Channel Administration) and cluster queues (see
Cluster Queue Administration) is not permitted if any of the cluster realms are offline.