Continuous Build and Publish
You can build user-created assets and configurations using webMethods Asset Build Environment (ABE), retrieve those assets and configurations from a VCS by using ABE or an automated tool like Jenkins, and then deploy those assets and configurations to the Integration Cloud Development Stage by using ABE.
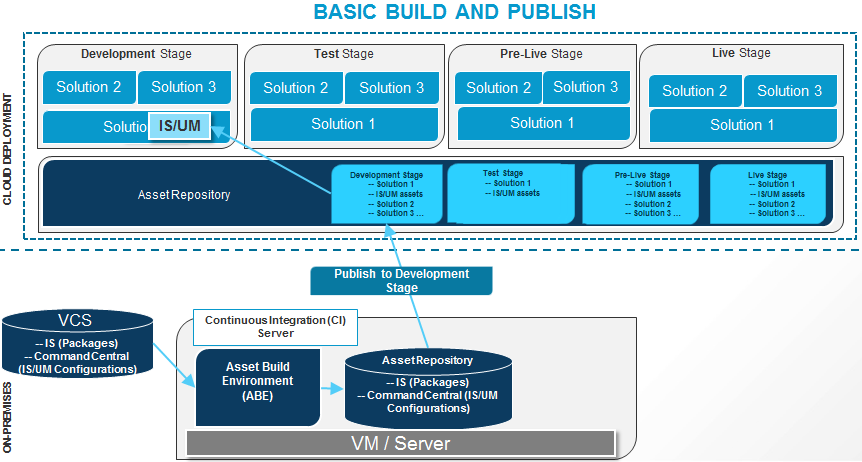
The following figure depicts the processes involved in the basic build and publish mechanism:
The following high-level steps describe the continuous integration (CI) and continuous deployment (CD) mechanism:
1. Create source packages and store them in a file system or any version control system (VCS). The source directory must be accessible to the build scripts. If the source directory is a file system on a VCS, ensure that the source directory is checked out in the local file system.
2. Creating and exporting configurations from Software AG Command Central
To create Command Central configurations, use the following command: sagcc exec templates composite generate -i <generate-templatemetadata-file>.xml
To export the configuration YAML files to a directory that you intend to use as sources for ABE, use the following command: sagcc get templates composite export <templateAlias> -o <template-file>.yaml -f application/yaml. Ensure that the exported YAML files are accessible to the build scripts.
3. Install webMethods Asset Build Environment (ABE). ABE installs the build scripts and the build properties file that you use to build the composites and descriptors. See the Building Composites for Repository-Based Deployment section in the webMethods Deployer User’s Guide for more information.
4. Set the properties for the build and run the build script in ABE to create the composites and descriptors. See the Building Composites for Repository-Based Deployment section in the webMethods Deployer User’s Guide for more information.
5. Use ABE to push the composites and descriptors to the Integration Cloud Asset Repository. Apart from providing values to the properties in build.properties, specify the following additional properties to upload composites and descriptors to the Integration Cloud Asset Repository.
Property | Definition |
localStore | Represents the local folder where the Git repository is cloned or the local Git repository. localStore must be the same as the build.output.dir. |
remoteStore | URL of the Integration Cloud Asset Repository. The URL format is: https://mysubdomain.webmethodscloud.com/integration/rest/internal/wmic-git/<stagename>-<solutionname>-<productaliasname> Example: https://mysubdomain.webmethodscloud.com/integration/rest/internal/wmic-git/development-mysolution-myis |
message | Required. Message which describes the commits. |
username | Required. Integration Cloud login user name. |
password | Required. Integration Cloud login password. |
Run one of the following commands from the <Software AG_directory>\common\AssetBuildEnvironment\bin directory to build and upload the composites and descriptors to the Integration Cloud Asset Repository:
For this platform... | Run the following command... |
Windows | build.bat buildUploadAssets |
UNIX | build.sh buildUploadAssets |
6. Promoting assets to the next stage
a. Using an automated tool like Jenkins, invoke the following API to promote the assets to the next stage:
Method: POST
URL: https://{subdomain}.webmethodscloud.com/integration/rest/external/v1/cdep/binaryAssets/solutions/{solutionName}/nodes/{nodeName}?action=promote
URI parameters
 solutionName
 - Name of the solution in
Integration CloudnodeName -
webMethods Integration Server instance where the assets need to be deployed.
Note: Use basic as the HTTP authorization scheme.
Request Body: The request body should contain the following:
fromStageName: In which stage the assets are available in
Integration Cloud toStageName: To which stage the assets are to be promoted in
Integration Cloud commitMessage: An optional commit message
acdlComposite: List of composites, assets, and their properties, which are available in the previous stage.
Note: If you want to retrieve the request body, invoke the getcomposites API as provided in Step b. The getcomposites API will get the composites and asset details from the previous stage.
Sample Request Body
{
"integration": {
"cicdBean": {
"fromStageName": "Development",
"toStageName": "Test",
"commitMessage": "Promoting assets from Development stage to
Test stage.",
"acdlComposite": {
"IS": [{
"name": "mySqlAssets",
"targetNamespace": "http://namespaces.softwareag.com/
webMethods/IS",
"assets": [],
"properties": [{
"name": "activatePkgOnInstall",
"values": [
"true"
]
},
{
"name": "archivePkgOnInstall",
"values": [
"true"
]
},
{
"name": "compilePackage",
"values": [
"true"
]
}
]
},
{
"name": "JDBCRegression_deployment",
"targetNamespace": "http://namespaces.softwareag.com/
webMethods/IS",
"assets": [{
"name": "deploy.notifications.deleteN",
"properties": [{
"name": "art.deployment.state",
"values": [
"disable"
]
},
{
"name": "notificationImmediate",
"values": [
"false"
]
},
{
"name": "notificationInterval",
"values": [
"10"
]
},
{
"name": "notificationOverlap",
"values": [
"false"
]
}
]
}],
"properties": [{
"name": "activatePkgOnInstall",
"values": [
"true"
]
}]
}
]
}
}
}
}
b. getcomposites API
getcomposites retrieves all the composites and its assets which have properties.
Method: GET
URL: https://{subdomain}.webmethodscloud.com/integration/rest/external/v1/cdep/binaryAssets/solutions/{solutionName}/nodes/{nodeName}?stageName={stageName}
URI parameters
solutionName: Name of the solution in
Integration Cloud nodeName:
webMethods Integration Server instance where the assets need to be deployed
Query parameters
stagename: The stage from where the composites and assets have to be retrieved
Allowed stage names: development, test, live, preLive
Note: Use basic as the HTTP authorization scheme.
Sample Response
{
"integration": {
"message": {
"code": 0,
"description": "Success"
},
"cicdBean": {
"fromStageName": "Development",
"toStageName": "Test",
"commitMessage": null,
"acdlComposite": {
"IS": [{
"name": "mySqlAssets",
"targetNamespace": "http://namespaces.softwareag.com/
webMethods/IS",
"assets": [],
"properties": [{
"name": "activatePkgOnInstall",
"values": [
"true"
]
},
{
"name": "archivePkgOnInstall",
"values": [
"true"
]
},
{
"name": "compilePackage",
"values": [
"true"
]
}
]
},
{
"name": "JDBCRegression_deployment",
"targetNamespace": "http://namespaces.softwareag.com/
webMethods/IS",
"assets": [{
"name": "deploy.notifications.deleteN",
"properties": [{
"name": "art.deployment.state",
"values": [
"disable"
]
},
{
"name": "notificationImmediate",
"values": [
"false"
]
},
{
"name": "notificationInterval",
"values": [
"10"
]
},
{
"name": "notificationOverlap",
"values": [
"false"
]
}
]
}],
"properties": [{
"name": "activatePkgOnInstall",
"values": [
"true"
]
}]
}
]
}
}
}
}
The response contains the following:
fromStageName: The stage where the assets are available
toStageName: The stage where the assets can be promoted
acdlComposite: The composites, assets, and their properties. You can replace the properties for the assets wherever required, and invoke the Promote Assets API as mentioned in
Step a to promote the assets to the next stage.