This document covers the following topics:
This chapter deals with some general guidelines and recommendations for using the Natural deployment scripts with a Jenkins server. The chapter is not an introduction to Jenkins server in general, nor can it be a comprehensive tutorial on integrating the Natural deployment scripts with a Jenkins server environment. It is rather a collection of ideas, hints, best practices as well as issues when setting up a new deployment environment on Jenkins. Users of other automation servers may also find some valuable hints here.
For a detailed description of the Natural deployment scripts, see Deploying Natural Applications.
The most basic assumption is that a Natural application has been developed with the help of NaturalONE and has been stored in a source code versioning system, such as GIT. The main goal of the deployment set up via Jenkins is to automatically extract the Natural sources from GIT, detect changes, and transfer the changed sources to a Natural development server where they can be cataloged.
When a new deployment script has been generated with NaturalONE, it is always a good idea to test the script in order to avoid the most obvious errors. You can test directly from within NaturalONE, as described in Starting the Deployment from Eclipse.
If the script works as expected, it can be added to the GIT repository, so that it is automatically checked out with the rest of the project when used with the Jenkins server. An example of a NaturalONE project with a deployment script named deploy.xml might look like this:

The jar files described in Starting the Deployment from the Command Line must be available on each Jenkins node that is used for running the deployment scripts. The directory with the jar files must be accessible to the user (agent) running the Jenkins job. The jar files represent the runtime environment for the Natural deployment scripts, so it is recommended that both are from the same NaturalONE version. When upgrading to a new general release version of the product, the deployment scripts shall be regenerated and the jar files shall be updated as well.
The Natural deployment scripts are designed to run in environments where no NaturalONE and no Jenkins or similar system is available. For example, the Natural deployment scripts could be run via the Windows Task Scheduler or the Linux cron daemon utility. Therefore, the Natural deployment scripts contain more functionality than necessary when running with Jenkins.
To access the sources in the repository with Jenkins, it is recommended that you use the versioning tool plugins from Jenkins itself instead of the built-in functionality of the Natural deployment script (i.e. checkout and update). This way it is possible to bootstrap the deployment scripts from the repository as well, changelog files are created automatically and continuous build features like polling can be used.
As a result of running a Natural deployment script, some files are generated in the project directory:
cache_*.properties contains the hash codes of each file in the project and is used to identify modified files.
timestamp_*.properties is generated when timestamp checking has been switched on. For further information on time stamps, see Checking the Time Stamps in the Natural Environment.
history_*.txt is generated when history logging has been switched on. For more information on logging capabilities, see Logging.
These files represent the current status of the Natural deployment task. cache_*.properties must not be deleted, otherwise the deployment process will start over with an initial full deployment.
Jenkins allows for various job types to be defined, two of which shall be observed a bit closer, namely freestyle jobs and pipeline jobs. With freestyle jobs you can bring together all your already existing build jobs, test jobs, tools, etc. and administer them on the Jenkins web UI. Pipeline jobs, on the other hand, allow the user to define the workflow of the required build activities and to split them into separate stages. Unlike freestyle jobs, which are defined with the Jenkins Web UI, pipeline jobs are coded scripts.
The project we want to build looks like this and is stored in a GIT repository:

One of the first things that needs to be defined in a new freestyle job is the versioning repository connection which can look like this:
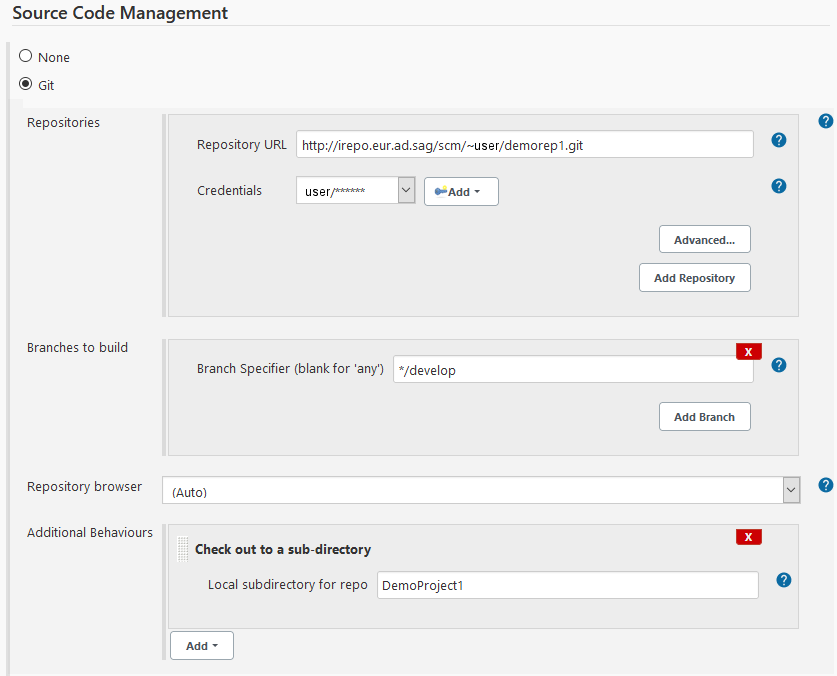
As usual, the repository URL, the credentials to access that repository, and the branch that is to be checked out need to be defined. Please pay attention to the definition of an additional behavior which specifies a special subdirectory for the checkout. As explained in Versioning Repository Handling, it is necessary for the Natural deployment script using GIT as the repository type to add an additional directory above the project directory. This additional directory must have the same name as the project directory itself.
Later in the Jenkins job you must define the build task which eventually executes the Natural deployment script:
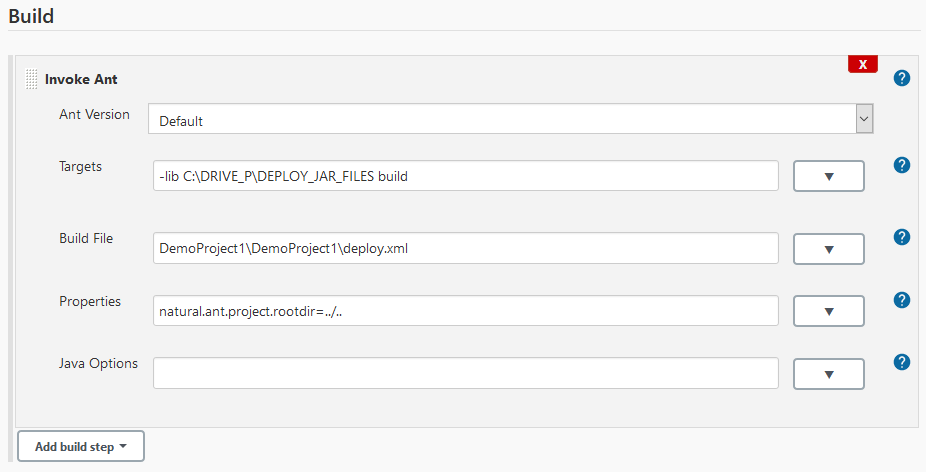
The directory with the JAR files and the target of the Natural
deployment script are specified in the Targets field.
Because the project has been checked out into a directory with the same name as
the project name, the deployment script is located in a
<projectdir>/<projectdir> directory. Finally, the
project root directory used inside the Natural deployment script must be set to
the top-level directory. This can be done with a relative path as shown in the
example but you could also specify it via the Jenkins environment variable
WORKSPACE as
natural.ant.project.rootdir=${WORKSPACE}.
In case it is necessary to delete the Jenkins workspace between two consecutive job runs you must make sure to save the files mentioned in Files Generated by Natural Deployment Scripts. If you use the Workspace Cleanup plugin to delete the workspace, you could configure it to exclude specific files from deletion like shown in this example:
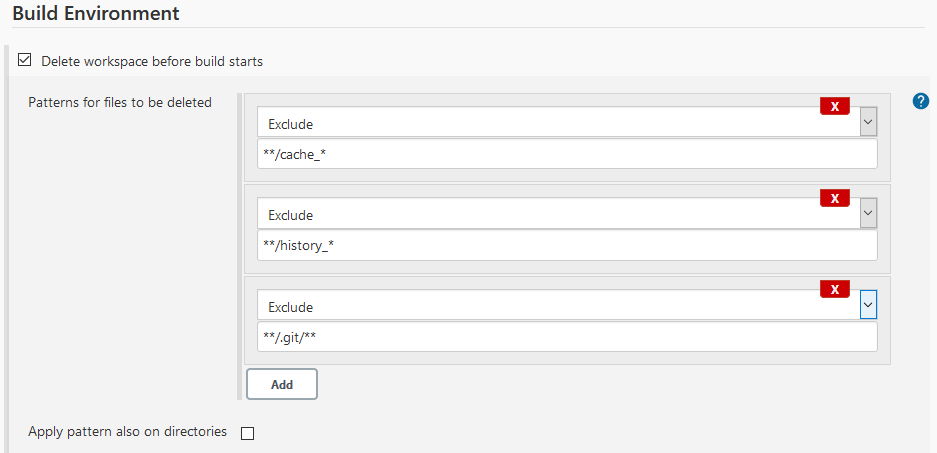
When excluding files from deletion it is also important to exclude the .git directory from deletion. Otherwise when cloning the repository next time, GIT will show an error.
Alternatively, you could also save the files as artifacts after a run of the Natural deployment script and copy the saved artifacts back in the next job run after the workspace has been deleted. You will need the Jenkins Copy Artifact plugin for this and you will need to configure it as shown to copy the files back from the artifact store:
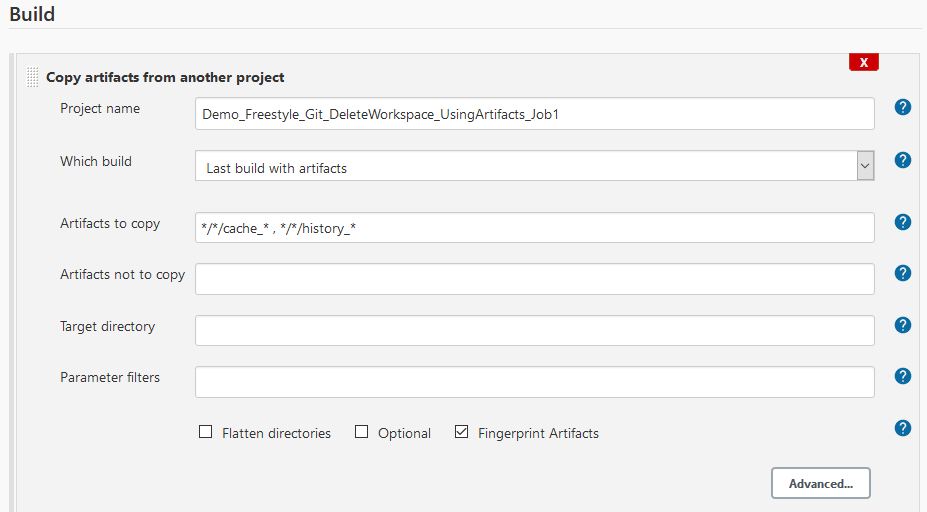
You must specify the same project name, select from which build the artifacts should be taken and then specify all files you want to copy back into the workspace. Then you must add a post-build action to store the artifacts after the run of the deployment script:

Defining a Jenkins pipeline job that performs a similar task to the freestyle job on the same NaturalONE project is accomplished the following way:
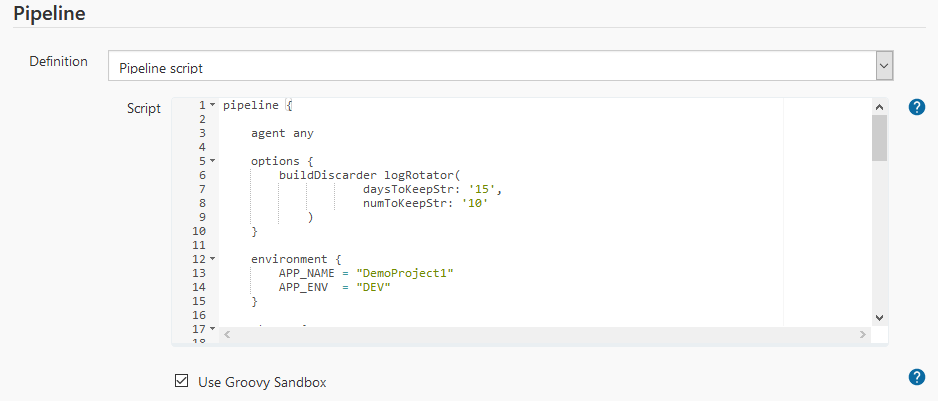
All tasks that have to be specified separately in the freestyle job are now integrated into the pipeline script. This means the pipeline script defines stages for cleanup workspace, checkout, build, etc.
Here is an example of a full script that also performs the save and restore of the Natural deployment files as artifacts:
pipeline {

    agent any

    options {
        buildDiscarder logRotator(
                    daysToKeepStr: '15',
                    numToKeepStr: '10'
            )
    }

    environment {
        APP_NAME = "DemoProject1"
        APP_ENV  = "DEV"
    }

    stages {

        stage('Cleanup') {
            steps {
                cleanWs()
                bat """
                echo "Clean-up of Workspace for ${APP_NAME}"
                """
            }
        }

        stage('Checkout') {
            steps {
                checkout([
                    doGenerateSubmoduleConfigurations: false,
                    extensions: [
                        [$class: 'RelativeTargetDirectory',
                        relativeTargetDir: 'DemoProject1']],
                    submoduleCfg: [],
                    $class: 'GitSCM',
                    branches: [[name: '*/develop']],
                    userRemoteConfigs:
                          [[credentialsId: 'f1a44b44-bc76-43f9-af44-805cf8b6fccb',
                            url: 'http://irepo.eur.ad.sag/scm/~stco/demorep1.git']]
                ])
            }
        }

        stage("Restore Cache") {
            steps {
                script {
                    try {
                        copyArtifacts(projectName: currentBuild.projectName,
                                      filter:'*/*/cache_*',
                                      selector: lastSuccessful())
                        copyArtifacts(projectName: currentBuild.projectName,
                                      filter:'*/*/history_*',
                                      selector: lastSuccessful())
                    }
                    catch(err) {/*empty*/}
                }
            }
        }

        stage('Build') {
            steps {
                withAnt(installation: 'Ant Installation') {
                    dir("DemoProject1/DemoProject1") {
                        script {
                            if (isLinux()) {
                                sh 'ant -f deploy.xml -lib /usr/lib/deploy_jar_files
                                         build -Dnatural.ant.project.rootdir=../..'
                            } else {
                                bat 'ant -f deploy.xml -lib  C:\\DRIVE_P\\DEPLOY_JAR_FILES
                                         build -Dnatural.ant.project.rootdir=../..'
                            }
                        }
                    }
                }
            }
        }

        stage("Save Cache") {
            steps {
                archiveArtifacts('*/*/cache_*')
                archiveArtifacts('*/*/history_*')
            }
        }

    }
}
One important benefit of Jenkins pipeline jobs compared to Jenkins freestyle jobs is that you specify the build, test and deployment phases as code and not as a document on a Web server. This code can be reviewed in the same way as the code of the application itself.
To go one step further, you can add the pipeline script code to the same versioning repository that also maintains your application code and your Natural deployments scripts. Then the project would look like this:
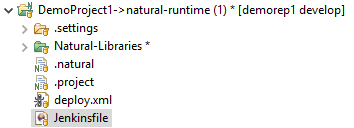
Here the Jenkins pipeline script from Jenkins Pipeline Jobs has been checked in as Jenkinsfile at the top level of the project. You can then create a Jenkins pipeline job with the following definition:
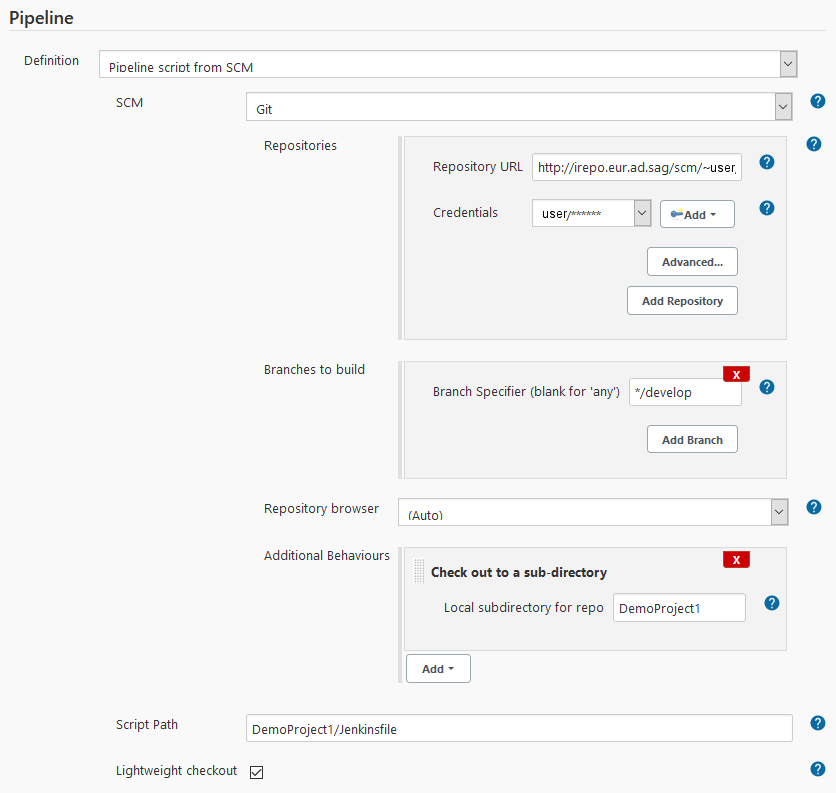
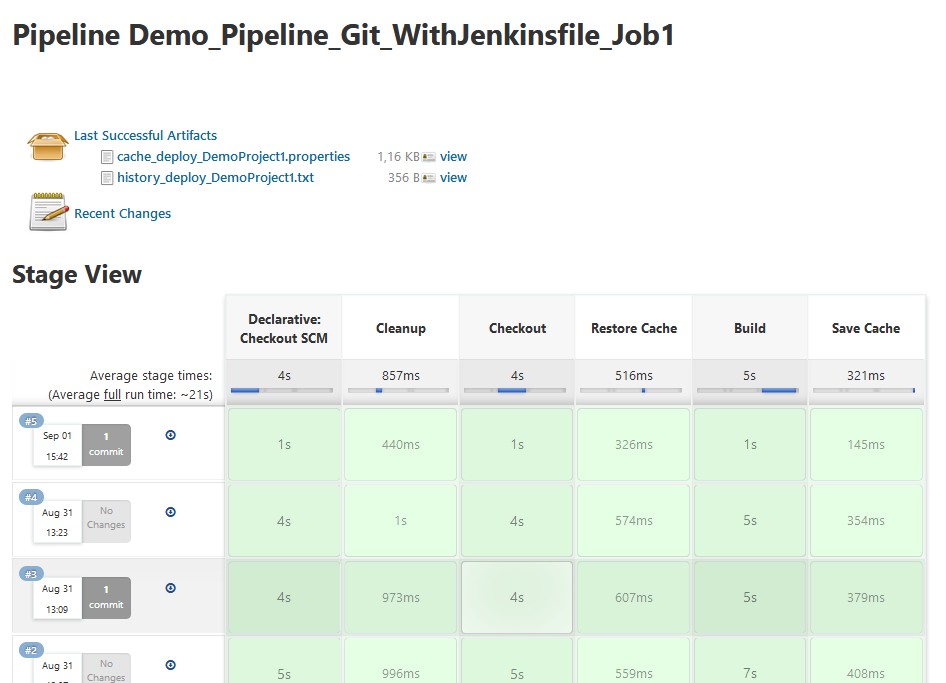
You must only specify where to find the Jenkinsfile in the repository. When the job is run, Jenkins extracts the Jenkinsfile and executes it. You can make changes to the Jenkinsfile the same way you would make changes to the application. After committing to the versioning repository, Jenkins will automatically extract the newest file during the next job run. The result of such a job run is shown in the Web UI of Jenkins:
