
This document covers the following topics:
There are 2 different ways to generate PDF documents for Natural page layouts:
REPORT and REPORT2 control
You can fill a report dynamically at runtime from within your Natural program.
According to the defined report, a PDF document is generated. This approach defines
the look and feel of the PDF at runtime and therefore requires some programming in the
corresponding Natural programs. For further information, see the description of the
REPORT and the REPORT2 control.
The REPORT2 control can be used with responsive and non responsive pages. In difference to the REPORT control, the REPORT2 control does not require to additionally render the data in the page itself. It can be used to simply trigger the generation of a PDF report from a Java or Natural program.
Adapter Listener
(com.softwareag.cis.server.adapterlistener.PDFFOPListener)
You can define the look and feel of the PDF document at design time. To do this, you
create a specific PDF print form using the Layout Painter. This approach defines the
PDF in a descriptive way and requires no programming on the Natural side. This
approach is described in the topics below.
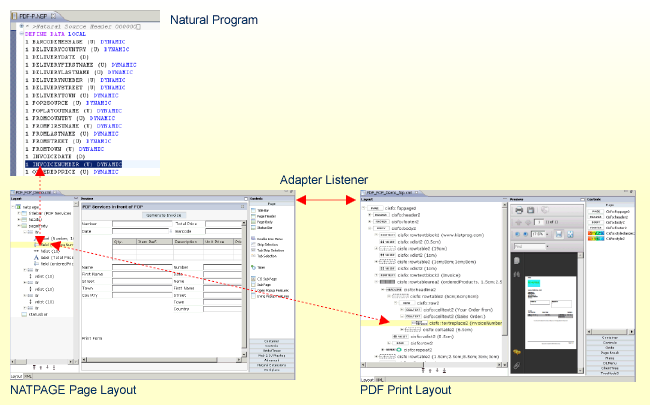
Using the adapter listener
com.softwareag.cis.server.adapterlistener.PDFFOPListener, you can
bind a NATPAGE page layout to a PDF print layout.
The data in the PDF layout is descriptively bound to the properties of the NATPAGE page
layout at design time. The NATPAGE page layout and the PDF print layout share the same
data which is provided from the Natural program.
The following steps describe how to add PDF support to a NATPAGE. You will find a running example in the Natural for Ajax demos.
In your NATPAGE page layout, set the property
adapterlisteners to
"com.softwareag.cis.server.adapterlistener.PDFFOPListener".
If you have already applied another adapter listener, append the new listener using a
semicolon.
<natpage adapterlisteners="com.softwareag.cis.server.adapterlistener.PDFFOPListener"
...
Add a button or an icon (or any other control that binds to a method) to the NATPAGE page layout, and as method apply the name "onPrintPDF".
<button name="Generate Invoice" method="onPrintPDF">
</button>
...
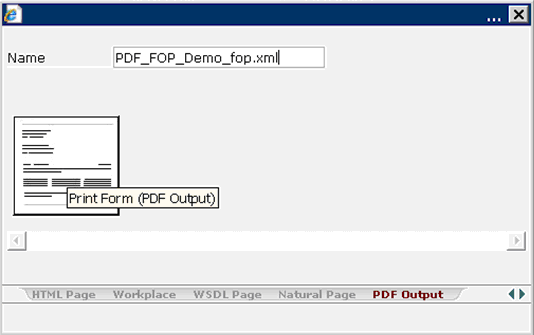
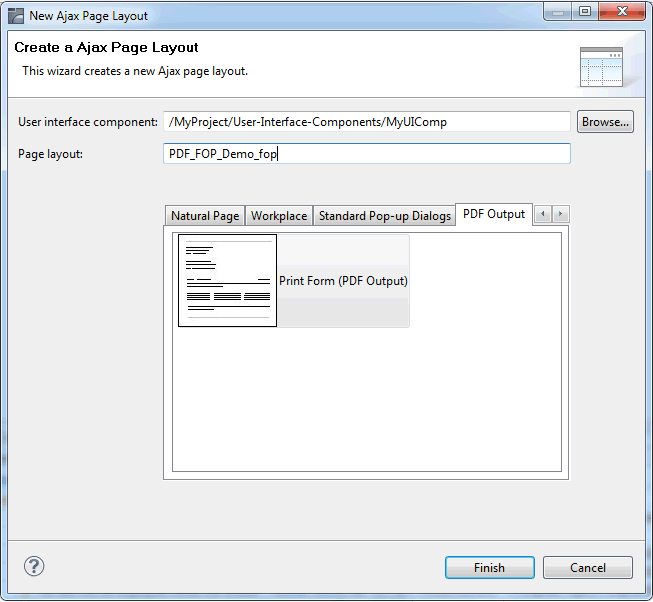
Create a PDF print form in the same project as your NATPAGE page layout. The name of the print form must be the same as the name of your page, appended with "_fop". For example, if the name of your page is "PDF_FOP_Demo.xml", the name of the PDF print form must be "PDF_FOP_Demo_fop.xml".
In the PDF print form, you use specific CISFO controls to define the rendering and the binding to the data. Use the Layout Painter to add and modify the corresponding CISFO controls. For detailed information on these controls, see PDF Page Layout.
For the PDF_FOP_Demo_fop.xml layout, no Natural adapter will be generated. The data binding between the NATPAGE and the PDF print form is done via naming conventions. For example, the FIELD control with the name "invoiceNumber" which is defined in the NATPAGE is bound to the corresponding CISFO control in the PDF print form, as shown below.
<natpage...
    ...
    <field valueprop="invoiceNumber" width="200">
    </field>
...
</natpage>
<cisfo:foppage2 ...
    ...
    <cisfo:celltext2 text="Sales Order:">
        <cisfo:textreplace2 valueprop="invoiceNumber">
        </cisfo:textreplace2>
    </cisfo:celltext2>
...
</cisfo:foppage2>
When using the adapter listener
com.softwareag.cis.server.adapterlistener.PDFFOPListener, the
following events are supported and can be bound to a control's method property:
| Event | Description |
|---|---|
onPrintPDF |
Creates a PDF document and opens it in a modal pop-up. |
onUploadPDF |
Uploads the PDF document to the Natural server. See also Documents in Some Common Rules for all Controls. |
Some advanced topics regarding the data binding between the properties defined in the NATPAGE page layout and the PDF print form are covered below.
Example:
<njx:fieldlist fieldlistprop="myfieldlist" fieldcount="5" hdist="10">
    <njx:fielditem valueprop="myvalue" width="130" invisiblemode="invisible">
    </njx:fielditem>
</njx:fieldlist>
In the corresponding *_fop.xml layout, the items of the above field list can be referenced as follows:
<cisfo:celltext2 text="First Item">
    <cisfo:textreplace2 valueprop="myfieldlist.items[0].myvalue">
    </cisfo:textreplace2>
</cisfo:celltext2>
...
<cisfo:celltext2 text="Second Item">
    <cisfo:textreplace2 valueprop="myfieldlist.items[1].myvalue">
    </cisfo:textreplace2>
</cisfo:celltext2>
Note that within the *_fop.xml layouts, indexing starts with 0.
To customize the decimal digits for all items in a grid, you simply add an XCIDATADEF field and refer to this central field as shown in the example below:
<xcidatadef dataprop="myDecimalDigits" datatype="int">
</xcidatadef>
<cisfo:repeat2>
  <cisfo:row2>
    <cisfo:replace2 valueprop="unitPrice" datatype="float"
                    decimaldigitsprop="/myDecimalDigits" bordercolor="black"
                    borderstyle="solid" borderwidth="1pt" padding="2pt"
                    textalign="right">
    </cisfo:replace2>
    <cisfo:replace2 valueprop="price" datatype="float"
                    decimaldigitsprop="/myDecimalDigits" bordercolor="black"
                    borderstyle="solid" borderwidth="1pt" padding="2pt"
                    textalign="right">
    </cisfo:replace2>
  </cisfo:row2>
</cisfo:repeat2>
If you would like to customize the decimal digits per item in a grid, add a corresponding XCIDATADEF field as a grid column as shown in the example below:
<textgridsss2 griddataprop="orderedProducts" rowcount="3" width="100%">
    <column name="Unit Price" property="unitPrice" width="100">
    </column>
    <column name="Price" property="price" width="100">
    </column>
    <xcidatadef dataprop="itemDecimalDigits" datatype="int">
    </xcidatadef>
</textgridsss2>
The name "itemDecimalDigits" is not fixed. You can choose any valid property name. From within the corresponding *_fop.xml layout, you can refer to this setting as follows:
<cisfo:repeat2>
  <cisfo:row2>
    <cisfo:replace2 valueprop="unitPrice" datatype="float"
                    decimaldigitsprop="itemDecimalDigits" bordercolor="black"
                    borderstyle="solid" borderwidth="1pt" padding="2pt"
                    textalign="right">
    </cisfo:replace2>
    <cisfo:replace2 valueprop="price" datatype="float"
                    decimaldigitsprop="itemDecimalDigits" bordercolor="black"
                    borderstyle="solid" borderwidth="1pt" padding="2pt"
                    textalign="right">
    </cisfo:replace2>
  </cisfo:row2>
</cisfo:repeat2>
To customize the Boolean texts for all items in a grid, you simply add an XCIDATADEF field and refer to this central field as shown in the example below:
<xcidatadef dataprop="mybooleantexts">
</xcidatadef>
<cisfo:repeat2>
  <cisfo:row2>
    <cisfo:replace2 valueprop="myChoice" datatype="boolean"
                    booleantextprop="/mybooleantexts" bordercolor="black"
                    borderstyle="solid" borderwidth="1pt" padding="2pt"
                    textalign="right">
    </cisfo:replace2>
    ...
  </cisfo:row2>
</cisfo:repeat2>
If you would like to customize the Boolean texts per item in a grid, add a corresponding XCIDATADEF field as a grid column as shown in the example below:
<textgridsss2 griddataprop="orderedProducts" rowcount="3" width="100%">
    <column name="Choice" property="myChoice" datatype="xs:boolean" width="100">
    </column>
    ...
    <xcidatadef dataprop="itemBooleanTexts" >
    </xcidatadef>
</textgridsss2>
The name "itemBooleanTexts" is not fixed. You can choose any valid property name. From within the corresponding *_fop.xml layout, you can refer to this setting as follows:
<cisfo:repeat2>
  <cisfo:row2>
    <cisfo:replace2 valueprop="myChoice" datatype="boolean"
                    booleantextprop="itemBooleanTexts" bordercolor="black"
                    borderstyle="solid" borderwidth="1pt" padding="2pt"
                    textalign="right">
    </cisfo:replace2>
    ...
  </cisfo:row2>
</cisfo:repeat2>
textid properties are currently not available for Boolean
texts. However, you can set the text value in the Natural application depending on the
language. Example:
IF *LANGUAGE = 2
THEN
   MYBOOLEANVALUES:="Ja;Nein;"
ELSE
   MYBOOLEANVALUES:="Yes;No;"
END-IF
In most cases you choose specific cisfo:* controls and containers to
reflect the intended whitespaces like line-breaks, tabs and spaces in your reports.
However, in some cases you may have the need to simply apply existing text with
whitespaces as values of cisfo:* controls or the REPORT and
REPORT2 control data fields. If you do this, per default spaces and tabs
are collapsed. This means, for instance, five spaces are collapsed into one space, and a
line-break or a tab is simply rendered as one space. You can customize this behavior for
the following controls:
CISFO:TEXT2
CISFO:REPLACE2
CISFO:TEXTREPLACE2
CISFO:STYLE2
These controls support two properties: whitespacepreserve and
tabspaces (see chapter Application Designer > PDF and FOP
Services).
You also can customize this behavior for TEXT fields in the
REPORT and REPORT2 control data structure. Set the property
whitespacehandling to true if you want to customize whitespace
handling for specific report text fields. This will generate two additional fields -
WHITESPACEPRESERVE and TABSPACES in the Natural data structure.
You’ll find corresponding samples in the NaturalAjaxDemos.
