
This document covers the following topics:
Defining the Login Configuration on Wildfly Application Server
Defining the Login Configuration on IBM WebSphere Application Server
Natural for Ajax is a Java EE-based application that runs on an application server or web container. By default, the access to this application is not secured. The credentials that users enter in the Natural for Ajax logon page (see the graphic below) are used to authenticate them in the selected Natural environment. They are not used to authenticate them on the application server or web container.
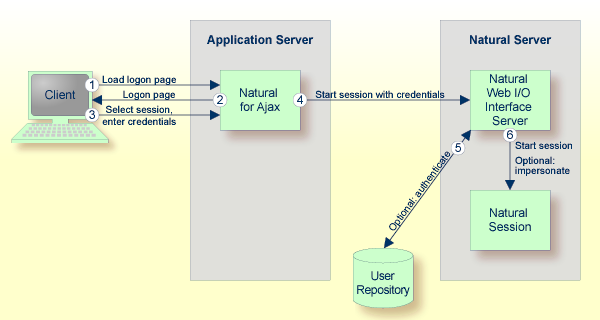
You might, however, wish to authenticate the users already in the application server or web container, before they even attempt to access a Natural session. This can be achieved with container-managed security (see Configuring Container-Managed Security ), but only for a subset of the supported application servers. With application-managed authentication, this can be achieved for all supported application servers and web containers.
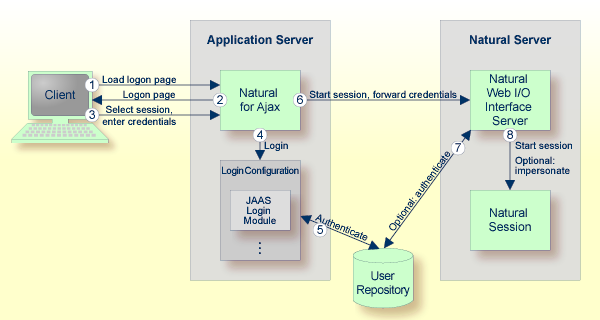
When application-managed authentication has been activated, the user is first authenticated on the application server or web container. For the authentication, JAAS-based (Java Authentication and Authorization Service) login modules are used. The login modules to be used and their parameters are configured in a login configuration. The user credentials entered on the Natural for Ajax logon page are authenticated against a user repository that is defined by the configured login modules.
A login configuration can consist of several login modules that are executed one after the other. A specific login module is responsible to forward the entered credentials from the application server or web container to the Natural Web I/O Interface server, so that they can be reused to authenticate the user on the Natural server side.
Application-managed authentication is activated on a per-session basis in the configuration tool .
 To activate application-managed authentication for a session
Invoke the configuration tool.
In the frame on the left, choose the Session Configuration link.
Select the Use JAAS-based authentication check box.
The Forward credentials check box is then selected automatically. This makes sure that the credentials entered for the authentication on the application server or web container are forwarded to the Natural server.
Choose the button.
Choose the button.
When a user opens the Natural for Ajax logon page and selects the session for which you made the above changes, the credentials entered on the logon page are now used to authenticate the user on the application server or web container and are then forwarded to the Natural server.
This applies also when a user does not explicitly open the logon page in order to select a session manually, but instead passes the session name as an URL parameter to the logon page as described in Starting a Natural Application with a URL .
You may wish to authenticate the users before they even access the Natural for Ajax logon page. This is activated globally in the configuration tool .
To secure the logon page
Invoke the configuration tool.
In the frame on the left, choose the Session Configuration link.
Select the Use secure logon page check box.
Choose the button.
When a user opens the Natural for Ajax logon page without specifying a session name beforehand, the user will now be prompted to enter the credentials in order to be authenticated on the application server or web container.
With JAAS, authentication is always done against a so-called realm. A realm defines the scope of security definitions. There can be several distinct realms. The user "George" in realm A, for example, is considered to be different from the user "George" in realm B. The realms are usually defined in a login configuration file. The location of this file depends on the application server or web container. A typical realm definition contains a set of login modules that are executed in a specific order to authenticate a user within this realm. The login modules are responsible for the actual authentication.
Natural for Ajax authenticates users against a realm named "NaturalWebIOAndAjaxRealm" . Therefore, the login configuration of the application server or web container must contain a realm definition with this name.
The login configuration depends on the Wildfly Application Server version. To define a sample configuration, proceed as described in one of the following sections, depending on the version that you are using:
Further configuration is described in the version-specific topics below:
If you use other login modules than in the sample configuration, copy the JAR files with these login modules into the WEB-INF/lib directory of the Natural for Ajax web application, which is called cisnatural.war by default.
In order to prepare for the step Forwarding the User Credentials to Natural , you need to provide the Natural for Ajax login module com.softwareag.njx.loginmodule.NJXLoginModule in the right place. This login module is contained in the JBoss7-WildFly8 directory of the installation medium, in the file njxlogin<nn>.jar . Copy this file also into the WEB-INF/lib directory of of the Natural for Ajax web application.
Copy the JAR files with the login modules to be used into the lib/ext directory of your IBM WebSphere installation. The Natural for Ajax login module com.softwareag.njx.loginmodule.NJXLoginModule mentioned below is contained in the file njxlogin<nn>.jar , which can be found in the WebSphere-specific directory of the installation medium.
To configure the login module
Make sure the application server is running.
Open your web browser and enter the following URL:
http://<host>:<adminport>/ibm/console
This opens the Administration Console.
Open the tree node Security > Global security .
On the right side of the screen, open Java Authentication and Authorization Service .
Choose Application logins .
Choose New .
Enter "NaturalWebIOAndAjaxRealm" as an alias.
Choose .
Choose .
Select NaturalWebIOAndAjaxRealm .
Choose New .
Enter the class name of your login module.
Configure the authentication strategy and custom properties of your login module.
Choose .
Choose .
Select NaturalWebIOAndAjaxRealm once more.
Choose New .
Enter the class name "com.softwareag.njx.loginmodule.NJXLoginModule" .
Choose OPTIONAL as the authentication strategy.
Enter "useFirstPass" as the property name.
Enter "true" as the property value.
Select the Select check box.
Choose .
Enter "storePass" as the property name.
Enter "true" as the property value.
Select the Select check box.
Choose .
Choose .
Copy the JAR files with the login modules to be used into the lib directory of your Apache Tomcat installation.
The Natural for Ajax login module com.softwareag.njx.loginmodule.NJXLoginModule mentioned below is contained in the file njxlogin<nn>.jar , which can be found in the Tomcat-specific directory of the installation medium. Copy the file njxlogin<nn>.jar into the WEB-INF/lib directory of the Natural for Ajax web application, which is called cisnatural by default.
In the conf directory of your Apache Tomcat installation, add a new properties file named njxjaas_config.properties . Within this file, configure the login modules in the following way:
NaturalWebIOAndAjaxRealm {
  your-login-module-class required
    param1="value1"
    param2="value2";

  com.softwareag.njx.loginmodule.NJXLoginModule optional
    useFirstPass=true
    storePass=true;
};
On Windows, edit the file startup.bat in the Apache Tomcat bin directory and add the following line:
set JAVA_OPTS=%JAVA_OPTS% -Djava.security.auth.login.config=%CATALINA_HOME%/conf/njxjaas_config.properties
Or, if you have installed Apache Tomcat as a Windows service, specify the above Java option in the Apache Tomcat Properties dialog.
On Linux, edit the file startup.sh in the Apache Tomcat bin directory and add the following line:
JAVA_OPTS=$JAVA_OPTS -Djava.security.auth.login.config=$CATALINA_HOME/conf/njxjaas_config.properties
When the user has been authenticated on the application server or web container, the authenticated user with the credentials can be forwarded directly to the Natural Web I/O Interface server. Optionally, the user can be authenticated the Natural Web I/O Interface server again. Also optionally, the started Natural session can be started under the user ID of the client (impersonation).
However, this works only if both the authentication on the application server and the authentication on the Natural Web I/O Interface server are done with the same credentials against the same authentication system. This will be the case, for example, if the Natural Web I/O Interface server is configured to authenticate with RACF and you have configured a login module on the application server or web container that authenticates the user against the same system.
To forward the user credentials to Natural
Invoke the configuration tool.
In the frame on the left, choose the Session Configuration link.
Make sure that the Forward credentials check box is selected.
Choose the button.
Choose the button.
