
This document provides options to define a general screen layout:
Various options of the terminal command %M are available for defining how and where the
Natural message line is to be displayed.
Below is information on:
Other options for the positioning of the message line are described in %M - Control of Message Line in the Terminal Commands documentation.
- %M=color-code
The message line is displayed in the specified color (for an explanation of color codes, see the session parameter
CDas described in the Parameter Reference).
You can use the terminal command %= to assign colors to field attributes for
programs that were originally not written for color support. The command causes all
fields/text defined with the specified attributes to be displayed in the specified
color.
If predefined color assignments are not suitable for your terminal type, you can use this command to override the original assignments with new ones.
You can also use the %= terminal command within Natural
editors, for example to define color assignments dynamically during map creation.
| Codes | Description |
|---|---|
| blank | Clear color translate table. |
| F | Newly defined colors are to override colors assigned by the program. |
| N | Color attributes assigned by program are not to be modified. |
| O | Output field. |
| M | Modifiable field (output and input). |
| T | Text constant. |
| B | Blinking |
| C | Italic |
| D | Default |
| I | Intensified |
| U | Underlined |
| V | Reverse video |
| BG | Background |
| BL | Blue |
| GR | Green |
| NE | Neutral |
| PI | Pink |
| RE | Red |
| TU | Turquoise |
| YE | Yellow |
Example:
%=TI=RE,OB=YE
This example assigns the color red to all intensified text fields and yellow to all blinking output fields.
The terminal command %X controls the display of the Natural infoline.
For further information, see the description of the terminal command
%X in the
Terminal Commands documentation.
Below is information on:
A window is that segment of a logical page, built by a program, which is displayed on the terminal screen.
A logical page is the output area for Natural; in other words the logical page contains the current report/map produced by the Natural program for display. This logical page may be larger than the physical screen.
There is always a window present, although you may not be aware of its existence.
Unless specified differently (by a DEFINE
WINDOW statement), the size of the window is identical to the
physical size of your terminal screen.
You can manipulate a window in two ways:
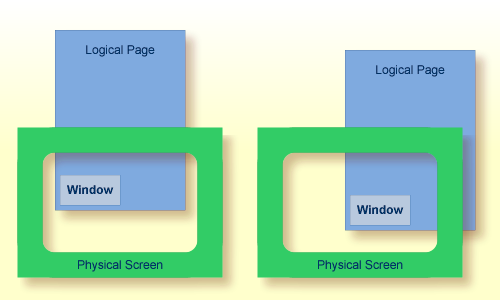
You can control the size and position of the window on the physical screen.
You can control the position of the window on the logical page.
The figure below illustrates the positioning of a window on the physical screen. Note that the same section of the logical page is displayed in both cases, only the position of the window on the screen has changed.
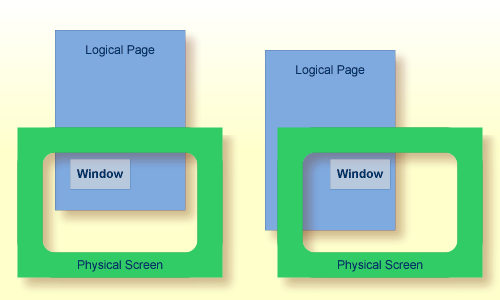
The figure below illustrates the positioning of a window on the logical page.
When you change the position of the window on the logical page, the size and position of the window on the physical screen will remain unchanged. In other words, the window is not moved over the page, but the page is moved "underneath" the window.
You use the DEFINE WINDOW
statement to specify the size, position and attributes of a window on the physical
screen.
A DEFINE WINDOW statement does not activate a window; this is done with a
SET WINDOW statement or
with the WINDOW clause of an INPUT statement.
Various options are available with the DEFINE
WINDOW statement. These are described below in the context of the
following example.
The following program defines a window on the physical screen.
** Example 'WINDX01': DEFINE WINDOW
************************************************************************
DEFINE DATA LOCAL
1 COMMAND (A10)
END-DEFINE
*
DEFINE WINDOW TEST
SIZE 5*25
BASE 5/40
TITLE 'Sample Window'
CONTROL WINDOW
FRAMED POSITION SYMBOL BOTTOM LEFT
*
INPUT WINDOW='TEST' WITH TEXT 'message line'
COMMAND (AD=I'_') /
'dataline 1' /
'dataline 2' /
'dataline 3' 'long data line'
*
IF COMMAND = 'TEST2'
FETCH 'WINDX02'
ELSE
IF COMMAND = '.'
STOP
ELSE
REINPUT 'invalid command'
END-IF
END-IF
END
The window-name identifies the window. The name may be up to 32 characters long. For a
window name, the same naming conventions apply as for user-defined variables. Here the
name is TEST.
The window size is set with the SIZE option. Here the window is 5 lines high and 25 columns
(positions) wide.
The position of the window is set by the BASE option. Here the top left-hand corner of the window is
positioned on line 5, column 40.
With the TITLE option, you can define a title that is to be displayed
in the window frame (of course, only if you have defined a frame for the window).
With the CONTROL
clause, you determine whether the PF-key lines, the message line and the statistics line
are displayed in the window or on the full physical screen. Here CONTROL
WINDOW causes the message line to be displayed inside the window. CONTROL
SCREEN would cause the lines to be displayed on the full physical screen
outside the window. If you omit the CONTROL clause, CONTROL
WINDOW applies by default.
With the FRAMED
option, you define that the window is to be framed. This frame is then cursor-sensitive.
Where applicable, you can page forward, backward, left or right within the window by
simply placing the cursor over the appropriate symbol (<, -, +, or >; see
POSITION
clause) and then pressing Enter. In other words, you are moving the
logical page underneath the window on the physical screen. If no symbols are
displayed, you can page backward and forward within the window by placing the cursor in
the top frame line (for backward positioning) or bottom frame line (for forward
positioning) and then pressing Enter.
With the POSITION clause of the FRAMED option, you define that information on the position
of the window on the logical page is to be displayed in the frame of the window. This
applies only if the logical page is larger than the window; if it is not, the
POSITION clause will be ignored. The position information indicates in
which directions the logical page extends above, below, to the left and to the right of
the current window.
If the POSITION clause is omitted, POSITION SYMBOL TOP RIGHT
applies by default.
POSITION
SYMBOL causes the position information to be displayed in form of
symbols: "More: < - + >". The information is displayed in the top
and/or bottom frame line.
TOP/BOTTOM determines whether the position information is
displayed in the top or bottom frame line.
LEFT/RIGHT determines whether the position information is
displayed in the left or right part of the frame line.
The INPUT
WINDOW statement activates the window defined in the DEFINE WINDOW statement. In the
example, the window TEST is activated. Note that if you wish to output data in a window
(for example, with a WRITE
statement), you use the SET
WINDOW statement.
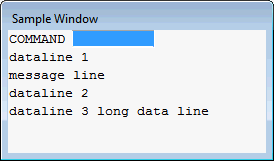
When the above program is run, the window is displayed with one input field
COMMAND. The session parameter AD is used to define that the value of the field
is displayed intensified and an
underscore is used as filler
character.
Output of Program WINDX01:
You can, of course, open multiple windows. However, only one Natural window is active at any one time, that is, the most recent window. Any previous windows may still be visible on the screen, but are no longer active and are ignored by Natural. You may enter input only in the most recent window. If there is not enough space to enter input, the window size must be adjusted first.
When TEST2 is entered in the COMMAND field, the program
WINDX02 is executed.
** Example 'WINDX02': DEFINE WINDOW
************************************************************************
DEFINE DATA LOCAL
1 COMMAND (A10)
END-DEFINE
*
DEFINE WINDOW TEST2
SIZE 5*30
BASE 15/40
TITLE 'Another Window'
CONTROL
                                   SCREEN
FRAMED POSITION SYMBOL BOTTOM LEFT
*
INPUT WINDOW='TEST2' WITH TEXT 'message line'
COMMAND (AD=I'_') /
'dataline 1' /
'dataline 2' /
'dataline 3' 'long data line'
*
IF COMMAND = 'TEST'
FETCH 'WINDX01'
ELSE
IF COMMAND = '.'
STOP
ELSE
REINPUT 'invalid command'
END-IF
END-IF
END
A second window is opened. The other window is still visible, but it is inactive.
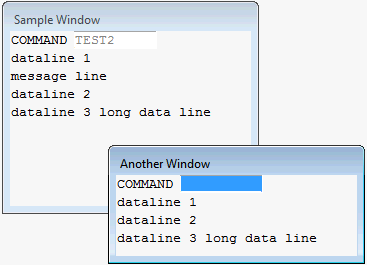
Note that for the new window the message line is now displayed
at the bottom of the output window and not in the window.
This was defined by the CONTROL SCREEN clause in the WINDX02
program.
For further details on the statements DEFINE
WINDOW, INPUT WINDOW and SET WINDOW, see the corresponding descriptions in the
Statements documentation.
A standard layout can be defined in the map editor. This layout guarantees a uniform appearance for all maps that reference it throughout the application.
When a map that references a standard layout is initialized, the standard layout becomes a fixed part of the map. This means that if this standard layout is modified, all affected maps must be re-cataloged before the changes take effect.
In contrast to a standard layout, a dynamic layout does not become a fixed part of a map that references it, rather it is executed at runtime.
This means that if you define the map layout as dynamic in the map editor, any modifications to the layout map are also carried out on all maps that reference it. The maps need not be re-cataloged.
For details on defining standard and dynamic map layouts, see Modifying the Map Profile in the Editors documentation.
Using Natural, you can create multilingual applications for international use.
Maps, helproutines, error messages, programs, functions, subprograms and copycodes can be defined in up to 60 different languages (including languages with double-byte character sets).
Below is information on:
In Natural, each language has a language code (from 1 to 60). The table below
is an extract from the full table of language codes. For a complete overview, refer to
the description of the system variable *LANGUAGE in the System
Variables documentation.
| Language Code | Language | Map Code in Object Names |
|---|---|---|
| 1 | English | 1 |
| 2 | German | 2 |
| 3 | French | 3 |
| 4 | Spanish | 4 |
| 5 | Italian | 5 |
| 6 | Dutch | 6 |
| 7 | Turkish | 7 |
| 8 | Danish | 8 |
| 9 | Norwegian | 9 |
| 10 | Albanian | A |
| 11 | Portuguese | B |
The language code (left column) is the code that is contained in the system variable
*LANGUAGE. This code is used by Natural
internally. It is the code you use to define the user language (see Defining the User
Language below). The code you use to identify the language of a
Natural object is the map code in the right-hand column of the table.
Example:
The language code for Portuguese is "11". The code you use when cataloging a Portuguese Natural object is "B".
For the full table of language codes, see the system variable *LANGUAGE as
described in the System Variables documentation.
To define the language of a Natural object (map, helproutine, program, function, subprogram or copycode), you add the corresponding map code to the object name. Apart from the map code, the name of the object must be identical for all languages.
In the example below, a map has been created in English and in German. To identify the languages of the maps, the map code that corresponds to the respective language has been included in the map name.
DEMO1 = English map (map code 1)
DEMO2 = German map (map code 2)
Map codes are in the range 1-9, A-Z or a-y. The alphabetical map codes require special handling.
Normally, it is not possible to catalog an object with a lower-case letter in the name - all characters are automatically converted into capitals.
This is however necessary, if for example you wish to define an object for Kanji
(Japanese) which has the language code 59 and the map code x.
To catalog such an object, you first set the correct language code (here 59) using the
terminal command %L=nn, where
nn is the language code.
You then catalog the object using the ampersand (&) character instead of the actual
map code in the object name. So to have a Japanese version of the map DEMO,
you stow the map under the name DEMO&.
If you now look at the list of Natural objects, you will see that the map is correctly
listed as DEMOx.
Objects with language codes 1-9 and upper case A-Z can be cataloged directly without the use of the ampersand (&) notation.
In the example list below, you can see the three maps DEMO1,
DEMO2 and DEMOx. To delete the map DEMOx, you
use the same method as when creating it, that is, you set the correct language with
the terminal command %L=59 and then confirm the deletion with the
ampersand (&) notation (DEMO&).
You define the language to be used per user - as defined in the system variable
*LANGUAGE - with the profile parameter
ULANG (which is
described in the Parameter Reference) or with the terminal command
%L=nn (where
nn is the language code).
To reference multilingual objects in a program, you use the ampersand (&) character in the name of the object.
The program below uses the maps DEMO1 and DEMO2. The
ampersand (&) character at the end of the map name stands for the map code and
indicates that the map with the current language as defined in the
*LANGUAGE system variable is to be used.
DEFINE DATA LOCAL
1 PERSONNEL VIEW OF EMPLOYEES
  2 NAME (A20)
  2 PERSONNEL-ID (A8)
1 CAR VIEW OF VEHICLES
   2 REG-NUM (A15)
1 #CODE (N1)
END-DEFINE
*
INPUT USING MAP 'DEMO&' /* <--- INVOKE MAP WITH CURRENT LANGUAGE CODE
...
When this program is run, the English map (DEMO1) is displayed. This is
because the current value of *LANGUAGE is 1 = English.
                                                          MAP DEMO1


                                SAMPLE MAP


                    Please select a function!


                    1.) Employee information

                    2.) Vehicle information


                    Enter code here: _
|
In the example below, the language code has been switched to 2 = German
with the terminal command %L=2.
When the program is now run, the German map (DEMO2) is displayed.
                                BEISPIEL-MAP


                    Bitte wählen Sie eine Funktion!


                    1.) Mitarbeiterdaten

                    2.) Fahrzeugdaten


                 Code hier eingeben: _
|
For some applications it may be useful to define multilingual programs. For example, a standard invoicing program might use different subprograms to handle various tax aspects, depending on the country where the invoice is to be written.
Multilingual programs are defined with the same technique as described above for maps.
Using the Natural utility SYSERR, you can translate Natural error messages into up to 60 languages, and also define your own error messages.
Which message language a user sees, depends on the *LANGUAGE
system variable.
For further information on error messages, see SYSERR Utility in the Utilities documentation.
The language used for date and time fields defined with edit masks also depends on the
system variable *LANGUAGE.
For details on edit masks, see the session parameter EM as described in the Parameter
Reference.
Users with varying levels of skill may wish to have different maps (of varying detail) while using the same application.
If your application is not for international use by users speaking different languages, you can use the techniques for multilingual maps to define maps of varying detail.
For example, you could define language code 1 as corresponding to the skill of the beginner, and language code 2 as corresponding to the skill of the advanced user. This simple but effective technique is illustrated below.
The following map (PERS1) includes instructions for the end user on how to select a function from the menu. The information is very detailed. The name of the map contains the map code 1:
                                                          MAP PERS1

                                  SAMPLE MAP

                    Please select a function


                    1.) Employee information  _

                    2.) Vehicle information   _

                        Enter code:  _

  To select a function, do one of the following:

  - place the cursor on the input field next to desired function and press ENTER
  - mark the input field next to desired function with an X and press ENTER
  - enter the desired function code (1 or 2) in the 'Enter code' field and press
ENTER
|
The same map, but without the detailed instructions is saved under the same name, but with map code 2.
                                                      MAP PERS2


                                  SAMPLE MAP

                    Please select a function


                    1.) Employee information  _

                    2.) Vehicle information   _

                        Enter code:  _
|
In the example above, the map with the detailed instructions is output, if the
ULANG profile parameter has the value 1, the map without the
instructions if the value is 2. See also the description of the profile parameter
ULANG (in the
Parameter Reference).
