
This document covers the following topics:
To perform development directly on a Natural server on which
Natural Development Server (NDV) is installed, you have to activate a Natural
server environment. You do this by mapping the appropriate server in the
Natural Server view. Each server provides all remote
services (such as access or update) for a specific FUSER (Natural
system file for user programs).
If you want to connect to a Natural environment for the first time, you have to map it as described below. Once you have mapped an environment, a node for this environment is automatically shown in the Natural Server view. It is possible to map the same environment more than once, for example, if you want to have Natural server sessions with different session parameters.
Note:
When mapping to an environment, especially with Natural
security installed, the ETID parameter should be set to
' ' (Mainframe) or $$ (UNIX). Otherwise an error
might occur that the user with the same ETID is already active. This error is
often raised during a refresh of a NaturalONE Server environment where multiple
connections are internally being set up in order to perform the
Refresh operation.
 To map a Natural environment
Go to the Natural Server view.
Invoke the context menu and choose Map.
Or:
Choose the following icon in the local toolbar:
![]()
Or:
Press CTRL+ALT+M.
The following dialog box appears.
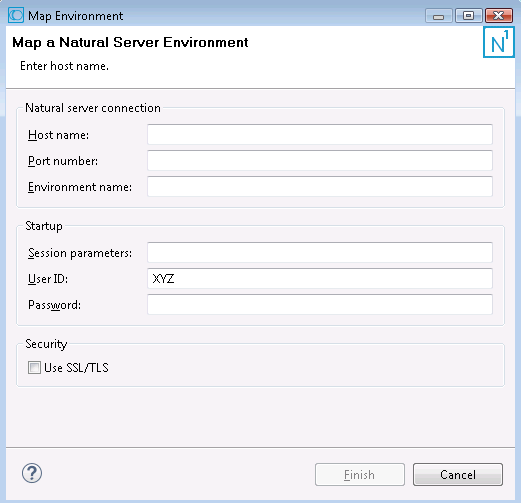
Specify the following information:
| Option | Description |
|---|---|
| Host name | The name of the Natural server. |
| Port number | The TCP/IP port number of the Natural server. |
| Environment name | The name that is to appear in the Natural Server view. A default name will be created automatically. If you want, you can enter a more specific environment name. |
| Session parameters | Optional. If dynamic parameters
are required for the Natural environment, specify them in this text box.
Tip: Notes:
|
| User ID | The user ID that is to be used
for mapping the Natural environment. This text box is initially blank. When you
have previously mapped an environment, the user name that you entered the last
time is automatically provided.
Notes:
|
| Password | Optional. If Natural Security is active on the Natural server, specify the required password in this text box. |
| Use SSL/TLS | Optional. Must be enabled when a connection to an SSL/TLS-secured Natural Development (NDV) Server is performed. |
Note:
If you do not know the host name and port number for your
Natural server, ask your administrator.
Choose the button.
A node for the specified environment is now shown in the Natural Server view.
It is also possible to map a Natural environment from an existing Natural project located in the Project Explorer View or the Natural Navigator View. In this case the runtime properties of the selected Natural project are used as the mapping parameters.
To map a Natural environment from an existing Natural
project
Go to either the Project Explorer View or the Natural Navigator View.
Select a single or multiple Natural project(s).
Invoke the NaturalONE context menu and choose Map.
Or:
Press CTRL+ALT+M.
A node for each specified environment is now shown in the Natural Server view.
The following description applies if you want to switch to a different CICS transaction on a mainframe.
You specify the CICS transaction name in the same text box in which you also specify the dynamic parameters for the Natural environment. So that the CICS transaction name can be evaluated, it is important that you specify it before any Natural parameters, using the following syntax:
<TA_NAME=name>
where name can be 1 to 4 characters long. This must be the name of an existing CICS transaction which applies to a CICS Adapter. It will override the transaction name which is currently defined in the configuration file for the CICS Adapter on the Natural Development Server (NDV). Ask your administrator for further information.
Make sure to put the entire definition in angle brackets. When this definition is followed by a Natural parameter, insert a blank before the Natural parameter. Example:
<TA_NAME=NA82> STACK=(LOGON SYSCP)
If the specified CICS transaction name cannot be found, an error message occurs and the session cannot be started.
The Natural Server view provides the logical representation of one or more Natural environments. The following example shows two Natural server nodes, one for a server on a mainframe and another for a server on UNIX. The names that are shown for the server nodes are the environment names that have been defined when the environments were mapped.
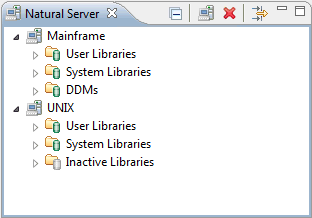
Specific top-level nodes are provided for user libraries and
system libraries (also known as the FUSER and FNAT
system files). Other top-level nodes correspond to the Natural architecture in
the mapped environment. For example:
In a mainframe environment, DDMs are always stored in the
system file FDIC. Therefore, a DDMs
node is available.
In a UNIX, OpenVMS or Windows environment, DDMs are normally
stored in libraries. However, if the parameter FDDM has
been set, the DDMs are stored in the system file FDDM. In this
case, a DDMs node is also available.
Inactive libraries are only available in UNIX, OpenVMS and Windows environments. Therefore, such a node is not provided for a mainframe environment.
Alias names can be shown for the system files in a UNIX, OpenVMS or Windows environment. They are shown when they have been defined with Natural on the appropriate platform.
When you expand the node for a system file, the nodes for the libraries in this system file are shown. For detailed information on the system files and library types, see the Natural documentation for the corresponding platform.
The objects in a library are grouped into different nodes, according to their Natural object types. For example, all programs are shown in a node called Programs. Thus, if you want to view the available programs in a library, you have to expand the Programs node.
For subroutines, functions, classes and DDMs, the long names (which may exceed 8 characters) are shown. These are the names that have been defined in the program; the names that have been defined when the object has been saved are not shown for these objects.
If Natural Security is active, only the allowed libraries and objects are shown. In addition, the commands which are not allowed to be used are disabled in the context menus.
You can use the
![]() button in the local toolbar to collapse all expanded nodes.
button in the local toolbar to collapse all expanded nodes.
Notes:
Using a filter, you can reduce the number of items that are shown in the Natural Server view. Filtering involves several steps: First you define a filter and then you apply the filter to a system file node or to a library node. Detailed information is provided in the following topics:
When you define a filter, you specify a pattern (for example, that only items are to be shown which start with the letter "L"). Each filter can hold an unlimited number of patterns.
The filters that you define can be applied to all mapped Natural environments.
To define a filter
Choose the following icon in the local toolbar of the Natural Server view:
![]()
The Define Filters dialog box appears.
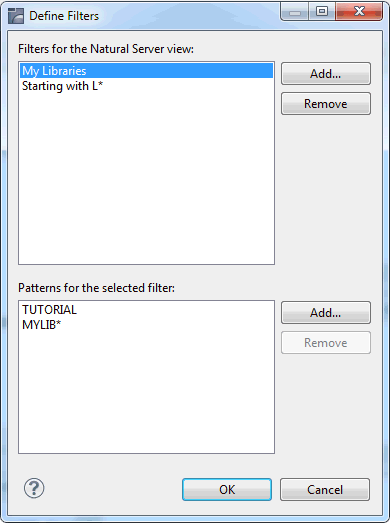
When filters are already defined, they are shown in the upper part of the dialog box. The lower part of the dialog box shows the patterns, if defined, for the selected filter.
Note:
This dialog box can also be invoked from the
Set Filters dialog box (see
Setting a
Filter).
To define a new filter, choose the button in the upper part of the dialog box.
Enter the name for the filter in the resulting dialog box.
You can use any name for the filter (for example, "My Libraries").
Choose the button to close the dialog box in which you have defined the name of the filter.
Now, you have to define one or more patterns for the new filter.
Make sure that the filter is selected in upper part of the dialog box.
Choose the button in the lower part of the dialog box.
Enter the filter pattern in the resulting dialog box. A pattern is defined as follows:
You can enter the names of all libraries or objects that are to be shown. All names must be separated by a semicolon.
Note:
Instead of entering all filter criteria in one
pattern, you can also enter them by adding several patterns.
You can use wildcards (? or *) within the names if you do not want to enter each name individually. The question mark (?) may be specified at any position inside the name. The asterisk (*) is only allowed at the end of a name.
You can also enter a range of names. Ranges must be entered as follows:
name1 - name2
When defining a range, it is important that you enter a space before and after the hyphen. The spaces are necessary since names may contain hyphens. Without the spaces, name1-name2 would be interpreted as the name of a single library or object. Each name in a range definition may contain wildcards (see above). Example:
AL* - AM?TEST
Choose the button to close the dialog box in which you have defined the pattern.
In the Define Filters dialog box, choose the button to save your changes and to close the dialog box.
Each defined filter can be applied to a system file node or to a library node of a mapped Natural environment:
When you select a system file node (for example, User Libraries), you can reduce the number of libraries that are shown for this system file.
When you select a library node, you can reduce the number of objects that are shown in this library.
When a filter has been applied, the icons that are shown for the nodes contain an additional plus sign:
|
|
System file with an active filter. |
|
|
Library with an active filter. |
Note:
The label decorations for the filters are controlled by the
preferences under General > Appearance > Label
Decorations. If you do not want to have label decorations for the
filters, just go to the above mentioned preference page and deselect
Natural Server View Filter.
All filters that you set for a mapped Natural environment are stored with the environment name that is shown in the Natural Server view. For example, when you have defined "MyMainframe" as the environment name and you unmap this environment, the filters will be set again when you map the same environment once more with the same environment name (that is, with the name "MyMainframe"). If you map the same environment with a different environment name (for example, with the name "MyServer"), the filters that you have set for "MyMainframe" are not considered.
To set a filter
In the Natural Server view, select the node(s) for which you want to set a filter (either a system file node or a library node).
Invoke the context menu and choose .
The Set Filters dialog box appears. It lists all filters that are currently defined.
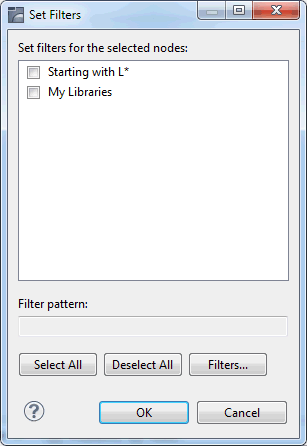
Activate the check box for each filter that you want to set.
You can also use the following command buttons:
| Command Button | Description |
|---|---|
| Activates all filters in the dialog box. | |
| Deactivates all filters in the dialog box. | |
| Invokes the Define Filters dialog box in which you can define additional filters or change the existing filters. See Defining a Filter. |
Note:
When you select a filter (not the check box), the
pattern for this filter is shown at the bottom of the dialog box.
Choose the button.
When an automatic refresh has been defined in the Natural preferences (see Runtime Execution in Setting the Preferences), the content of the Natural Server view changes automatically so that just the items that match your filter pattern are shown (depending on your selection).
When an automatic refresh has not been defined in the Natural preferences, you have to refresh the display manually. See Refreshing the Display.
Notes:
You can either deactivate a filter for a node or you can remove a filter completely so that it is no longer available.
You can also remove a single pattern if you no longer need it.
To deactivate a filter
In the Natural Server view, select the node(s) for which you want to deactivate a filter.
Invoke the Set Filters dialog box as described above (see Setting a Filter).
Deselect the check box for each filter that you want to deactivate.
Choose the button.
To remove a filter
Invoke the Define Filters dialog box as described above (see Defining a Filter).
Select the filter that you want to delete.
Choose the button in the upper part of the dialog box.
Note:
When the selected filter is currently active, you are
asked whether you really want to delete the filter.
To remove a pattern
Invoke the Define Filters dialog box as described above (see Defining a Filter).
Select the filter which contains the pattern that you want to delete.
Select the pattern that you want to delete.
Choose the button in the lower part of the dialog box.
When you select a node in the Natural Server view, the corresponding properties are automatically shown in the Properties view. The information that is shown in the Properties view depends on the type of node that is currently selected:
Natural Environment
Information on the selected Natural environment is shown. This
includes the mapping information.
Note:
More detailed information on a Natural environment is
provided in the Properties dialog box. See
System Information
for a Natural Environment.
System File, Library or Object Type
Information on the selected system file, library or object
type is shown, for example, database ID, file number, the number of different
objects (such as sources and cataloged objects) and their sizes.
Object
Information on the selected object is shown, for example,
short name and long name, programming mode, encoding, and date and time when
the source was last modified or cataloged.
Brief information on the selected node is also shown in the status line of the Eclipse window. For example, when a Natural object is selected, the following information is shown: environment name (with host name and port number), system file name (with database ID and file number), library name, object type (for example, "P" for program), and object name.
Note:
You can also invoke a Properties dialog
box for a node, using the command from
the context menu.
In the Natural Server view, you can display detailed system information for each mapped Natural environment.
To display system information for a Natural environment
In the Natural Server view, select the top-level node for a mapped Natural environment.
Invoke the context menu and choose .
The Properties dialog box appears, showing the system information for this environment.
In the tree on the left side of the dialog box, choose the type of system information that you want to display.
Information on the resulting page is provided in the topics below.
Note:
The information provided in the Properties
dialog box corresponds to the output of the Natural system commands
SYSPROD, SYSPROF and
SYSFILE.
When you choose General in the tree, general information about the current environment is shown.
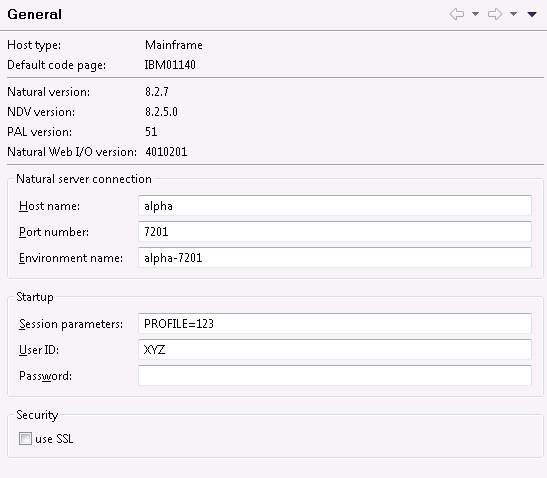
This information includes, for example, the Natural Development Server (NDV) version and the name of the default code page.
If you want to change the mapping (for example, in order to specify different session parameters or a different user ID and password), you can do this here. See Mapping a Natural Environment for information on the options that can be specified.
Note:
General information is also shown in the
Properties view when the node for a mapped Natural
environment is selected. However, it is not possible to modify information in
this view. See also Properties for the Different
Nodes.
When you choose Product Information (SYSPROD) in the tree, a list of all products that are installed in the Natural environment is shown.
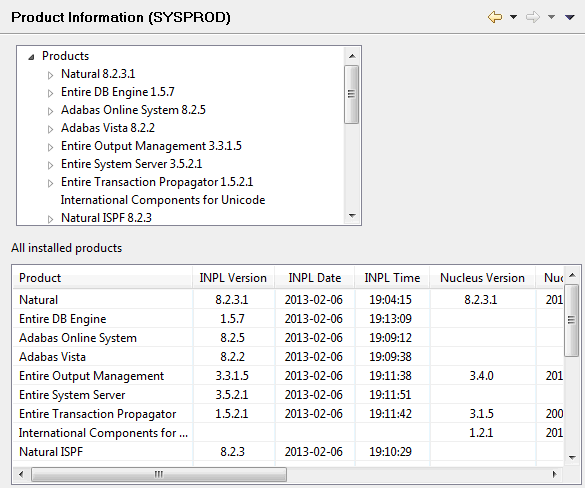
Two different areas are available, a tree and a table. The information that is shown depends on the selected Natural environment.
The tree at the top lists all installed products in the Natural environment.
When you move the mouse pointer over a product name in the tree, a tool tip appears, providing information about this product. The same information is shown in the table at the bottom when you select the product in the tree.
For some products, it is possible to expand the product node in the tree:
Mainframe environments
You can display information on history records and/or
subcomponents.
Windows, UNIX and OpenVMS environments
You can display information on hotfixes.
The table at the bottom shows information about the entry which is currently selected in the tree. For example:
When you select the top-level entry Products in the tree, a list of all installed products is shown in the table. In this case, you can see the details for all products (such as INPL version number, INPL date and product ID) at a glance.
When you select a product in the tree, only the details for the selected product are shown in the table.
When you select, for example, a history record in the tree, the corresponding information is shown in the table.
When you choose System Files (SYSPROF) in the tree, the current assignments for all Natural system files in the Natural environment are shown.
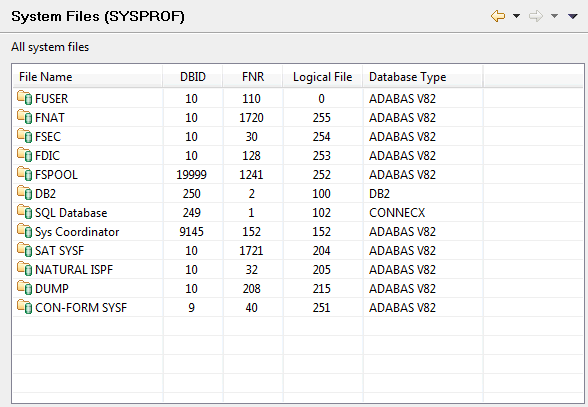
For each system file, detailed information such as database ID and file number is provided. The information that is shown depends on the selected Natural environment. The above example shows the system files in a mainframe environment. For Windows, UNIX and OpenVMS environments, additional entries for inactive system files can also be shown.
When you choose Work and Print Files (SYSFILE) in the tree, information about work files and printer settings is shown.
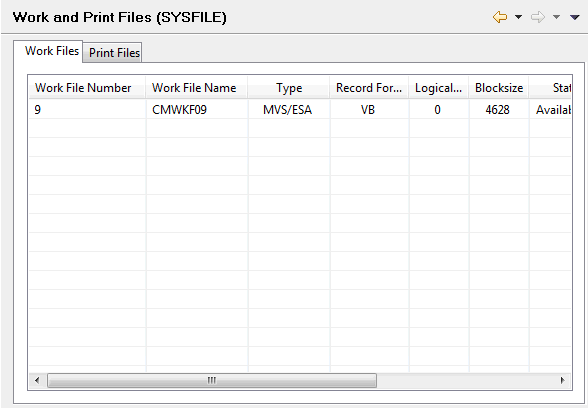
Several tabs are provided. The information that is shown depends on the selected Natural environment. The above example shows the tabs for a mainframe environment (work files and print files). In a Windows, UNIX and OpenVMS environment, tabs are provided for work files, reports and logical devices.
When you unmap a Natural environment, its node is removed from the Natural Server view.
Note:
Any editor windows that have been opened for an environment are
not closed when unmapping this environment. Even though the environment has
been unmapped, it is still possible to save to this environment any
modifications that you make in the editor windows.
To unmap a Natural environment
In the Natural Server view, select the node for the Natural environment that you want to unmap.
Invoke the context menu and choose Unmap.
Or:
Choose the following icon in the local toolbar:
![]()