This section describes how to set preferences for the Code Generation component supplied with NaturalONE. The following topics are covered:
This section describes how to set common generation preferences for Code Generation.
 To set Code Generation preferences
Select on the menu.
The Preferences window is displayed.
Expand the Software AG root node.
Select Code Generation.
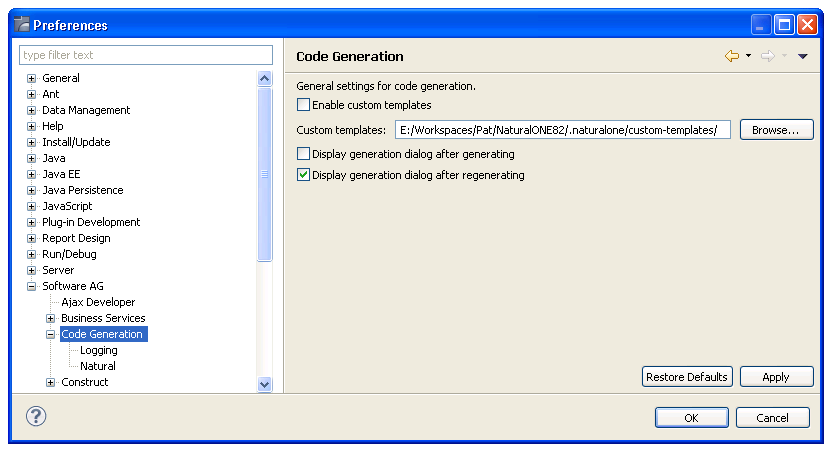
The Code Generation preferences are displayed. For example:

Using this window, you can:
| Task | Procedure |
|---|---|
| Enable customized templates and select the folder containing the templates. | Select Enable custom
templates and use to select the root
folder for custom templates (by default, the custom-templates folder).
Note: |
| Display the Generation Progress window after generation. | Select Display generation dialog after generating. |
| Not display the Generation Progress window after regeneration. | Deselect Display generation dialog after regenerating. |
Select to save the preferences.
This section describes how to set preferences for logging.
 To set logging preferences
Select on the menu.
The Preferences window is displayed.
Expand the Software AG root node.
Select Code Generation > Logging.
The Logging preferences are displayed.
Using this window, you can:
| Task | Procedure |
|---|---|
| Change the logger level in the Code Generation console view. | Select the logger level in
Level. The logger levels are:
|
Select to save the preferences.
This section describes how to set preferences for Natural.
 To set Natural preferences
Select on the menu.
The Preferences window is displayed.
Expand the Software AG root node.
Select Code Generation > Natural.
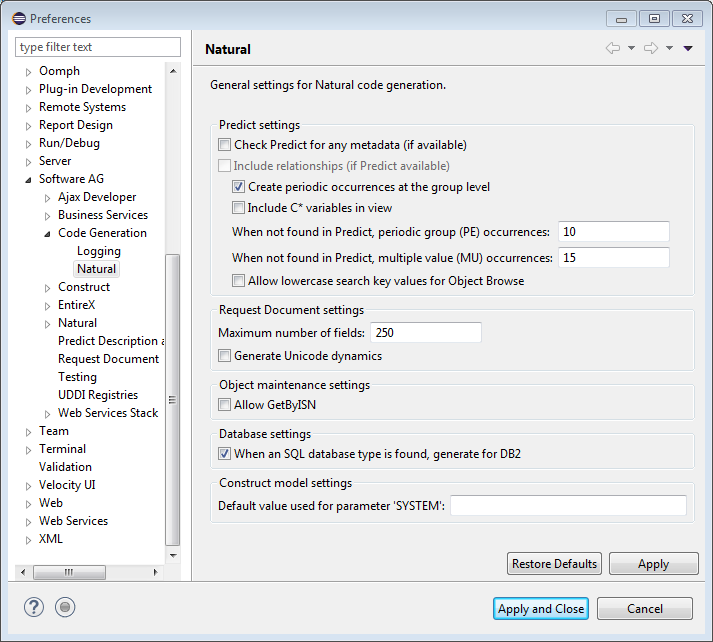
The Natural preferences are displayed. For example:

Using this window, you can:
| Task | Procedure |
|---|---|
| Check Predict for additional metadata. | Select Check Predict
for additional metadata.
Note: |
| Include relationship data from Predict (if available on the server). | Select Include
relationships.
Notes:
|
| Suppress the creation of periodic occurrences at the group level. | Deselect Create
periodic occurrences at the group level.
For example, a DDM containing a periodic group (PE) named INCOME with four occurrences can be represented as follows:
|
| Include all C* variables in the view. | Select Include C*
variables in view.
If this option is selected, the C* variables are generated into the code to determine the number of occurrences of a periodic group. For example: 2 C*INCOME 2 INCOME 3 SALARY(P5/4) 3 CURRENCY (A3/4) |
| Change the maximum number of occurrences for a periodic group when not found in Predict. | Type the number in When
not found in Predict, periodic group (PE) occurrences.
The number of occurrences of a periodic group is not stored with the DDM and the maximum number of occurrences could be too large to use. To solve this problem, you can define the maximum number of PE occurrences in this field. Note: |
| Change the maximum number of occurrences for a multiple-valued field when not found in Predict. | Type the number in When
not found in Predict, multiple value (MU) occurrences.
The number of occurrences of a multiple-valued field is not stored with the DDM and the maximum number of occurrences may be too large to use. To solve this problem, you can define the maximum number of MU occurrences in this field. Note: |
| Allow search keys to be entered in lower case for an object-browse subprogram. | Select Allow lowercase
search key values for Object Browse.
By default, the object browse subprogram will convert the starting values for all supplied alphanumeric key components to upper case. If this option is selected, the ALLOW-LOWER-CASE option is generated for all keys and the input values can include lower case characters. For example, if the database contains both upper case and lower case values for the BUSINESS-NAME field (for example, iXpress and IBM) and you select this option, either lower case or upper case input values can be used in a search (for example, "I*" for iXpress and "I*" for IBM). |
| Change the maximum number of fields generated for a REQUEST-DOCUMENT subprogram. | Type a new number in
Maximum number of fields.
A REQUEST-DOCUMENT subprogram can generate a large amount of code, which may cause memory errors. To avoid this, you can use this option to place restrictions on the REQUEST-DOCUMENT Client code generator. |
| Generate the dynamics to support Unicode fields. | Select Generate Unicode
dynamics.
This option allows the REQUEST-DOCUMENT subprogram to send and receive Unicode data. Note: |
| Allow the GetByISN option for an Object Maint subprogram. | Select Allow
GetByISN.
This option is available for Adabas files. If this option is selected, data can be retrieved using the ISN. Although extra code is generated, performance speed will be enhanced. |
| Suppress the generation of DB2 code for SQL database types. | Deselect When an SQL database type is found, generate for DB2. |
| Construct model settings | Can be used to change the default
name to be used for standard parameter SYSTEM.
Enter a different default name to be used for
parameter Note: By default, the library name which is specified in
the client generation wizards, e.g. as described in section
Generate the
Modules is used for the standard parameter
The system name must be alphanumeric and not exceed 32 characters in length. The combination of the module name and system name is used as a key to access help information for the generated module. |
Select to save the preferences.