
The Layout Painter is used to write the page layout.
This document contains the following exercises:
You will now create a layout which is stored in the user interface component you have previously created.
 To create a new layout
In the Navigator view or in the Natural Navigator view, select the user interface component.
From the menu, choose .
The following dialog box appears:
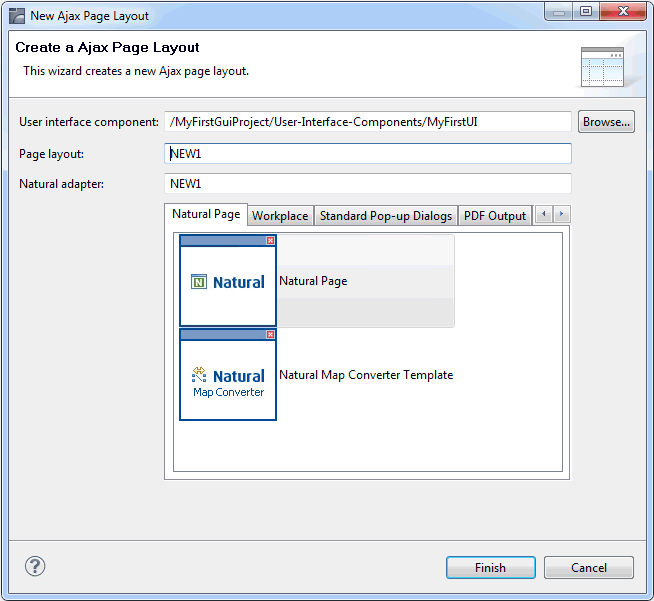
Enter "helloworld" in the Page layout text box. This is the name of your layout definition.
Enter a valid Natural object name in the Natural adapter text box. The name you specify here is used to create a Natural adapter object when you save the layout.
In this tutorial, the name HELLO-A is used.
On the Natural Page tab, select the template for the Natural page.
Choose the Finish button.
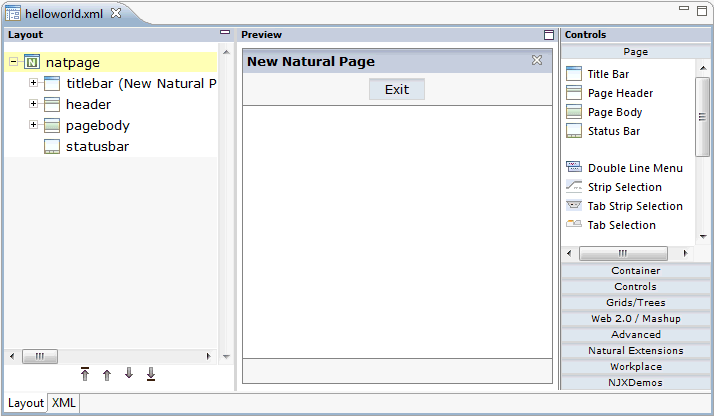
The Layout Painter appears.
Note:
The file helloworld.xml is stored in
the xml folder of the user interface
component.
The Layout Painter is divided into several areas:
Layout Area (left side)
This area shows the layout tree which contains the controls
that represent the XML layout definition. You drag these controls from the
controls palette into the layout tree. Each node in the layout tree represents
an XML tag.
Preview Area (middle)
The preview area shows the HTML page which is created using
the controls in the layout area. This page is refreshed each time, you choose
the
command (see below).
Controls Palette (right side)
Each control is represented by an icon. A tool tip is provided
which appears when you move the mouse pointer over the control. This tool tip
displays the XML tag which will be used in the XML layout. The palette is
structured into sections, where each section represents certain types of
controls.
When the Layout Painter is active, the additional menu is shown in the menu bar.
The layout tree inside the Layout Painter already contains some nodes that were copied from the template that you chose in the dialog in which you specified the name of the page. When you modify the layout and want to find out how the current layout definitions are rendered on the page, you can preview the layout as described below.
The preview area is a sensitive area. When you select a control in the preview area (for example, the title bar), this control is automatically selected in the layout tree.
To preview the layout
From the menu, choose .
When creating the layout, you can view the currently defined XML code.
To view the XML code
Choose the XML tab which is shown at the bottom of the Layout Painter.
At this stage of the tutorial, the resulting page contains the following XML layout definition for the nodes which were copied from the template.
<?xml version="1.0" encoding="UTF-8"?>
<natpage natsource="HELLO-A" natkcheck="true" natsinglebyte="true"
         xmlns:njx="http://www.softwareag.com/njx/njxMapConverter">
    <titlebar name="New Natural Page">
    </titlebar>
    <header withdistance="false">
        <button name="Exit" method="onExit">
        </button>
    </header>
    <pagebody>
    </pagebody>
    <statusbar withdistance="false">
    </statusbar>
</natpage>
Ajax Developer provides its own perspective which provides just the views which are important for editing layouts.
Note:
It is not mandatory to use the Ajax Developer perspective; the
same views are provided in the NaturalONE perspective.
To open the Ajax Developer perspective
From the menu, choose .
In the resulting Open Perspective dialog box, select Ajax Developer and choose the button.
You can now proceed with the next exercise: Writing the GUI Layout.