This document covers the following topics:
A Natural for Ajax application consists of two parts that are usually installed on two different machines. On one hand, there are Natural modules (adapters, programs, subprograms and other Natural objects) that are installed on a Natural server. On the other hand, there are page layouts of rich GUI pages and other user interface related files that are installed in a Natural for Ajax environment on an application server or web container.
The Natural modules are deployed to the Natural server with the Natural Ant deployment wizard (see Deploying Natural Applications in the Using NaturalONE documentation).
The user interface part of an application is packaged as a standard web application that can be deployed to an application server or web container. For this purpose, NaturalONE offers an additional deployment wizard, which is described below. This wizard collects all required information needed to package the user interface components of a Natural for Ajax application to a web application. It creates an Ant script which performs the packaging process. This process creates either a web archive file (.war) which can be deployed to one of the supported web containers (such as Apache Tomcat) or application servers (such as IBM WebSphere), or it creates plain folders and files which can be copied into an existing server environment.
The deployment process can either be started from within the NaturalONE Eclipse environment or via the Ant command line utility.
A deployed Natural for Ajax web application consists of the following elements:
User Interface Components
These are the elements which constitute the user interface of the
application, such as layout pages, style sheets, images and language files.
Configuration Tool
This tool enables you to modify the session configuration
(sessions.xml) after the deployment.
Runtime License File
To execute a Natural for Ajax application outside the development
environment of NaturalONE, a Natural for Ajax runtime license is required. You
received this license file with your Natural for Ajax product kit.
Special Files for the Web Application
You can customize your web application further by adding specific
configuration files and web pages. To do this, you can add a directory named
webconfig to your project. The files contained in this
directory are packaged to specific, well-defined places in your web
application:
Root Directory
The files from your project's webconfig/root
directory are placed in the root directory of the web application. This
directory may contain, for example, your own application-specific
index.html file.
WEB-INF Directory
The files from your project's
webconfig/web-inf directory are placed in the
WEB-INF directory of the web application. Usually, this
contains your own application-specific web.xml and
sessions.xml files.
resources Directory
The files from your project's
webconfig/resources directory are placed in the
resources directory of the web application. Usually, this
contains your own application-specific style sheets.
To make it simple, a sample webconfig directory is provided (see below) that you can import into your project before deployment. If you are an experienced developer of web applications, you can create and modify the files in this directory.
Important:
If the deployment mode
Deploy as file
export is selected in the deployment wizard, only the
user interface components are deployed. In this case, it is assumed that all
other elements mentioned above have already been installed on the application
server.
Before packaging the application with the deployment wizard, it is useful to import the sample webconfig directory into your project. The files contained in this sample directory can be customized as needed, or left as they are. In their default state, they provide a comfortable approach to launch the application.
You can import the sample webconfig directory into your project by clicking the box Add webconfig folder on the Ajax Developer tab of the project properties:
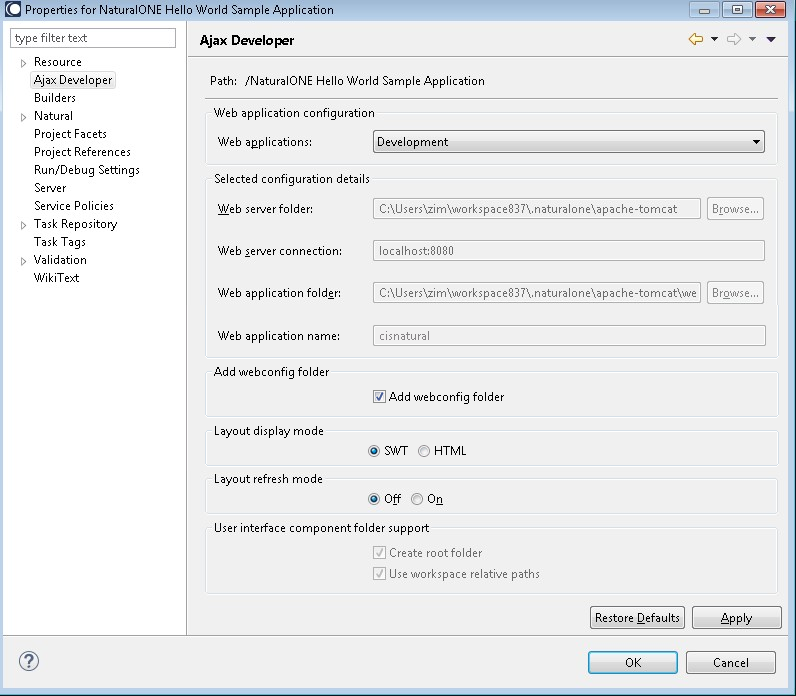
The sample webconfig directory contains the following subdirectories:
web-inf
If your project contains the files listed below, the packaging script
adds them to the web application and replaces certain variables with the values
you have specified in the deployment wizard. The files will be placed into the
WEB-INF directory of the web application.
sessions.xml
This configuration file defines the sessions that can be invoked
from the logon page. After the deployment, the configuration file can be
modified using the configuration tool.
web.xml
This is the central configuration file for a web application.
Modify this file only if you have experience with web applications.
If you need to support different application servers which require different versions of the files sessions.xml and web.xml, you can place these files in specific subdirectories of the WEB-INF directory of the web application. For example:
- WEB-INF
    - Tomcat
      - sessions.xml
      - web.xml
    - WebSphere
      - sessions.xml
      - web.xml
    - JBoss7
      - sessions.xml
      - web.xml
    - JBoss8
      - sessions.xml
      - web.xml
root
This directory contains the following files which will be placed into
the root directory of the web application:
start.html
This file is used to start the web application in the browser. You
start the application with the following URL:
http://<host>:<port>/<webcontext>/start.html
start.jnlp
This file is used to start the web application in the SWT client.
You start the application with the following URL:
http://<host>:<port>/<webcontext>/start.jnlp
index.html
This file provides links for starting the web application in the
browser and in the SWT client. These correspond to the above URLs. In addition,
it provides links for invoking the configuration tool and the tracing and
monitoring tools for the application.
resources
This directory contains the following file which will be placed in
the resources directory of the web application:
sample.css
This is an example style sheet which is used to control the font,
the color and the representation of the PF keys of classic I/O pages that your
application might use. You can adapt this style sheet as needed or create more
style sheets.
The deployment wizard creates a WAR deployment file in your project root. This is an Ant script. You can create one or more WAR deployment files for a project, and you can also load an existing WAR deployment file and modify the current settings.
 To use the deployment wizard
In the Navigator view or in the Natural Navigator view, select the project for which you want to create the deployment file.
Or:
If you want to load the settings of an existing WAR deployment file,
select this file in the Navigator view or in the
Natural Navigator view.
From the menu or from the context menu, choose .
In the resulting New dialog box, expand the Natural node, select Deploy Natural War Ant and then choose the button.
The first page of the wizard appears (see below).
Specify all required information as described in the topics below. Use the button repeatedly to proceed from the first page of the wizard to the last page.
When all required information has been provided, choose the button.
The different pages of the deployment wizard are described in the following topics:
On the first page of the wizard, you define general settings for the deployment.
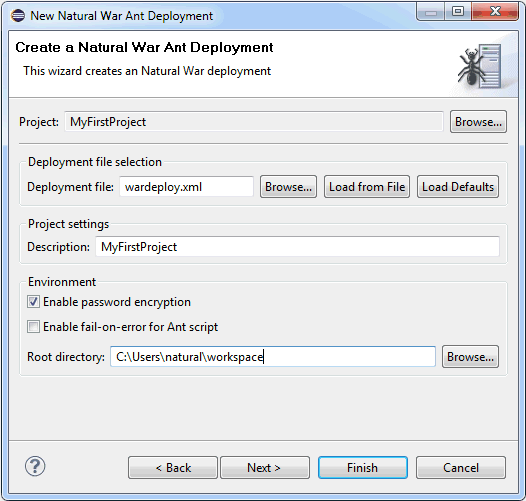
The default name for the WAR deployment file is wardeploy.xml. This name is shown in this text box when an existing WAR deployment file was not selected while invoking the wizard. However, when an existing WAR deployment file was selected, the name of the selected file is shown and the settings from this file are automatically loaded.
You can enter any other name for your new deployment file. It is recommended that your new deployment file also has the extension ".xml".
Note:
If you keep the name wardeploy.xml, the
settings from an existing WAR deployment file with the same name are loaded the
next time you select the project and invoke the wizard.
If you want to load an existing WAR deployment file, choose the button. A dialog appears, providing for selection all WAR deployment files in the current project. Next, you have to choose the button. Otherwise, the settings in this file are not shown in the wizard and may thus be overwritten unintentionally.
If you want to return to the default settings of the deployment wizard (this also includes the information that can be specified on the other pages of the wizard), choose the button.
This descriptive text is displayed in the administration tool of the application server or web container after the web application has been deployed.
When enabled, all passwords that are used in the deployment file are stored in an encrypted format.
When enabled, the Ant script reports errors and terminates in the case of a build failure.
When disabled, the Ant script still reports errors but build failures are only triggered in severe situations (see also Status Code Handling).
This path should only be changed when you intend to start the deployment from the command line (that is, when the deployment is not to be started from Eclipse).
Specify the working directory in which the selected project is to be checked out and where the processing takes place. When the deployment is supposed to run on a different machine, you can insert the desired root path via copy-and-paste.
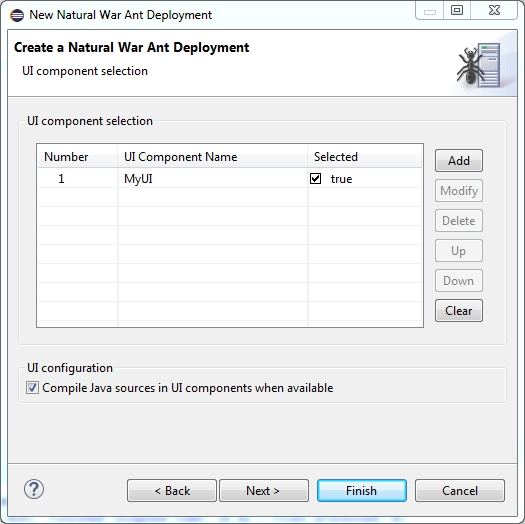
On the second page of the wizard, you specify the user interface components that are to be processed.
By default, all user interface components in the project are selected. If you want to exclude a user interface component from processing, remove the check mark in the Selected column.
The following applies if Deploy as war archive has been selected:
Style sheets for the user interface should be contained in a subfolder styles of your user interface component. In this case, the .css files are automatically regenerated from the .info files. If your style sheets are in a different folder, you need to take care of the regeneration yourself. To package your own cisconfig.xml file with the .war file, put the cisconfig.xml file into a subfolder cisconfig of your user interface.
Select Compile Java sources in UI components when available if the user interface components contain Java sources that need to be compiled for deployment. The Java sources must reside in the predefined sub folder src of your user interface component, for example: <myui>/src. Please note that a Java compiler (i.e. a JDK kit) must be accessible for the Ant script in that case.
On the third page of the wizard, you define all settings related to the versioning repository. This can be either Subversion (SVN), GIT or CVS. The settings are used to check out the entire project.
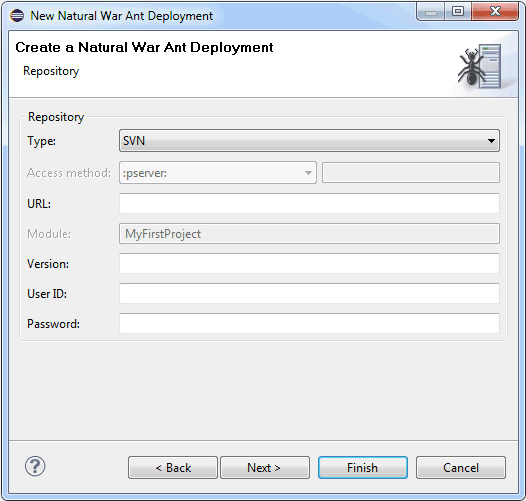
From the Type drop-down list box, select the type of versioning repository that you are using, and then specify all required information. The names of the text boxes and their availability changes according to the selected type.
The wizard usually collects a set of default information as given for the selected project. In most cases, only minor corrections have to be made to the defaults, for example, user ID and password may have to be provided.
The fourth page of the wizard shows information which applies to the web application that is to be created.
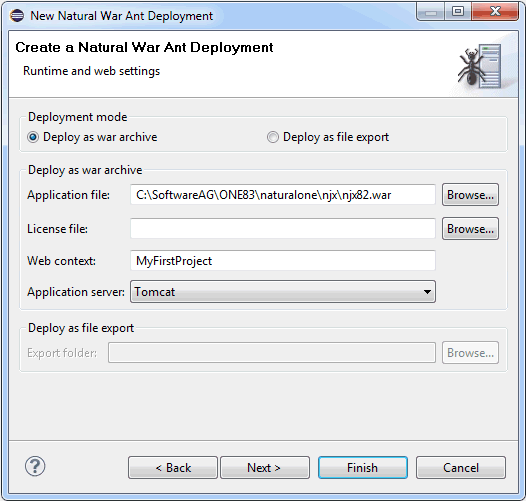
The deployment wizard can either create a .war archive or export the selected components to a folder that you have to specify. Depending on your choice (Deploy as war archive or Deploy as file export), different options are available on this page of the wizard.
Only available when Deploy as war archive is selected.
Your web application is created based on a basic Natural for Ajax web application that is provided with your NaturalONE installation. This text box is preset with the path to this web application. Normally, you should not change this setting.
Only available when Deploy as war archive is selected.
In a runtime environment, a Natural for Ajax runtime license is required. Specify the path to this license file. You received a runtime license file with your Natural for Ajax product kit.
Only available when Deploy as war archive is selected.
The web context is the root of all URLs of your web application. When you later deploy the application to an application server or web container, you will start it with the following URL:
http://<host>:<port>/<webcontext>/start.html
where <host> and <port> are the host name and port number of your application server or web container.
Only available when Deploy as war archive is selected.
Select the type of application server for which the .war archive is to be created. Different application servers might require different sets of configuration files. This option allows you to select the application server-specific files as discussed under Content of the Sample webconfig Directory.
Only available when Deploy as file export is selected.
Specify the destination folder for the exported files. The destination folder must refer to an existing Natural for Ajax application environment inside an application server's directory structure. In particular, a WEB-INF directory must be available within the destination folder. This is necessary because the user interface components have to be regenerated when they are deployed to the application server. This is achieved by using the tools from the WEB-INF directory of an existing Natural for Ajax application.
The fifth (and last) page of the wizard shows the options that your web application will use by default to connect to the Natural server. The packaging script places the values you specify here into the sessions.xml file of your web application. After you have deployed the application, you can use the configuration tool to modify these settings or to add alternative connection parameters.
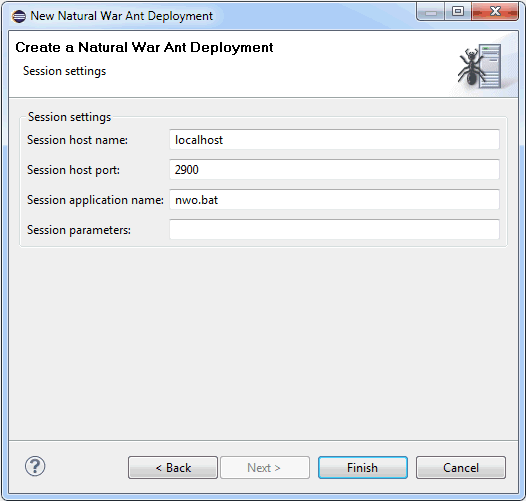
The name or TCP/IP address of the server on which Natural and the Natural Web I/O Interface server are running.
The TCP/IP port number on which the Natural Web I/O Interface server is listening.
Natural for Mainframes
The name of the Natural program or a command sequence that
starts your application as you would enter it on the NEXT prompt.
Example:
TEST01 data1,data2
Natural for UNIX
The name of the UNIX shell script for starting the Natural
application (a file similar to nwo.sh).
Natural for Windows
The name of the Windows command file (.bat)
for starting the Natural application.
Optional. Parameters for starting the Natural application. This can be stack parameters, a parameter file/module or other Natural-specific information.
Natural for Mainframes
Used to pass dynamic Natural profile parameters to the session,
for example:
SYSPARM=(MYPARMS) STACK=(LOGON MYAPPL)
Note:
It is recommended to specify the Natural program that starts
the application with the option Session application name
instead of passing it with the profile parameter STACK.
Natural for UNIX and Natural for Windows
Used when the above shell script (UNIX) or command file
(Windows) uses the parameter $5 after
"natural", for example:
PARM=MYPARM STACK=(LOGON MYLIB;MENU)
When you start the deployment process from Eclipse, it is not possible
to execute the checkout and update targets of the
deployment file since these targets would access the versioning repository, and
this is not feasible from within an Eclipse environment. If you want to check
out a specific revision from the versioning repository or if you want to update
your project with sources from the versioning repository, you have to start the
deployment from the command line as described below.
For testing purposes, for example, it is helpful to start the
deployment process from Eclipse. Since the WAR deployment file is an Ant
script, the built-in Eclipse functionality of starting Ant scripts is used
here. The build target of the Ant script will then be
executed.
To start the deployment from Eclipse
In the Navigator view or in the Natural Navigator view, select your WAR deployment file, invoke the context menu and choose .
The deployment process is started, and the output of the deployment file is written to the Console view.
When Deploy as war archive has been selected as the deployment mode, the web application (.war file) is created in the project directory. To see the file in the Navigator view or in the Natural Navigator view, a refresh may be required.
When Deploy as file export has been selected as the deployment mode, the directories and files are generated within the specified destination folder.
You can start the deployment process from a Windows command line such as the Command Prompt (cmd.exe) or from a shell command line on a Linux system. When you start the deployment from the command line, special requirements must be met.
The following topics are covered below:
The prerequisites for deploying a web application are the same as for deploying Natural applications. See Prerequisites in Deploying Natural Applications, which is part of Using NaturalONE. However, you have to copy the WAR deployment file to the root directory (instead of the Natural deployment file).
When all prerequisites are in place, the deployment can be started by issuing specific Ant calls. This section just provides some examples (where the default name wardeploy.xml is used).
Print the help screen of the Ant script:
ant -lib path-to-mylib -f wardeploy.xml help
Perform an initial checkout of the project sources from the versioning repository:
ant -lib path-to-mylib -f wardeploy.xml checkout
Perform an update of the project sources from the versioning repository:
ant -lib path-to-mylib -f wardeploy.xml update
With a single call, perform an update of the project sources from the versioning repository first, and then package the web application:
ant -lib path-to-mylib -f wardeploy.xml update build
In the above examples, the logging information is written to standard output. If logging information is to be written to a file, use a call such as the following:
ant -lib path-to-mylib -f wardeploy.xml update build -logfile mylogfile.txt
The Ant deployment script for Ajax can run in two status code modes.
The mode can be toggled by specifying the command line parameter
-Dnatural.ant.ajax.failonerror as described in the
following table.
| Command Line Option | Description |
|---|---|
-Dnatural.ant.ajax.failonerror=no |
Only severe errors such as missing project directories will lead to a build failure with a status code other than 0. This is the default mode. |
-Dnatural.ant.ajax.failonerror=yes |
In addition to the severe errors described above, errors occurring during checkout or update will also lead to a status code other than 0 and hence will lead to a build failure. |
Note:
The default mode can also be changed on the
first page of the
deployment wizard.
When the additional status code handling has been enabled, the Ant tool as well as the internally used tools such as SVN, GIT or CVS clients may issue specific status codes. In case the status codes are unclear, refer to the documentation of these tools.
The way you actually deploy the web application to a production application server or web container depends on the server you are using. Usually, an application server or web container provides an Administration Console for deploying and configuring an application (Apache Tomcat, IBM WebSphere, JBoss Application Server). Or you can simply copy the web application into an application directory on the server (Apache Tomcat, JBoss Application Server).