The Natural Construct component for NaturalONE provides access from Eclipse to Natural Construct on the server. This access includes the modeling functionality in the SYSCST library, as well as Eclipse wizards corresponding to a subset of the most common Natural Construct models in your server installation. The Eclipse wizards collect the model specifications and pass this information to the Natural server to generate the code, which is then returned to the local project that was selected as the target on a wizard panel.
This type of code generation is different from the local, non-server based generation implemented using Velocity templates (for example, REQUEST-DOCUMENT Client, Object Maint, Object Browse, and Object Skeleton; see Using the Code Generation Component). The Natural Construct component allows you to use Natural Construct models on the server in NaturalONE, as well as create Eclipse wizards for them (including customized ones).
Note:
To install the Natural Construct component
for NaturalONE, you must select
Designer > NaturalONE > Natural Construct in
the installation tree for the installer.
This section covers the following topics:
The Natural Construct component for NaturalONE supplies client generation wizards for the following Natural Construct models on the server:
| Model | Generates |
|---|---|
| BROWSE | Browse program that reads a file in logical order and displays record values on the screen. |
| BROWSE-SELECT | Browse-select program that reads a file in logical order, displays record values on the screen, and allows the user to specify which set of commands are executed. |
| BROWSE-SELECT-HELPR | Browse-select helproutine that enables the user to select a field value from a list of valid values. |
| BROWSE-SELECT-SUBP | Browse-select subprogram that is invoked as a sub-function of another program. For example, you can use a browse-select subprogram to perform the Browse action for a maintenance program, in which case, the maintenance program invokes the subprogram without disturbing the current state of the panel. |
| BROWSE-SUBP | Browse subprogram that is invoked as a sub-function of another program. |
| DRIVER | Driver program that executes a helproutine or subprogram for testing purposes. |
| MAINT | Maintenance program that maintains a file using a unique key and, optionally, a related secondary file. The Maint wizard generates the code necessary to scroll through the MU/PE fields of a primary file or the records of a secondary file. |
| MENU | Menu program that presents users with several choices in the form of a menu. The user enters a code for one of the choices to invoke a predefined function. |
| OBJECT-BROWSE-DIALOG | Object-browse dialog component of an object-maintenance process that works with the object-browse subprogram to provide the browse functionality for a Natural object. |
| OBJECT-BROWSE-SELECT-SUBP | Object-browse-select subprogram and corresponding parameter data areas that provide the browse functionality for a Natural object. This model is similar to the OBJECT-BROWSE-SUBP model, except the generated object-browse-select subprogram can accommodate a client/server environment and a subprogram proxy can be used to access the generated code as a business service. |
| OBJECT-BROWSE-SUBP | Object-browse subprogram and corresponding parameter data areas that provide the browse functionality for a Natural object. |
| OBJECT-MAINT-DIALOG | Object-maintenance dialog component of an object-maintenance process. The dialog component (Natural program) communicates with the user and invokes methods (data actions) implemented by the object-maintenance subprogram. |
| OBJECT-MAINT-SUBP | Object-maintenance subprogram and corresponding parameter data areas that update all entities within a Natural object. |
| QUIT | Quit program that releases resources used by an application. It displays a confirmation window that overlays the host panel and gives users the option of quitting an application entirely or resuming where they left off. |
| STARTUP | Startup program (often named Menu) that initializes global variables and invokes the main menu program. |
To use the Natural Construct code generation features in NaturalONE, the following requirements must be met:
Your NaturalONE environment must be mapped to a server in the Natural Server view that contains a version of Natural Construct 5.3, service pack 8 or higher.
Projects in your workspace must be connected to the server containing Natural Construct; projects mapped to the local Natural runtime environment cannot be used to generate Natural Construct modules.
The target Natural project must be configured to a remote environment. If you select a Natural project that is mapped to a local environment, an error will be displayed. When you change the target project to a valid remote project, the clear subprogram will be called using the connection settings for the valid project.
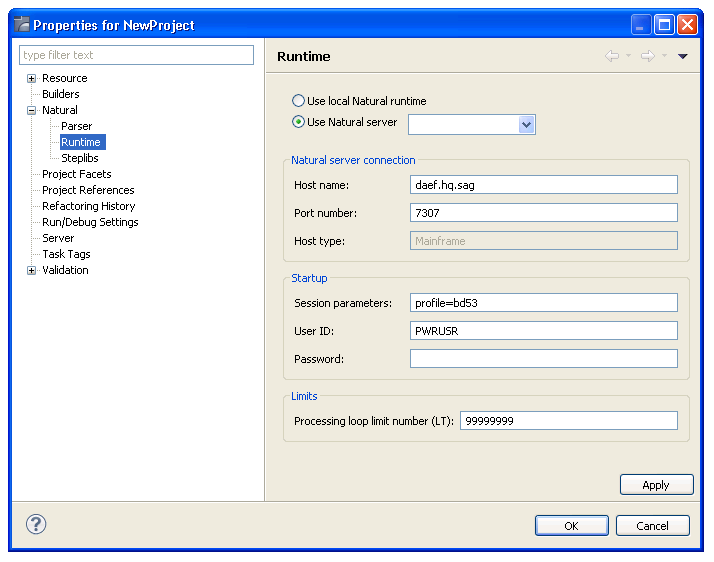
The setting in the Properties window for the project must point to the Natural Server connection containing the Natural Construct installation. For example:
You can use the Natural Server view to copy/paste, delete, or move Natural Construct resources on the server. The action will be performed in the mapped environment for the selected node(s).
This section covers the following topics:
![]() To perform actions on one or more code frames:
To perform actions on one or more code frames:
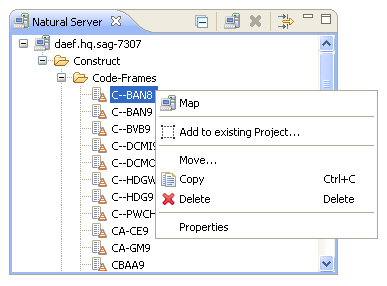
Open the context menu for the code frame(s) in the Natural Server view.
For example:
Select one of the actions listed.
The available actions are:
| Action | Description |
|---|---|
| Move | Removes the selected code frame(s) from the current mapped environment and adds it to a target mapped environment. For information, see Move a Code Frame. |
| Copy | Copies the selected code frame(s) to the clipboard in anticipation of a Paste action. For information, see Copy a Code Frame. |
| Delete | Removes the selected code frame(s) from the current mapped environment. For information, see Delete a Code Frame. |
This section describes how to move one or more code frame(s) from the current mapped environment to a target mapped environment.
Note:
A code frame cannot be moved within the same mapped
environment.
![]() To move one or more code frames:
To move one or more code frames:
Open the context menu for the code frame(s) in the Natural Server view.
Select .
The Move Objects window is displayed. For example:
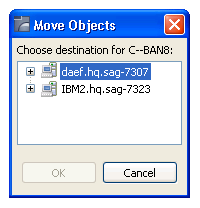
This window lists the connection nodes for the available mapped environments.
Expand the connection node for the environment into which you want to move the code frame(s).
Select the Construct or Code-Frames root node.
Select .
A progress window is displayed while the code frame(s) is removed from the current mapped environment and copied to the target mapped environment.
This section describes how to copy one or more code frames to the clipboard and then paste the frame(s) into a target mapped environment.
![]() To copy one or more code frames:
To copy one or more code frames:
Open the context menu for the code frame(s) in the Natural Server view.
Select .
Open the context menu for the Construct or Code-Frames root node into which you want to copy the code frame(s).
Select .
The frame(s) is copied to the target mapped environment.
This section describes how to remove one or more code frames from the current mapped environment.
![]() To delete one or more code frames:
To delete one or more code frames:
Open the context menu for the code frame(s) in the Natural Server view.
Select .
A confirmation window is displayed to confirm the action.
Select .
The frame(s) is removed from the current mapped environment.
![]() To perform actions on one or more Natural Construct models:
To perform actions on one or more Natural Construct models:
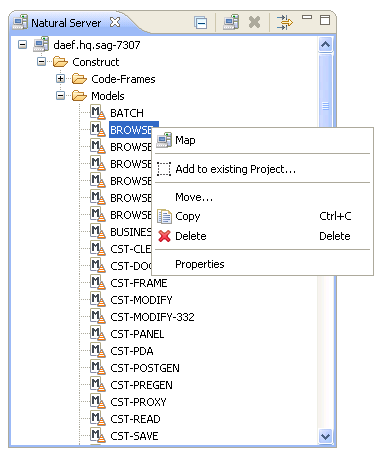
Open the context menu for the model(s) in the Natural Server view.
For example:
Select one of the actions listed.
The available actions are:
| Action | Description |
|---|---|
| Move | Removes the selected Construct model from the current mapped environment and adds it to a target mapped environment. For information, see Move a Construct Model. |
| Copy | Copies the selected model(s) to the clipboard in anticipation of a Paste action. For information, see Copy a Construct Model. |
| Delete | Removes the selected model(s) from the current mapped environment. For information, see Delete a Construct Model. |
This section describes how to move one or more model(s) from the Models root node in the current mapped environment to a target mapped environment.
Note:
A Construct model cannot be moved within the same mapped
environment.
![]() To move one or more Construct models:
To move one or more Construct models:
Open the context menu for the model(s) in the Natural Server view.
Select .
The Move Objects window is displayed. For example:
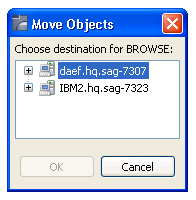
This window lists the connection nodes for the available mapped environments.
Expand the connection node for the environment into which you want to move the model(s).
Select the Construct or Models root node into which you want to move the model(s).
Select .
A progress window is displayed while the model(s) is removed from the current mapped environment and copied to the target mapped environment.
This section describes how to copy one or more models to the clipboard and then paste the model(s) into a target mapped environment.
![]() To copy one or more Construct models:
To copy one or more Construct models:
Open the context menu for the model(s) in the Natural Server view.
Select .
Open the context menu for the Construct or Models root node into which you want to copy the model(s).
Select .
The model(s) is copied to the target mapped environment.
This section describes how to remove one or more models from the current domain.
![]() To delete one or more Construct models:
To delete one or more Construct models:
Open the context menu for the model(s) in the Natural Server view.
Select .
A confirmation window is displayed to confirm the action.
Select .
The model(s) is removed from the current mapped environment.
When a Construct resource (for example, a Construct model, code frame, etc.) is open in the editor, the Dependencies view displays dependencies between that resource and other Construct resources and/or Natural resources. This section describes the child nodes contributed to the view by the Construct-related resources. The following topics are covered:
Notes:
When a Construct resource is open in the editor, the root node
displays the name of the resource. In caller mode (![]() ), child nodes are contributed to the
Dependencies view for each resource that depends on that
Construct resource. For example, when a code frame is open in the editor, the
child nodes display any Construct models or other code frames that depend on
that code frame:
), child nodes are contributed to the
Dependencies view for each resource that depends on that
Construct resource. For example, when a code frame is open in the editor, the
child nodes display any Construct models or other code frames that depend on
that code frame:
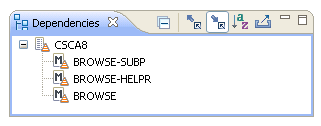
In this example, three Construct models (BROWSE-SUBP, BROWSE-HELPR, and BROWSE) depend on the CSCA8 code frame.
In callee mode (![]() ),
Construct and Natural nodes are contributed to the view for each resource the
Construct resource depends on. For example, when a Construct model is open in
the editor, the child nodes will display any code frames, PDAs, subprograms and
Construct models that this model depends on. For example:
),
Construct and Natural nodes are contributed to the view for each resource the
Construct resource depends on. For example, when a Construct model is open in
the editor, the child nodes will display any code frames, PDAs, subprograms and
Construct models that this model depends on. For example:
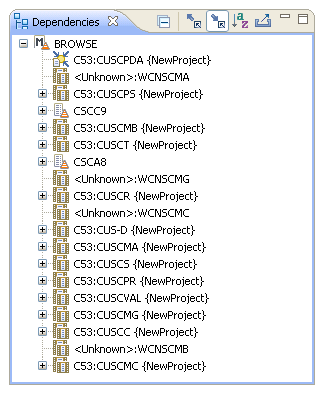
In this example, the Construct model named BROWSE depends on two code frames (CSCC9 and CSCA8), a PDA named CUSCPDA in the C53 library and many subprograms.
When a Natural subprogram is open in the editor, the root node
displays the name of the subprogram, as well as the name of the library in
which it is located. In caller mode (![]() ), child nodes are contributed to the
Dependencies view for each Construct-related resource that
depends on this subprogram (such as a Construct model, code frames, etc.). For
example:
), child nodes are contributed to the
Dependencies view for each Construct-related resource that
depends on this subprogram (such as a Construct model, code frames, etc.). For
example:
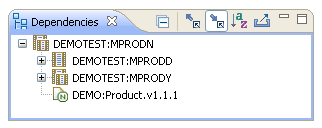
In callee mode (![]() ),
a Construct model node is contributed to the view if the subprogram was
generated by a Construct model. For example:
),
a Construct model node is contributed to the view if the subprogram was
generated by a Construct model. For example:
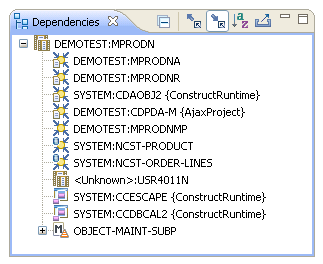
To avoid compile errors for Construct-generated modules in the server environment, Natural Construct on the server is delivered with all the required runtime/compile time modules in the SYSTEM library. Since these modules are combined with other modules and products in SYSTEM, the Natural Construct component on the client delivers the required modules in the Construct runtime project. The modules in this project will eliminate compile and parsing errors caused by missing Natural Construct resources and will provide more detailed information in the Dependencies view.
This section covers the following topics:
Replace the Construct Runtime Project with the Latest Version
Build the Construct Runtime Project in a non-Construct Server Environment
When Natural code is generated by a Code Generation wizard, the wizards verify whether the required runtime/compile-time modules are available in the local environment. If they are not, a window is displayed prompting you to add the Construct runtime project to your workspace. For example:
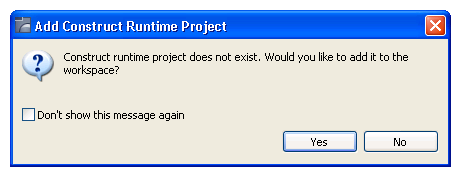
If you select Yes, the project is added to the workspace and referenced from the current project.
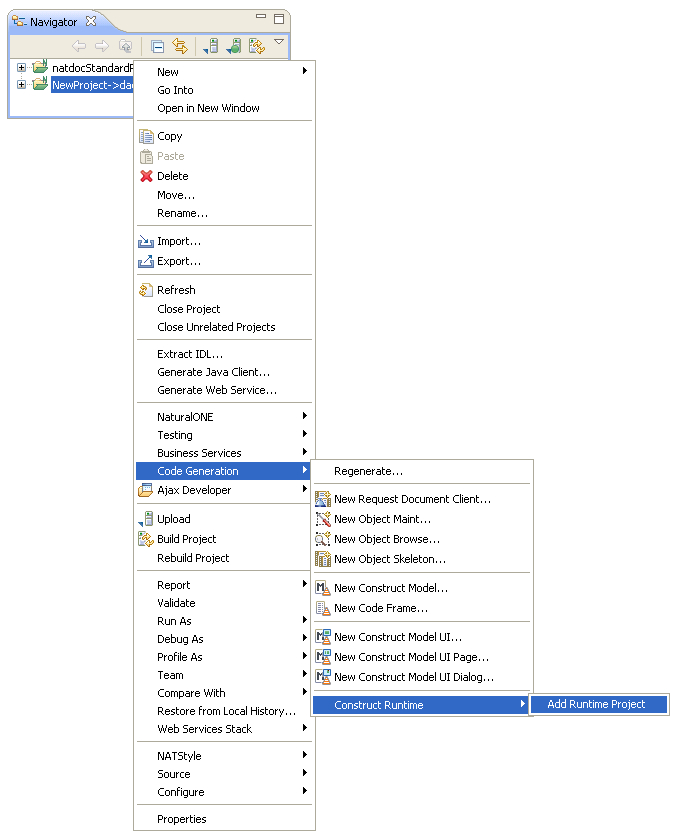
You can also add the Construct runtime project to your workspace manually.
![]() To add the Construct runtime project manually:
To add the Construct runtime project manually:
Open the context menu for any node in the Navigator view.
Select .
For example:
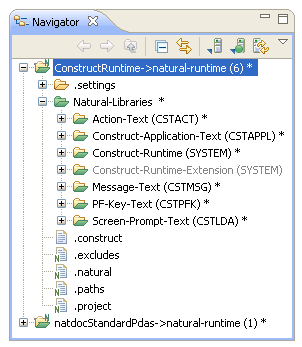
The project is added to the view. For example:
The current version of the Construct runtime project is defined in the .construct file. For example:

Note:
The information in the .construct file is used internally and
should not be modified.
The local version information is compared to the version information delivered in the Construct runtime project at startup and during generation and regeneration. If the version has changed on the server, the local project will be updated.
This section describes how to update an existing Construct runtime project to the latest version of the project. Updated modules in the shipped version are copied to the workspace (and overwritten when necessary).
| Warning: Any customizations of the Construct runtime project modules will be lost unless you exclude the modules from the update processing. For information, see Exclude Modules from the Update or Replace Process. |
![]() To update the Construct runtime project to the latest version:
To update the Construct runtime project to the latest version:
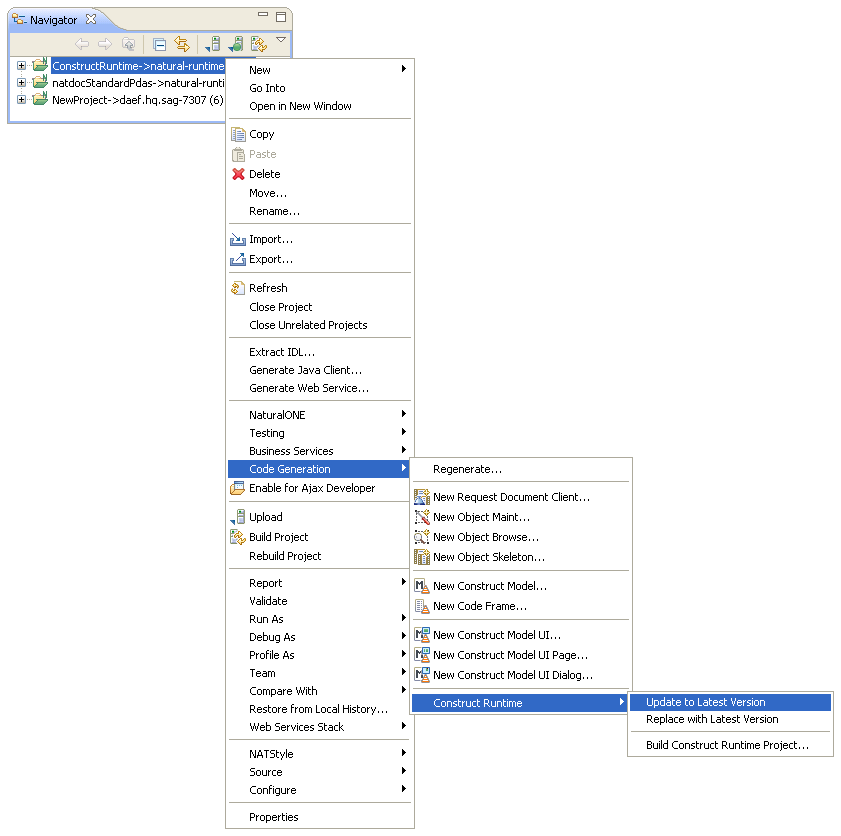
Open the context menu for the ConstructRuntime project in the Navigator view.
Select .
For example:
This section describes how to replace an existing Construct runtime project with the latest shipped version of the project. All modules in the shipped version are copied to the workspace (and overwritten when necessary).
| Warning: Any customizations of the Construct runtime project modules will be lost unless you exclude the modules from the replace processing. For information, see Exclude Modules from the Update or Replace Process. |
![]() To replace the Construct runtime project with the latest
version:
To replace the Construct runtime project with the latest
version:
Open the context menu for the ConstructRuntime project in the Navigator view.
Select .
This section describes how to exclude (and subsequently include) Construct runtime project resources from being overwritten during the update or replace process. You can use this functionality to protect changes to these modules from being overwritten during the update or replace process.
Notes:
![]() To exclude modules in the Construct runtime project from the update
or replace processing:
To exclude modules in the Construct runtime project from the update
or replace processing:
Open the context menu for a Construct runtime resource in the Navigator view.
Select . For example:
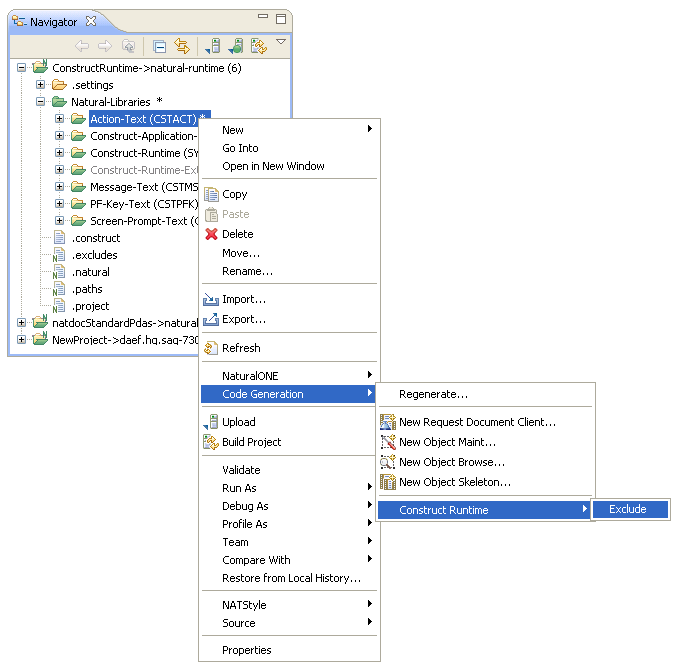
The selected resource is added to the .construct-excludes file in the project. For example:
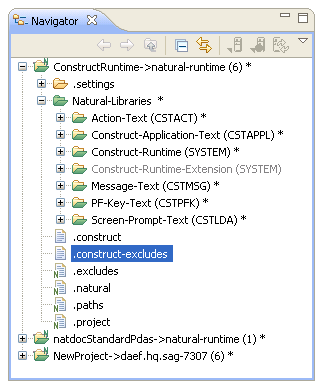
Excluded resources will never be updated or replaced with the latest shipped version (triggered automatically at startup, generation, regeneration or by selecting the or Replace with Latest Version context menu actions).
Note:
You can view the .construct-excludes file to determine which
resources are currently excluded, but you should never modify the file
manually.
![]() To include modules in the Construct runtime project update or
replace processing:
To include modules in the Construct runtime project update or
replace processing:
Open the context menu for the excluded Construct runtime resource in the Navigator view.
Select .
The selected resource is removed from the .construct-excludes file and will now be overwritten during an update or replace process.
If you have customized any of the required modules on the server, you must add these customizations to the local Construct runtime project. This project is imported from an archived file called ConstructRuntime.zip in the installation folder for the Natural Construct component.
![]() To add customized modules to the Construct runtime project:
To add customized modules to the Construct runtime project:
Make a backup copy of the ConstructRuntime.zip file.
Import the ConstructRuntime.zip file into your workspace.
Open the zip file and copy the customized modules into the Construct runtime project.
Export the modified Construct runtime project from your workspace to the ConstructRuntime.zip file.
Your customizations will overwrite the supplied Construct runtime project in the Natural Construct installation folder.
The customized Construct runtime project now can be used as the basis for loading runtime projects in a customized environment.
The Construct runtime project allows Construct-generated modules to be compiled in NaturalONE and executed in a non-Construct Natural server environment. If Natural Construct is installed on the server (including the compiled version only), a Construct-generated application can be compiled and/or executed on that server. If Natural Construct is not installed on the server (for example, in a NaturalOne local server environment), a Construct-generated application can be compiled on that server if the Construct runtime project has been installed.
The Construct runtime project is copied to the environment defined in the Properties window for the project (for example, Projectname > Properties > Natural > Runtime).
For a Construct-generated application to compile in a NaturalOne local environment:
The referenced application DDMs must be copied into the NaturalOne local environment.
The Construct runtime project must be available in the workspace and referenced.
The SYSTEM library must be in the steplib chain.
The runtime folder does not require a Construct physical file. If Construct help is being used, the Construct physical file must be installed on the server and both the runtime and the CST-Help folders should be updated on the server.
Notes:
![]() To build the Construct runtime project in a non-Construct server
environment:
To build the Construct runtime project in a non-Construct server
environment:
Open the context menu for the ConstructRuntime project in the Navigator view.
Select .
The Define the Build Details panel is displayed. For example:
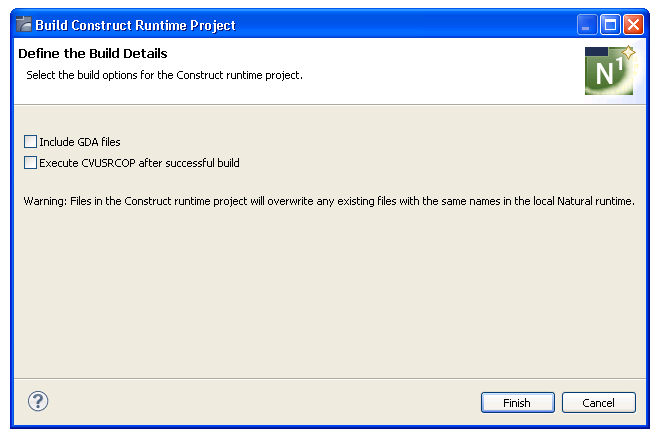
Select .
The Construct runtime project is built with all defaults.
Or:
Select one or more of the following options:
| Option | Description |
|---|---|
| Include GDA files | Select this option to include all global
data area files.
The wizard ignores any global data areas. To include them, select Include GDA files. Note: |
| Execute CVUSRCOP after successful build | Select this option to execute the CVUSRCOP utility, which copies the Natural utility routines to the SYSTEM library after the Construct runtime project has been successfully built on the server. For more information, see Natural Business Services Installation on Mainframes. |
Select .
The Construct runtime project is built with the selected options.