
This document contains general information which applies when installing and setting up any Software AG product on an OpenVMS platform. The following topics are covered:
Installing the Software AG Product from the Installation Medium
Installing Software AG Products in an Adabas or Entire Net-Work Environment
Note:
Before installing the product, please refer to the files
INSTALL.TXT and README.TXT in the
root directory and in the product-specific subdirectories of the installation
medium. The file INSTALL.TXT contains information that you
should be aware of before you start the installation. The file
README.TXT contains information that you should be aware
of after the installation has completed and before you start to use the
product.
The general procedure for installing Software AG products on OpenVMS is:
Use Software AG's product Sagbase (product code GBA) to prepare the OpenVMS environment for installation of Software AG's OpenVMS products. Sagbase creates an account and a top-level directory, in which all Software AG OpenVMS products are placed in subdirectories. For further information, see Installing Sagbase on OpenVMS.
Use the command procedure SETUP.COM located on the installation medium to install the product in the OpenVMS environment. SETUP.COM copies the product's PCSI files from the installation medium to the SAG$ROOT:[SAGKITS] directory, changes the default location to this directory and starts the Polycenter Software Installation utility (PCSI).
The PCSI utility guides you through the installation and verifies whether the installation was successful.
After completion of the PCSI installation procedure, some product-specific post-installation steps must be performed as described in the product-specific installation documentation.
When a product consists of several single products, the installation is done within the framework of a product suite.
The following terms are used throughout this documentation.
| version | Refers to a specific version, update package or patch level of the product. |
| platform | This is a text string representing the name of the OpenVMS platform, for example "I64". |
Log in to the OpenVMS system manager's account or equivalent account.
Mount the installation medium using the following command:
MOUNT/OVERRIDE=ID/MEDIA=CD/UNDEF=VAR:CR <device-name>
The /OVERRIDE=ID qualifier is necessary because the volume
label may differ from installation medium to installation medium.
The SETUP.COM procedure leads you through the suite installation automatically. It copies the product suite files from the installation medium to the SAG$ROOT:[SAGKITS] directory and renames the *.PCS files to *.PCSI files.
On the installation medium, a product suite file is located in the subdirectory <installation-medium-device-name>[VMS.<platform>.<product>.<version>]. It is named <product><version>.SUI, for example, NAT6312.SUI. A product suite installation allows you to install the products included in the suite in a single installation sequence.
A suite installation consists of a few single product installations. Thus, it is also possible (apart from the suite installation) to install a product separately.
The suite installation establishes a dependency between the components (single products) of the suite. When a product suite component has to be uninstalled, you will be informed about the consequences of the uninstallation, namely that the dependencies between the product components of the suite will be removed. But it is also possible to uninstall a suite component separately.
The installation package containing Software AG products is provided on an installation medium conforming to the ISO 9660 standard.
The following graphic shows the general directory structure for Software AG products on OpenVMS.
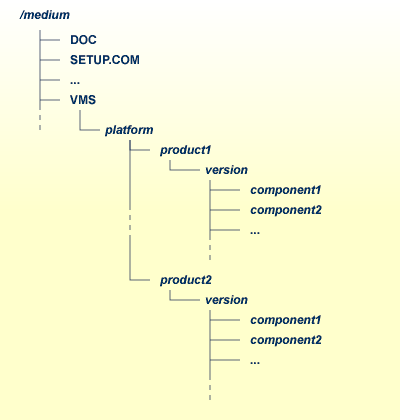
platform in the above graphic may stand for I64 or AXP, and component may stand for a suite file (*.SUI) or a product file (*.PCS).
A single product is saved in the product PCSI file <product><version>.PCS, for example NAT6312.PCS for a Natural installation contained in the <version> directory.
A product suite contains several PCSI files for single products with the file extension PCS and an additional product suite file with the file extension SUI, for example NAT6312.SUI which is also contained in the <version> directory.
The SETUP.COM procedure invokes the installation.
A Software AG product is protected by a license key. Every time the Software AG product starts, the license key is read and the validity of the license key is checked.
Before you start the product installation, you have to copy the license key file to the SYS$LOGIN directory of the installing user.
During the installation, the license key file will be copied automatically from the SYS$LOGIN directory to the SAG$ROOT:[LKEY] directory.
The license key file is provided as an XML document. This document can be viewed using a browsing tool or text editor. It contains text which represents the licensing information and a digital signature. It displays Software AG legal notices, copyright information etc. as well as the product license information.
| Warning: If the license key is modified in any way, the digital signature will become invalid and the license key check will fail. If the check fails, you will not be able to install or run the product. In the event of a check failure, please contact your Software AG Support representative. |
Use the SETUP.COM procedure to copy the product file(s) to the SAG root directory and to start the PCSI installation procedure.
Enter the following command:
SET DEFAULT <installation-medium-device-name>:[000000]
Enter the following command:
@SETUP
The SETUP.COM procedure will prompt you for all information it needs for the installation.
The product kits from the installation medium will be copied to SAG$ROOT:[SAGKITS.<product><version>], for example SAG$ROOT:[SAGKITS.NAT6312].
When prompted to copy the product PCSI file, enter one of the following:
"Y" to copy the product to the SAG$ROOT:[SAGKITS.<platform>_<product><version>] directory.
"N" to copy the product to another location.
The SETUP.COM command procedure displays a success message, if the product PCSI file was successfully copied.
The installation procedure displays the location where you copied the PCSI files.
You have the choice to proceed with the PCSI installation or to interrupt the installation.
When you enter "I", the product will be installed with the PCSI utility. When you press RETURN, you will leave the SETUP.COM procedure. You can continue the installation if you start the SETUP.COM procedure once more.
The command procedure SETUP.COM recognizes what kind of product (a single product or a product suite) is available on the installation medium. It automatically invokes the corresponding kind of product and leads you through the installation.
The PCSI utility requires CMKRNL, SYSLCK,
SYSPRV and TMPMBX privileges. When the
SETPRV privilege is set, the PCSI utility does not check the
privileges before the installation.
Please continue reading the installation instructions for the Software AG product being installed.
Starting with Adabas Version 6.1 and Entire Net-Work Version 7.4, Software AG uses an access control list protection mechanism for Adabas-based products on OpenVMS. This provides a more refined level of protection than that which is available with UIC-based protection.
To make sure your product works in an environment with Adabas Version 6.1 or above or Entire Net-Work Client Version 1.4 or above, the DCL procedure USERADMIN.COM, which is delivered with Adabas products, has to be used. This procedure enables you to give your users access to Adabas and Entire Net-Work. For all users, an account using the USERADMIN.COM procedure has to be created.
USERADMIN.COM resides under SAG$ROOT:[SAGCOMMON].
For more information, see your Adabas documentation, section User Maintenance in Installing Adabas on OpenVMS.
If you use a system-wide Adabas Version 6.1 environment together with your product, you have to make sure that both products use same SAG$ROOT definition. To check this definition, enter the following:
$ mc sysman
sysman> startup show file STARTUP_ADABAS_I64.COM
When an entry for STARTUP_ADABAS_I64.COM exists, check the SAG$ROOT definition at the beginning of this file. You must remove or uncomment this definition if it differs from the SAG$ROOT definition of Sagbase, which is a prerequisite for your product. In such a case, Sagbase makes sure that all products use the same SAG$ROOT definition.