
The test project properties dialog box can be accessed by right-clicking on the relevant test project and selecting . Here you edit the basic properties as well as advanced properties:
See also Host Configuration Parameters.
This node is the first node of the test project properties and provides the most basic test project information. Right-click on an test project to access the general properties.
- Test project name
A unique name defined when first creating the test project. The test project name is read only here but can be changed by right-clicking on the test project and selecting .
- Description
A brief description of the test project.
- Initialization mode
- Automatic
Automatically loaded when the server is started.
- When first accessed
Loaded when first accessed, in other words, when the code that initializes startup is first called (default).
Host Parameters are described in detail in Host Configuration Parameters.
- Host name
The name of the host that is to be connected to your test project (required field).
- Address
The host's TCP/IP address (read only).
- Port
The TCP/IP port to which the host is listening (read only).
- Device Type
The device type of terminal that Natural Screen Tester emulates (read only).
- Protocol
The protocol used to access the host (read only).
- Model
The number of characters per column and per row, in the host's window (read only).
- Code Page
The code page number of the required language for this test project (read only).
- Non-activity timeout
Natural Screen Tester can be defined to disconnect after a certain period of non-activity. When selecting unlimited, the session will stay connected even when there is no activity.
- Wait condition timeout
The default amount of time, in milliseconds, for which the test project waits to receive a screen from the host. For example, in paths, if the user defined a target screen, and it was not reached within this timeout, the user will get an exception. An additional example is in the frameworks, where the user will receive the last screen, and will continue waiting (as the host is still locked). Possible values are from 1000 to 999999 ms.
- Flicker
An amount of time, defined in milliseconds, in which the test project waits for the host to send information. This is necessary, as information may be sent in a few chunks of data, before declaring that it has received the entire screen. This is a value defined for all the test project screens, and can be bypassed using the Wait Conditions. (By default, this value is set to 0). Possible values are from 0 to 10000 ms. Refer to Handling Flickering of Host Screens.
- Blank screen timeout
The amount of time, defined in milliseconds, in which the test project waits after receiving a blank screen, giving the host the opportunity to continue sending the next screen before returning to the client. This is very similar to the flicker parameter, the difference being that the flicker feature waits the complete amount of time defined as oppose to the blank screen timeout which finishes once the screen stops being blank. In addition, this setting only applies to blank screens, and in this way, does not slow down the performance of the entire test project. (Default value: 500 ms). Possible values are from 0 to 10000 ms.
- Work offline
Indicates whether to simulate a communication with the host by using a pre-recorded file. By default, this feature is not enabled.
- Files on server
Lists the trace files which are on the server. Click and browse to copy a file from your local machine to the server.
- Simulate host delay
Allows a session replayed by a GCT to simulate the host's communication delay or to predefine a time delay to wait before showing the information (this is because generally, the test project is faster when replayed). Available values: No delay, Simulate host, 500- 10000 ms (by default No delay is selected).
The Record Trace File feature enables creating a file, which will trace the connection communication (connection pool or user) between the Natural Screen Tester server and the host, for each connection. It is possible to define whether a single trace file will be created, replacing the previously saved file or if the data will be saved to a new file for every new connection or session. Identifying the separately saved files is possible by inserting identifying parameters in the file name (the session ID, connection time and/or connection ID).
- Record display sessions (trace files)
Select this option to enable recording trace files.
- Compress (create files in zip format)
Select this option to compress the file.
- Encrypt (using server private key)
Select this option to encypt the file. In order to encrypt files, you must first define the encryption key (In the Server properties, General tab).
- Suppress hidden fields
Conceals passwords and hidden fields in the trace file.
Note:
The "Suppress hidden fields" option is not supported when recording using Terminal Emulation Proxy.- File name
The name of the trace file. You can create a separate File for each session, or connection and the name can include the session ID, creation time and/or connection ID.
%u will insert the session ID.
%t will insert the time stamp of the connection.
%c will insert the connection ID.
- Location of folder
Browse and select the location of the folder where the files will be stored. Determine whether sub folders will be created for each year/month/day.
- Open recordings folder
Opens the Windows Explorer and displays the location and list of existing trace files.
The Send Options enable to configure how and whether a field is sent to the host when there are mismatches between the field and the host field.
- Throw exception when field content does not match host field attributes
When the field does not match the host field attributes, for example, when the value to be entered is longer than the field length, or the field is not found, or the cursor position is not in an unprotected field, an error will occur.
- When field content is longer than host field length...
When the field content is longer than the host field it is possible to select the option that this field will not be sent to the host, or that the contents of the field will be cut to match the host field size.
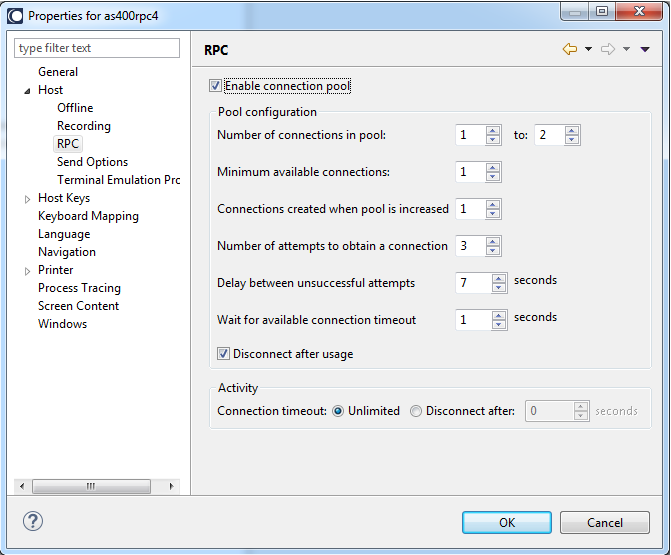
Available in test projects associated with AS/400 only.
In the RPC tab, connection parameters for the Natural Screen Tester Program Calls. This is enabled only for AS/400 hosts.
- Enable connection pool
Selecting this check box indicates that the server should maintain a pool of connections.
- Number of connections in pool
The minimum and maximum number of connections it is possible to have in the pool at one given time.
- Minimum available connections
The minimal number of connections in the pool that are ready to serve a transaction. If the number of available connections in the pool falls below this number, new connections will be created until the minimum is reached.
- Connections created when pool is increased
The number of connections created each time the pool size is increased.
- Number of attempts to obtain a connection
The number of attempts to create a connection.
- Delay between unsuccessful attempts
The time, in milliseconds, before retrying to obtain a connection.
- Wait for available connection timeout
If no connections are available in the connection pool, the length of time to wait for an available connection before a timeout message is sent.
- Connection timeout
The total time, in minutes, that a connection can exist. Setting the value to "Unlimited" sets no timeout. After the set time elapses the connection is terminated.
- Disconnect after usage
This checkbox determines whether to restart the connection once a user finishes using a connection or to terminate the connection when it is returned to the pool. When checked, the connection is terminated after usage.
This feature enables redirecting emulation network traffic to pass through the port configured in this screen (only relevant for AS/400 and Mainframe hosts).
- Use Terminal Emulation Proxy
Select this check box to use the Terminal Emulation Proxy option.
Note:
When recording using Terminal Emulation Proxy, the "Suppress hidden fields" option is not supported.- Terminal Emulation Proxy port
Enter the port number through which you would like to redirect the emulation network traffic.
Use the Keyboard Mappings node to map host keys to keyboard keys.
- Keyboard key/s
The combination of keyboard keys such as Shift+W. The values in this field are entered into the field as they are pressed on the keyboard.
Note:
When using the keyboard keys within the web test project, the CTRL+N and CTRL+K keys are blocked by default as they cause multiple browser windows to use the same session (this can be manually set in the config/gx_keyboardMappings.xml file).- Command
Determines the host key that will be sent. The host key should be in square brackets and can be selected from the standard host keys list to the right of the Host key field.
The Language node enables you to define the language used in the test project as well as direction settings, relevant mainly for right-to-left languages.
- Language
The test project's language.
The following settings are relevant for right-to-left languages. The option you select is the default setting for all the screens, but can be changed for a specific screen in the relevant screen identification properties.
- Screen direction
Relevant for mainframe hosts only. The screen direction of right-to-left languages differs according to the original host settings, and when incorrectly set, can cause the screen to be illegible. In order to correct this, define the suitable screen direction.
- Typing direction
Right-to-left languages may display typed-in text in the client test project text fields, aligned to the left of the field. In order to display the text aligned to the right, select the right-to-left option. Numeric type fields typing direction will always be left-to-right.
- Tab direction
When pressing the button the cursor moves to the next consecutive field. The direction the cursor moves (moving to the next field to the left or moving to the next field to the right) must be correctly defined in order to preserve the screen logic.
- Enable map steps recording while navigating in session
Once selected, the test project map will record the navigation steps between the screens.
- Exception path
An Exception path is initiated once a test case procedure that is being executed reaches a screen that is not defined as the To Screen of the step that was executed or as the From Screen of the next step to be executed. When such a screen is reached, Natural Screen Tester immediately searches (ignoring the wait condition timeout) for the Exception Path that has been defined. If an Exception path is found, it is executed. Natural Screen Tester will then try to continue the original path from the point before the Exception Path was initiated. The attempt to find and execute a suitable Exception path will be repeated as many as 30 times, after which the original path will fail to be executed.
- Replace padding characters with space
Some hosts fill input fields with a character such as underscores or dots (following the actual content of the field). You may define that Natural Screen Tester replaces this character in the input field with spaces when the server sends the field's contents to the client. It is possible to define up to two padding characters.
The radio buttons enable applying this to all fields or only to input (unprotected) fields (input fields also include test project fields with "both" protection type - protected and unprotected).
- Remove from both sides of text
This field determines whether the padding character will be removed from both sides of the field or just from one side (in LTR test projects the character will be removed from the right side, and in RTL test projects the character will be removed from the left side). In numeric type input fields, the characters are removed from both sides of the content (as it is clearly not a number).
- Trim Fields
Some hosts fill input fields with spaces (following the actual content of the field). You may instruct Natural Screen Tester to remove the spaces from the content of the input field.
The radio buttons enable applying this to all fields or only to input (unprotected) fields or input fields and test project fields with "both" protection type - protected and unprotected).
- Remove from both sides of text
This field determines whether the spaces will be removed from both sides of the field or just from one side (in LTR test projects the character will be removed from the right side, and in RTL test projects the character will be removed from the left side). In numeric type input fields, the characters are removed from both sides of the content (as it is clearly not a number).
- Return Content of Hidden Fields
Some hosts have hidden fields in the screen. Usually these fields' visibility depends on the context of the screen. By default, Natural Screen Tester does not return the content of these fields because the user in an emulator cannot see them. However, sometimes their content can be important and one may want to access it (for example, hidden fields can be used as screen identifiers, or as a part of a test case procedure's logic). Check the Return content of hidden fields check box to return the content of all hidden fields in the test project.
- Split fields when an attribute changes (color, blinking etc.)
This field determines whether when an attribute changes in the middle of a field, this field will be split.
In the Designer, you can describe the way a window is displayed in the host. The Window definitions are used to correctly identify screens and to open host windows as separate pop-up windows. Click the or button to make any changes.
Note:
When the host is a Natural UNIX host, this tab is disabled, as the
windows' definitions are included in the Natural-Unix protocol and do not
require being defined via Natural Screen Tester.
- List of host windows
The list of host windows is displayed here. Add or remove windows by clicking on the relevant button. When adding a window you are required to select the type of modal windows the host sends. There are two types: Reversed Video or Frame. For test projects that have more than one level of windows (a window within a window), where each level is defined with a different Window Type, be sure to define the windows in the correct order.
- Attributes
- Frame is intensified
One of the parameters that assist in recognizing windows. This parameter determines whether the frame will be recognized as a window when the frame is intensified.
- Frame with title
One of the parameters that assist in recognizing windows. This parameter determines whether the frame will be recognized as a window if the frame has a title.
- Identify window even though unprotected fields exist outside window area
This field determines whether or not an area that seemingly could be identified as a window will be recognized as one, even though there are unprotected fields outside the window area. Note: When a window is identified within a screen, and working with modal windows, it is not possible to edit unprotected fields outside the window area.
- Content
- Remove window frame
Characters appear on the first line of the screen without the window frame. Suitable typically for Natural mapping test projects.
- Display window title
Displays the window title in the window frame to be viewed.
- Frame characters
- Vertical
The character used for the host's modal window vertical lines. The character can be either typed in, or selected from the list of characters.
- Horizontal
The character used for the host's modal window horizontal lines. The character can be either typed in, or selected from the list of characters.
- Corners
The character used for the host's modal window corners. The character can be either typed in, or selected from the list of characters.
- Synchronize corners
Defines that all four corners of the window frame are the same character (default). When selecting this option, define the character for each of the corners (upper-left, lower-left, upper-right and lower-right).