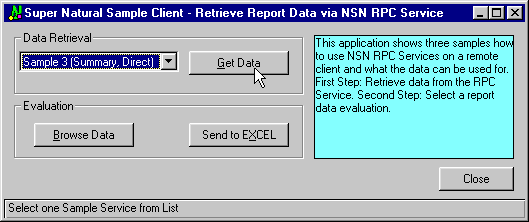
This transaction uses the summary function to show cumulated data for statistical purposes. The RPC Generation is executed in Direct Mode.
Your administrator has to set the Service Type of the Service Generation
Options in you user profile to R.
If you Server is running under Natural Security, you have to set up your RPC example client to run this example correctly.
 To set up the RPC sample client for Natural Security
Execute the Program USR1071P from the system library SYSEXT in your Natural for Windows.
Fill the following fields in the appearing screens as follows:
Set RPC Data field to
X
Set Code field to
T
Set User-ID field to the Logon-ID of Natural Mainframe
Set User ID's Password field to the Password of Natural Mainframe
| Primary File | SAG-TOURS-E-CONTRACT |
| Display System Functions | cnt DATE-BOOKING sum PRICE avg PRICE max PRICE min PRICE old BOOK-MONTH |
| Control Field | C1: DATE-BOOKING |
| Selection Criteria | DATE-BOOKING = 19910101 THRU 19911231 AND DATE-CANCELLATION EQ 0 |
This section covers the following topics:
 To Add a Transaction
Issue the ADD TRANSACTION SAMPLE11
command.
The Add Transaction window appears with the transaction name already entered in the Transaction ID field.
 To Choose File
The report requires data from the file SAG-TOURS-E-CONTRACT.
Type the file name SAG-TOURS-E-CONTRACT in the
File Name field. You can alternatively use the
Asterisk (*) List function.
Press Enter.
The Worksheet appears.
 To Choose Fields
The report requires data stored in the fields CONTRACT-ID, PRICE, DATE-BOOKING and DATE-CANCELLATION.
Choose the fields as described in Step 3 of Sample 1.
 To Create the User Field BOOK-MONTH
Type BOOK-MONTH into the Field Name column and press Enter.
The Define User Field window appears:
Fill in the required information as shown in the following screen:
 20:41                      ***** SUPER NATURAL *****                 2000-10-17
 SAMPLE11                          - Worksheet -                           SN3011
                           !------------------------------------------------------!
 Ref DB    Field Name      !                  Define User Field                   !
 AA  1K    CONTRACT-ID ... !  Field: BOOK-MONTH                                   !
 AC  1     PRICE ......... !                                                      !
 AF  1K    DATE-BOOKING .. !  Name or value .. BOOK-MONTH______________________   !
 AG  1K    DATE-CANCELLATI !  Format ......... n                                  !
 AR        BOOK-MONTH_____ !  Length ......... 6 _                                !
 AS        _______________ !  Dec. places .... _                                  !
 AT        _______________ !  Subfield of .... DATE-BOOKING____________________   !
 AU        _______________ !  Offset ......... ___                                !
 AV        _______________ !  Dynamic input .. _                                  !
 AW        _______________ !------------------------------------------------------!
 AX        _______________
 AY        ________________________________
 AZ        ________________________________
 BA        ________________________________


 Command ===>
 Enter-PF1---PF2---PF3---PF4---PF5---PF6---PF7---PF8---PF9---PF10--PF11--PF12---
Help Exit Flip Canc |
Press Enter.
The Worksheet appears. The field BOOK-MONTH is inserted as a user field.
 To Create the Control Break
Type "C1" in the Control column next to the field DATE-BOOKING.
 To Define the System Function
Type "SF" in the Func column next to the field PRICE.
Press Enter.
The Specify System Functions screen appears.
Mark Sum, Avg, Max and Min next to the Control Field DATE-BOOKING.
Type "SF" in the Func column next to the field DATE-BOOKING.
Press Enter.
The Specify System Functions window appears.
Mark Cnt next to the Control Field DATE-BOOKING.
Press Enter.
The Worksheet appears.
 To Determine Display Sequence
Type "1" in the Sequence column next to the field BOOK-MONTH.
Now your worksheet looks as follows:
 10:46                      ***** SUPER NATURAL *****                 2000-10-04
 SAMPLE11                         - Worksheet -                           SN3011

 Ref DB    Field Name                         Seq   S/C  Func Def  Info Del
 AA  1K    CONTRACT-ID ....................   ___   ___   __   __   __   __
 AC  1     PRICE ..........................   ___   ___   >_   __   __
 AF  1K    DATE-BOOKING ...................   ___   C1_   >_   __   __
 AG  1K    DATE-CANCELLATION ..............   ___   ___   __   __   __
 AR   U    BOOK-MONTH .....................   1__   ___   __   __   __
 AS        ________________________________
 AT        ________________________________
 AU        ________________________________
 AV        ________________________________
 AW        ________________________________
 AX        ________________________________
 AY        ________________________________
 AZ        ________________________________
 BA        ________________________________


 Enter "*" in Fieldname column to select fields or enter NEXT
 Command ===>
 Enter-PF1---PF2---PF3---PF4---PF5---PF6---PF7---PF8---PF9---PF10--PF11--PF12---
Help Next Exit Field Incl Flip - + Sel Run Canc |
 To Define Selection Criteria
The report requires information on the Date of booking and cancellation.
Press PF10.
The SELECTION command is issued and the
Selection Editor appears.
Enter "DATE-BOOKING = 19910101 THRU 19911231 AND DATE-CANCELLATION EQ 0" in the editor area.
The Selection Editor has the following content:
 10:49                      ***** SUPER NATURAL *****                 2000-10-04
 SAMPLE11                       - Selection Editor -                      SNZUL-S


       1  < DATE-BOOKING = 19910101 THRU 19911231                        >    1
       2  < AND DATE-CANCELLATION EQ 0                                   >    2
       3  <                                                              >    3
       4  <                                                              >    4
       5  <                                                              >    5
       6  <                                                              >    6
       7  <                                                              >    7
       8  <                                                              >    8
       9  <                                                              >    9
      10  <                                                              >   10
      11  <                                                              >   11
      12  <                                                              >   12
      13  <                                                              >   13
      14  <                                                              >   14
      15  <                                                              >   15

 Define selection lines or use CONTINUE
 Command ===>
 Enter-PF1---PF2---PF3---PF4---PF5---PF6---PF7---PF8---PF9---PF10--PF11--PF12---
Help Next Exit Field Check Flip - + Cont Run Canc |
 To Run the Transaction
Issue the RUN command. This command is
allocated to PF11.
Press Enter.
The report is displayed.
 2000-10-17  DATE-BOOKING = 19910101 THRU 19911231                         1
 20:55:09    AND DATE-CANCELLATION EQ 0
 SAMPLE11
      BOOK-MONTH
      ----------

 ** Control Break (1) **
      DATE-BOOKING :   19910127
 Old      199101
 Cnt       DATE-BOOKING =       100
 Sum       PRICE =          415590.000
 Avg       PRICE =            4155.900
 Max       PRICE =           18700.000
 Min       PRICE =            1360.000


 Enter-PF1---PF2---PF3---PF4---PF5---PF6---PF7---PF8---PF9---PF10--PF11--PF12---
Print Exit Flip + Canc |
Press PF3.
The Worksheet appears again.
 To generate the RPC Service for the transaction SAMPLE11
Issue the command GENERATE RPC in the
Worksheet of the transaction SAMPLE11 and press Enter.
The following window appears:
 10:56                      ***** SUPER NATURAL *****                 2000-10-04
 SAMPLE11                          - Worksheet -                           SN3011
                                      !-----------------------------------------!
 Ref DB    Field Name                 !         RPC-Service Generation          !
 AA  1K    CONTRACT-ID .............  !                                         !
 AC  1     PRICE ...................  ! The RPC Service will be stored with     !
 AF  1K    DATE-BOOKING ............  !     Object Name ..............          !
 AG  1K    DATE-CANCELLATION .......  !     in Library ...............          !
 AR   U    BOOK-MONTH ..............  !     with Generation Mode ..... Direct   !
 AS        _________________________  !     and Result Record Limit .. 5        !
 AT        _________________________  !                                         !
 AU        _________________________  !   _  Generate with these options        !
 AV        _________________________  !   X  Change options before generation   !
 AW        _________________________  !   _  Modify Transaction                 !
 AX        _________________________  !-----------------------------------------!
 AY        _________________________
 AZ        ________________________________
 BA        ________________________________


 Command ===>
 Enter-PF1---PF2---PF3---PF4---PF5---PF6---PF7---PF8---PF9---PF10--PF11--PF12---
Flip Canc |
Mark the option Change options before generation and press Enter.
The following window appears:
 20:57                      ***** SUPER NATURAL *****                 2000-10-17
 SAMPLE11                          - Worksheet -                           SN3011
                                  !---------------------------------------------!
 Ref DB    Field Name             !   RPC-Service - Modify Generation Options   !
 AA  1K    CONTRACT-ID .........  !                                             !
 AC  1     PRICE ...............  !  RPC Service Object Name ........           !
 AF  1K    DATE-BOOKING ........  !              Library ............           !
 AG  1K    DATE-CANCELLATION ...  !                                             !
 AR   U    BOOK-MONTH ..........  !  Generation Mode ................ D  Direct !
 AS        _____________________  !  Limit of Result Records ........ 5______   !
 AT        _____________________  !  (Max. possible Result Records .. 714     ) !
 AU        _____________________  !---------------------------------------------!
 AV        _____________________      !                                !
 AW        _________________________  !   _  Modify Transaction        !
 AX        _________________________  !--------------------------------!
 AY        _________________________
 AZ        ________________________________
 BA        ________________________________


 Command ===>
 Enter-PF1---PF2---PF3---PF4---PF5---PF6---PF7---PF8---PF9---PF10--PF11--PF12---
Flip Canc |
Specify the RPC Service Object Name "RPCSMPL3" and the Library NSNSAMPL to generate the RPC Service.
Select Generation Mode Direct.
Set the Record Limit to "5" and press Enter to limit the number of retrieved records.
Press Enter.
The RPC Service is generated. You can view it by logging on to the respective library and choosing the RPC Service Object. You will find the description of the source in the Administration documentation.
 To proceed the data on your PC
Before you can work with the generated RPC Service, you have to set up your Natural environment and load the example data from the Documentation CD to your Natural for Windows environment. You will find the description how to set up your environment for the RPC Service in Setting up Super Natural.
Open your Natural for Windows.
Execute by using the Execute button in
the symbol list.
The following dialog appears:

Select Sample 3 (Summary, Direct) in the Data Retrieval field.
Choose Get Data to load the sample
data.
Select OK.
The data is loaded from your mainframe environment and displayed on your PC where you can browse the data.
In order to proceed with this data on your PC, send it to Excel by
selecting the Send to Excel button.
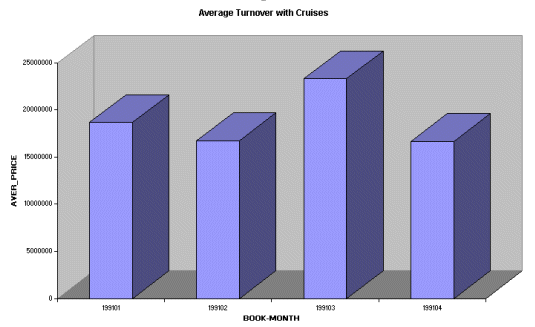
The selected data is sent to Excel, inserted into a table and displayed as a chart.
