
This transaction uses dynamic input fields to enable you to view different ranges of data each time you run it. The RPC Generation is executed in Context mode.
Your administrator has to set the Service Type of the Service Generation
Options in you user profile to R.
If you Server is running under Natural Security, you have to set up your RPC example client to run this example correctly.
![]() To set up the RPC sample client for Natural Security
To set up the RPC sample client for Natural Security
Execute the Program USR1071P from the system library SYSEXT in your Natural for Windows.
Fill the following fields in the appearing screens as follows:
Set RPC Data field to
X
Set Code field to
T
Set User-ID field to the Logon-ID of Natural Mainframe
Set User ID's Password field to the Password of Natural Mainframe
| Primary File | SAG-TOURS-E-PERSON |
| Display Fields | 1: FIRST-NAME-1 2: SURNAME 4: STREET-NUMBER 6: ZIP-CODE 7: CITY 9: COUNTRY |
| Sort Fields | S1: COUNTRY S2: SURNAME |
| Dynamic Input Fields | NAME-START NAME-END |
| Selection Criteria | SURNAME = NAME-START THRU NAME-END |
This section covers the following topics:
![]() To Add a Transaction
To Add a Transaction
Issue the ADD TRANSACTION SAMPLE10
command.
The Add Transaction window appears with the transaction name already entered in the Transaction ID field.
Type the description "Dynamic Input Fields in the Description field" (optional).
![]() To Choose File
To Choose File
The report requires data from the fileSAG-TOURS-E-PERSON.
Type the file name SAG-TOURS-E-PERSON in the
File Name field. You can alternatively use the
Asterisk (*) List function.
Press Enter.
The Worksheet appears.
![]() To Choose Fields
To Choose Fields
The report requires data stored in the fields SURNAME, FIRST-NAME-1, STREET-NUMBER, COUNTRY, ZIP-CODE and CITY.
Choose the fields as described in Step 3 of Sample 1.
![]() To Determine Display Sequence
To Determine Display Sequence
Type " 1" in the Sequence column next to the field FIRST-NAME-1.
Type "2" in the Sequence column next to the field SURNAME.
Type "4" in the Sequence column next to the field STREET-NUMBER.
Type "6" in the Sequence column next to the field ZIP-CODE.
Type "7" in the Sequence column next to the field CITY.
Type "9" in the Sequence column next to the field COUNTRY.
![]() To Define Sort Order
To Define Sort Order
Type "S1" in the S/C column next to the field COUNTRY.
Type "S2" in the S/C column next to the field SURNAME.
![]() To Define Dynamic Input Fields
To Define Dynamic Input Fields
Type NAME-START into the Field Name column and press Enter.
The Define User Field window appears:
Fill in the required information as shown in the following screen:
 20:10                      ***** SUPER NATURAL *****                 2000-10-17
 SAMPLE10                          - Worksheet -                           SN3011
                           !------------------------------------------------------!
 Ref DB    Field Name      !                  Define User Field                   !
 AE  1K 2  SURNAME ....... !  Field: NAME-START                                   !
 AF  1  2  FIRST-NAME-1 .. !                                                      !
 AL  1  2  STREET-NUMBER . !  Name or value .. NAME-START____________________     !
 AM  1K 2  COUNTRY ....... !  Format ......... a                                  !
 AN  1K 2  ZIP-CODE ...... !  Length ......... 20_                                !
 AO  1K 2  CITY .......... !  Dec. places .... _                                  !
 BI        NAME-START .... !  Subfield of .... ________________________________   !
 BJ        _______________ !  Offset ......... ___                                !
 BK        _______________ !  Dynamic input .. #                                  !
 BL        _______________ !------------------------------------------------------!
 BM        _______________
 BN        ________________________________
 BO        ________________________________
 BP        ________________________________


 Command ===>
 Enter-PF1---PF2---PF3---PF4---PF5---PF6---PF7---PF8---PF9---PF10--PF11--PF12---
Help Exit Flip Canc |
Press Enter.
The Worksheet appears. The field NAME-START is inserted as a dynamic input field.
Proceed for the dynamic input field NAME-END just as NAME-START.
Now your Worksheet looks as follows:
 20:18                      ***** SUPER NATURAL *****                 2000-10-17
 A-SMPL2                          - Worksheet -                           SN3011

 Ref DB    Field Name                         Seq   S/C  Func Def  Info Del
 AE  1K 2  SURNAME ........................   2__   S2_   __   __   __
 AF  1  2  FIRST-NAME-1 ...................   1__   ___   __   __   __
 AL  1  2  STREET-NUMBER ..................   4__   ___   __   __   __
 AM  1K 2  COUNTRY ........................   9__   S1_   __   __   __
 AN  1K 2  ZIP-CODE .......................   6__   ___   __   __   __
 AO  1K 2  CITY ...........................   7__   ___   __   __   __
 BI   #    NAME-START .....................   ___   ___   __   __   __
 BJ   #    NAME-END .......................   ___   ___   __   __   __
 BK        ________________________________
 BL        ________________________________
 BM        ________________________________
 BN        ________________________________
 BO        ________________________________
 BP        ________________________________


 Fill in required definitions
 Command ===>
 Enter-PF1---PF2---PF3---PF4---PF5---PF6---PF7---PF8---PF9---PF10--PF11--PF12---
Help Next Exit Field Incl Flip - + Sel Run Canc |
![]() To Define Selection Criteria
To Define Selection Criteria
The report requires information on the field SURNAME. You must use two dynamic input fields in which you can enter the first value of the field SURNAME you want to see and the last value you want to see when the transaction is run.
Press PF10.
The SELECTION command is issued and the
Selection Editor appears.
Enter "SURNAME = NAME-START THRU NAME-END" in the editor area.
The Selection Editor has the following content:
 10:08                      ***** SUPER NATURAL *****                 2000-10-04
 SAMPLE10                       - Selection Editor -                      SNZUL-S


       1  < SURNAME = NAME-START THRU NAME-END                           >    1
       2  <                                                              >    2
       3  <                                                              >    3
       4  <                                                              >    4
       5  <                                                              >    5
       6  <                                                              >    6
       7  <                                                              >    7
       8  <                                                              >    8
       9  <                                                              >    9
      10  <                                                              >   10
      11  <                                                              >   11
      12  <                                                              >   12
      13  <                                                              >   13
      14  <                                                              >   14
      15  <                                                              >   15

 Define selection lines or use CONTINUE
 Command ===>
 Enter-PF1---PF2---PF3---PF4---PF5---PF6---PF7---PF8---PF9---PF10--PF11--PF12---
Help Next Exit Field Check Flip - + Cont Run Canc |
![]() To Run the Transaction
To Run the Transaction
Issue the RUN command. This command is
allocated to PF11.
Press Enter
The following dialog appears:
 10:08                      ***** SUPER NATURAL *****                 2000-10-04
 SAMPLE10                       - Selection Editor -                      SNZUL-S
                                          !-------------------------------------!
                                          !         Dynamic Input Value         !
       1  < SURNAME = NAME-START THRU NAM !   Transaction:  SAMPLE10            !
       2  <                               !                                     !
       3  <                               !  NAME-START .. g___________________ !
       4  <                               !  NAME-END .... k___________________ !
       5  <                               !                                     !
       6  <                               !-------------------------------------!
       7  <                                                              >    7
       8  <                                                              >    8
       9  <                                                              >    9
      10  <                                                              >   10
      11  <                                                              >   11
      12  <                                                              >   12
      13  <                                                              >   13
      14  <                                                              >   14
      15  <                                                              >   15

 Define selection lines or use CONTINUE

 Enter-PF1---PF2---PF3---PF4---PF5---PF6---PF7---PF8---PF9---PF10--PF11--PF12---
Print Exit Flip + Posi < > Canc |
Enter the Start and End value and press Enter.
The report is displayed:
 2000-10-04  SURNAME = NAME-START THRU NAME-END                            1
 10:13:20
 SAMPLE10
     FIRST-NAME-1           SURNAME           STREET-NUMBER      ZIP-CODE
 -------------------- -------------------- -------------------- ---------- -----

 ANDREAS              GASSNER              KAERTNER STR. 9      7000       STUTT
 PETRA                GOLDSTEIN            WALDWEG 8            8190       WOLFR
 HEINZ                GRAF                 SCHLOSSWEG 1         6100       GRIES
 MARGARETHE           GROTH                BEETHOVENSTR. 34     6000       FRANK
 JOPP                 GROTHE               WIELANDSTR. 109      6000       FRANK
 FLORIAN              GRUBER               DIEBURGERSTR. 54     6100       DARMS
 ESTER                GRUENBERG            ROSENWEG 17          6103       GRIES
 MARTHA               GUHLICH              THERESE GIESE STR 89 6450       HANAU
 ROSWITHA             HAIBACH              POSTFACH 332         6450       HANAU
 YASMIN               HASSEIN              DOMWEG 8             6000       FRANK
 CORNELIA             HECK                 MARIENSTRASSE 18     8000       MUENC
 CLEMENS              HEILBROCK            OPELSTRASSE 49       6000       FRANK
 GERHARD              HEINZELMANN          VIKTORIASTR. 43      6100       DARMS
 JOHANNA              HELDMANN             DARMSTAEDTERWEG 34   6104       SEEHE
 ANTON                HESCHMANN            MEERKATZSTR. 8       6000       FRANK

 Enter-PF1---PF2---PF3---PF4---PF5---PF6---PF7---PF8---PF9---PF10--PF11--PF12---
Print Exit Flip + Posi < > Canc |
 2000-10-04  SURNAME = NAME-START THRU NAME-END                            13
 10:14:11
 SAMPLE10
     FIRST-NAME-1           SURNAME           STREET-NUMBER      ZIP-CODE
 -------------------- -------------------- -------------------- ---------- -----

  *** End of report ***

  Number of records processed: = 178
|
Press PF3.
The Worksheet appears:
 10:15                      ***** SUPER NATURAL *****                 2000-10-04
 SAMPLE10                          - Worksheet -                           SN3011

 Ref DB    Field Name                         Seq   S/C  Func Def  Info Del
 AE  1K 2  SURNAME ........................   2__   S2_   __   __   __
 AF  1  2  FIRST-NAME-1 ...................   1__   ___   __   __   __
 AL  1  2  STREET-NUMBER ..................   4__   ___   __   __   __
 AM  1K 2  COUNTRY ........................   9__   S1_   __   __   __
 AN  1K 2  ZIP-CODE .......................   6__   ___   __   __   __
 AO  1K 2  CITY ...........................   7__   ___   __   __   __
 BI   #    NAME-START .....................   ___   ___   __   __   __
 BJ   #    NAME-END .......................   ___   ___   __   __   __
 BK        ________________________________
 BL        ________________________________
 BM        ________________________________
 BN        ________________________________
 BO        ________________________________
 BP        ________________________________


 SELECTION successfully terminated
 Command ===>
 Enter-PF1---PF2---PF3---PF4---PF5---PF6---PF7---PF8---PF9---PF10--PF11--PF12---
Help Next Exit Field Incl Flip - + Sel Run Canc |
![]() To generate the RPC Service for the transaction SAMPLE10
To generate the RPC Service for the transaction SAMPLE10
Issue the command GENERATE RPC in the
Worksheet of the transaction SAMPLE10 and press Enter.
The following window appears:
 10:15                      ***** SUPER NATURAL *****                 2000-10-04
 SAMPLE10                          - Worksheet -                           SN3011
                                      !------------------------------------------!
 Ref DB    Field Name                 !         RPC-Service Generation           !
 AE  1K 2  SURNAME .................  !                                          !
 AF  1  2  FIRST-NAME-1 ............  ! The RPC Service will be stored with      !
 AL  1  2  STREET-NUMBER ...........  !     Object Name ..............           !
 AM  1K 2  COUNTRY .................  !     in Library ...............           !
 AN  1K 2  ZIP-CODE ................  !     with Generation Mode ..... Context   !
 AO  1K 2  CITY ....................  !     and Result Record Limit .. 1638      !
 BI   #    NAME-START ..............  !                                          !
 BJ   #    NAME-END ................  !   _  Generate with these options         !
 BK        _________________________  !   X  Change options before generation    !
 BL        _________________________  !   _  Modify Transaction                  !
 BM        _________________________  !------------------------------------------!
 BN        _________________________
 BO        ________________________________
 BP        ________________________________


 Command ===>
 Enter-PF1---PF2---PF3---PF4---PF5---PF6---PF7---PF8---PF9---PF10--PF11--PF12---
Flip Canc |
Mark the option Change options before generation and press Enter.
The following window appears:
 20:18                      ***** SUPER NATURAL *****                 2000-10-17
 A-SMPL2                          - Worksheet -                           SN3011
                                 !----------------------------------------------!
 Ref DB    Field Name            !   RPC-Service - Modify Generation Options    !
 AE  1K 2  SURNAME ............  !                                              !
 AF  1  2  FIRST-NAME-1 .......  !  RPC Service Object Name ........ ________   !
 AL  1  2  STREET-NUMBER ......  !              Library ............ ________   !
 AM  1K 2  COUNTRY ............  !                                              !
 AN  1K 2  ZIP-CODE ...........  !  Generation Mode ................ C  Context !
 AO  1K 2  CITY ...............  !  Limit of Result Records ........ 1638___    !
 BI   #    NAME-START .........  !  (Max. possible Result Records .. 1638    )  !
 BJ   #    NAME-END ...........  !----------------------------------------------!
 BK        ____________________        !                         !
 BL        _________________________   !  _  Modify Transaction  !
 BM        _________________________   !-------------------------!
 BN        _________________________
 BO        ________________________________
 BP        ________________________________


 Command ===>
 Enter-PF1---PF2---PF3---PF4---PF5---PF6---PF7---PF8---PF9---PF10--PF11--PF12---
Flip Canc |
Specify the RPC Service Object Name "RPCSMPL2" and the Library NSNSAMPL to generate the RPC Service.
Select Generation Mode Context.
Delete the Record Limit and press Enter to receive the recommended record limit for the generation.
Press Enter.
The RPC Service is generated. You can view it by logging on to the respective library and choosing the RPC Service Object. You will find the description of the source in the Administration documentation.
![]() To proceed the data on your PC
To proceed the data on your PC
Before you can work with the generated RPC Service, you have to set up your Natural environment and load the example data from the Documentation CD to your Natural for Windows environment. You will find the description how to set up your environment for the RPC Service in Setting up Super Natural.
Open your Natural for Windows.
Execute by using the Execute button in
the symbol list.
The following dialog appears:
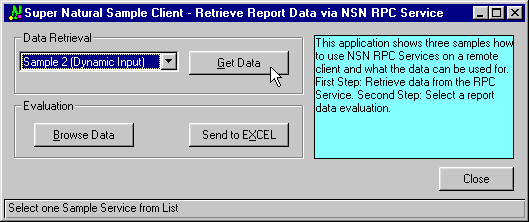
Select Sample 2 (Dynamic Input) in the Data Retrieval field.
Choose Get Data to load the sample
data.
The following dialog appears:

Enter the start and end value as dynamic input.
Select OK.
The data is loaded from your mainframe environment and displayed on your PC where you can browse the data.
In order to proceed with this data on your PC, send it to Excel by
selecting the Send to Excel button.
The selected data is sent to Excel and inserted into a table.