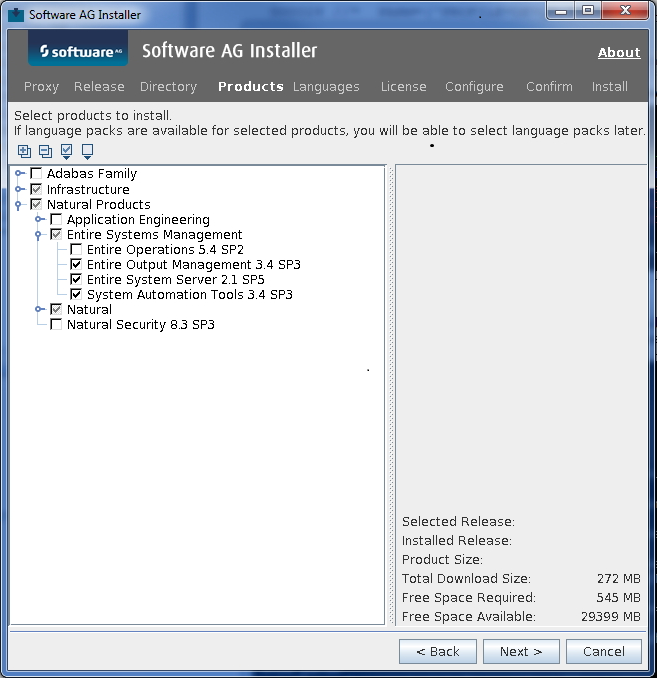
This installation documentation provides just a brief description on how to install Entire Output Management directly on the target machine using the Software AG Installer GUI. For detailed information on the Software AG Installer, see Using the Software AG Installer.
 To install Entire Output Management
Software AG provides license files for Entire Output
Management. Copy the license file to the machine on which you want to install
Entire Output Management. You can copy the license file to any temporary
location. The installer will ask for the location of your license file and will
then copy it to the common/conf directory of your installation
directory.
Start the Software AG Installer GUI as described in Using the Software AG Installer.
When the first page of the Software AG Installer GUI (the so-called Welcome panel) is shown, choose the button repeatedly (and specify all required information on the shown panels as described in Using the Software AG Installer) until the panel containing the product selection tree appears. This tree lists the products you have licensed and which can be installed on the operating system of the machine on which you are installing.
To install Entire Output Management with all of its product components, expand the Natural Products node and select Entire Systems Management > Entire Output Management 3.4 SP3.
Or:
Expand Natural Products > Entire Systems Management >
Entire Output Management and select the product components that you
want to install.

Note:
Products or product versions which are already installed in the
selected installation directory are shown as disabled.
The following products are prerequisites and will be selected as well, if they are not already installed:
Natural
Entire System Server
System Automation Tools
The installer automatically selects any additional components which are also required. If you have not yet installed the Natural development environment, these components are automatically selected.
Entire Output Management also requires Adabas. However, since it is possible to use a remote Adabas installation or an older Adabas version, this is not automatically selected in the tree.
Choose the button.
Read the license agreement, select the check box to agree to the terms of the license agreement, and choose the button.
Note:
If you are installing other products together with Entire Output
Management, several panels may appear that are not explained in this
documentation. See the documentation for these products for more
information.
First-time installation only. Depending on your selection in the tree, the installer may ask for a license file. Enter the full path to the license file (or use the button to select it from a dialog box), and choose the button.
On the last panel, review the list of products and items you have selected for installation. If the list is correct, choose the button to start the installation process.
When the Software AG Installer has completed the first-time installation, additional configuration steps are required. See Completing the Installation for further details.