
This document covers the following topics:
Natural for Ajax is based on running HTML pages in a browser. These pages are designed as XML page layouts.
Test automation tools like Selenium (see http://docs.seleniumhq.org/) need to locate specific HTML elements in an HTML page to either check or adapt the content or to trigger corresponding events. In a Selenium test program, the developer usually passes identifiers using the Selenium Java API which enable Selenium to locate the elements for testing.
For stable automated tests, it is extremely important to use
stable identifiers. For instance, rearranging controls in a layout or adding an
additional control must not change the identifiers. For the most common
controls, Natural for Ajax automatically generates stable identifiers, the
so-called "test tool IDs". They are generated as
data-testtoolid attributes into the HTML page. Test tools like
Selenium can use this data-testtoolid attribute to locate the
element.
The following gives a brief introduction for using stable identifiers in Natural for Ajax applications.
All Natural for Ajax applications automatically generate stable identifiers for the most common controls. So a developer need not do anything to set them.
Let us have a look at the helloworld.xml page layout of the njxdemos. The most interesting controls for automated tests are the FIELD and BUTTON controls.
In the following example, you see that the
valueprop property is set in the FIELD control,
but the testtoolid property is not explicitly
set.
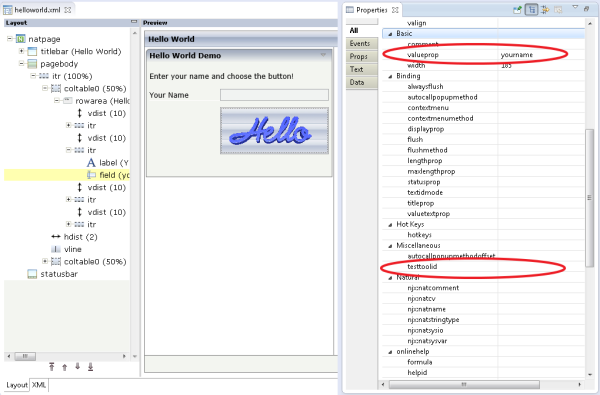
If a value for the testtoolid
property is not explicitly set in a FIELD control, the HTML will contain a
data-testtoolid attribute with the value of the
valueprop property. This is shown in the HTML snippet below. You
do not need to understand all the HTML details. The snippet just shows that a
data-testtoolid attribute is automatically
generated for a FIELD control; you do not have to do anything.
...
<input id="F_13" name="CC" class='FIELDInputEdit'
data-testtoolid='yourname' type="text" style="width: 185px;">
...
Caution:
The above HTML code contains the id attribute
with the value F_13. Do not use this in your test tool. It will
break your tests sooner or later because it is not stable. For example, if you
add another FIELD control in front of the yourname FIELD control,
the id of the yourname FIELD control will change its
value to F_14.
In the BUTTON control, the method
property is set. Again, the testtoolid property is
not explicitly set.
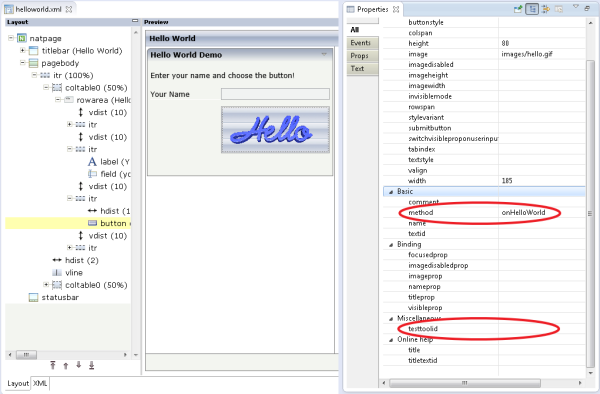
For a BUTTON control, a data-testtoolid attribute
with the value of the method property is
automatically generated as shown in the HTML snippet below. Again, you need not
understand all the HTML details, just look at the data-testtoolid
attribute.
...
<button type="button" id="B_17" data-testtoolid='onHelloWorld'
    	   style="width: 185px; height: 80px;" name="CC"
        class="BUTTONInput">
...
With the Selenium tool, for example, you can locate the FIELD and
BUTTON controls using an XPATH expression which contains the
data-testtoolid value. This XPATH expression can
be passed to the Selenium locator
org.openqa.selenium.By.ByXPath:
By myfieldlocator = new ByXPath(".//*[@data-testtoolid='yourname"]");
By mymemthodlocator = new ByXPath(".//*[@data-testtoolid='onHelloWorld"]");
See http://docs.seleniumhq.org/ for more information about the Selenium Java API.
testtoolidIn some cases, you may not want to use the
valueprop property of a control as the
testtoolid. Instead, you want to specify your own
testtoolid. Examples for this are layouts in which several
controls are bound to the same Natural data field. You can then simply set an
explicit testtoolid property for each of these
controls.

...
<input id="F_13" name="CC" class='FIELDInputEdit'
testtoolid='myowntesttoolid' type="text" style="width: 185px;">
...
For complex controls, a single testtoolid is not
enough to locate the individual parts of the control. The following table
provides examples for the most common XPATH expressions for some complex
controls.
| Control | testtoolid |
XPATH |
|---|---|---|
| ICONLIST | testtoolid="myiconlist" |
.//*[@data-testtoolid='myiconlist0'], .//*[@data-testtoolid='myiconlist1'],... |
| BUTTONLIST | testtoolid="mybuttonlist" |
.//*[@data-testtoolid='mybuttonlist0'], .//*[@data-testtoolid='mybuttonlist1'],... |
| ROWTABLEAREA2 | testtoolid="lines" |
.//*[@data-testtoolid='lines_table'] Rows/columns: .//*[@data-testtoolid=’lines.items[0].<col1testtoolid>’] .//*[@data-testtoolid=’lines.items[0].<col2testtoolid>’]... .//*[@data-testtoolid=’lines.items[1].<col1testtoolid>’] .//*[@data-testtoolid=’lines.items[1].<col2testtoolid>’]... |
| ROWTABSUBPAGES | testtoolid="mytabs" |
.//*[@data-testtoolid='mytabs0'], .//*[@data-testtoolid='mytabs1'],... |
| MULTISELECT | testtoolid="mychoice" |
XPATH for entries: .//*[@data-testtoolid='mychoice0'], .//*[@data-testtoolid='mychoice1'],... XPATH for buttons: .//*[@data-testtoolid='mychoicebutton0'], .//*[@data-testtoolid='mychoicebutton1'], .//*[@data-testtoolid='mychoicebutton2'], .//*[@data-testtoolid='mychoicebutton3']... |
| BMOBILE:SIMPLEGRID | testtoolid="lines" |
.//*[@data-testtoolid='lines'] Column text: .//*[@data-testtoolid='lines'] 1.row/1.column //*[@data-testtoolid='lines']//tr[1]/td[1] 1.row/2.column.//*[@data-testtoolid='lines']//tr[1]/td[2] 2.row/1.column .//*[@data-testtoolid='lines']//tr[2]/td[1] Button to enable editing Select the row/column: //*[@data-testtoolid='lines']//tr[1]/td[1] Use the className
Selenium example: driver.findElement(By.xpath(".//*[@data-testtoolid='lines']//tr[1]/td[2]")).findElement(By.className("SIMPLEGRIDEditbutton"));
Input field of editable column: .//*[@data-testtoolid='SIMPLEGRIDColinput’] OK Button editable column: .//*[@data-testtoolid='SIMPLEGRIDColinputok’] Cancel Button editable column: .//*[@data-testtoolid='SIMPLEGRIDColinputok’] |
In complex controls, you need not explicitly set the
testtoolid property in the page layout. If you do
not specify any testtoolid, the corresponding
*prop properties such as valueprop,
griddataprop,
iconlistprop or
pagesprop will be used.
Here is the table from above when not specifying a
testtoolid explicitly:
| Control | *prop |
XPATH |
|---|---|---|
| ICONLIST | iconlistprop="myiconlist" |
.//*[@data-testtoolid='myiconlist0'], .//*[@data-testtoolid='myiconlist1'],... |
| BUTTONLIST | buttonlistprop="mybuttonlist" |
.//*[@data-testtoolid='mybuttonlist0'], .//*[@data-testtoolid='mybuttonlist1'],... |
| ROWTABLEAREA2 | griddataprop="lines" |
.//*[@data-testtoolid='lines_table'] Rows/columns: .//*[@data-testtoolid=’lines.items[0].<col1testtoolid>’] .//*[@data-testtoolid=’lines.items[0].<col2testtoolid>’]... .//*[@data-testtoolid=’lines.items[1].<col1testtoolid>’] .//*[@data-testtoolid=’lines.items[1].<col2testtoolid>’]... |
| ROWTABSUBPAGES | pagesprop="mytabs" |
.//*[@data-testtoolid='mytabs0'], .//*[@data-testtoolid='mytabs1'],... |
| MULTISELECT | valueprop="mychoice" |
XPATH for entries: .//*[@data-testtoolid='mychoice0'], .//*[@data-testtoolid='mychoice1'],... XPATH for buttons: .//*[@data-testtoolid='mychoicebutton0'], .//*[@data-testtoolid='mychoicebutton1'], .//*[@data-testtoolid='mychoicebutton2'], .//*[@data-testtoolid='mychoicebutton3']... |
| BMOBILE:SIMPLEGRID | gridprop="lines" |
.//*[@data-testtoolid='lines'] Column text: .//*[@data-testtoolid='lines'] 1.row/1.column //*[@data-testtoolid='lines']//tr[1]/td[1] 1.row/2.column.//*[@data-testtoolid='lines']//tr[1]/td[2] 2.row/1.column .//*[@data-testtoolid='lines']//tr[2]/td[1] Button to enable editing Select the row/column: //*[@data-testtoolid='lines']//tr[1]/td[1] Use the className
Selenium example: driver.findElement(By.xpath(".//*[@data-testtoolid='lines']//tr[1]/td[2]")).findElement(By.className("SIMPLEGRIDEditbutton"));
Input field of editable column: .//*[@data-testtoolid='SIMPLEGRIDColinput’] OK Button editable column: .//*[@data-testtoolid='SIMPLEGRIDColinputok’] Cancel Button editable column: .//*[@data-testtoolid='SIMPLEGRIDColinputok’] |