
In order to understand the structure of a Natural Studio plug-in and its interaction with Natural Studio, it is instructive to create and explore a minimal, but fully operational plug-in. Later this plug-in will be extended. Perform the steps described in the topics below.
In order to develop a plug-in, you need the example library
SYSEXPLG as a basis. This library contains the plug-in example and
some central definitions and modules that are common to all plug-ins.
Plug-ins are always executed under the Natural parameter file
NATPARM. While developing a plug-in, you need the same Natural
environment during editing, cataloging, debugging and execution of your
plug-in. Especially make sure that Natural Studio runs with the same system
file settings as specified in the Natural parameter file
NATPARM.
 To check the prerequisites
Make sure that the library SYSEXPLG is
available.
Invoke the Configuration Utility and make sure
that the libraries SYSEXPLG and SYSEXT are defined as
steplibs in
the Natural parameter file NATPARM.
This step applies only after a first-time installation of Natural.
In the Configuration Utility open Natural Configuration Files > Global Configuration File > System Files.
You will see an entry with the alias name "PLUGINS". This system file, which is part of the plug-in environment must be used as the FUSER of the Natural installation.
Note:
This new "PLUGINS" entry is
only available after a first-time installation of Natural. It is not available
with an update installation or when Natural is installed in parallel to an
older version of Natural.
This step applies only after an update installation of Natural or when a current version of Natural is installed in parallel to an older version of Natural.
After an update installation or when a current version of Natural is installed in parallel to an older version of Natural, the FUSER setting of the plug-in environment has to be added manually to the global configuration file:
In the Configuration Utility open Natural Parameter Files > NATPARM > System Files > User System File.
In the FUSER tab change the values for DBID and FNR to match those of the FUSER of your plug-in environment.
Important:
Never use the FNAT of the plug-in environment as
the FUSER of Natural since an update installation might delete the FNAT.
Save your configuration and exit the Configuration Utility.
Plug-ins are always executed in the plug-in environment (for
example C:\Program Files (x86)\Common Files\Software
AG\Natural\V1) under the Natural parameter file
NATPARM.
While developing plug-ins, Natural for Windows must be started with the FUSER of the plug-in environment.
Important:
Please be aware of the fact that the plug-in
environment is independent from the Natural Studio environment. When a plug-in
extends Natural Studio or retrieves data from Natural Studio, this should
always be performed via the exposed interfaces.
Plug-ins are created using the Plug-in Manager.
To create a plug-in
Make sure that the Prerequisites are met.
Make sure that plug-in activation has been enabled. See Workspace Options in the documentation Using Natural Studio.
Invoke the Plug-in Manager as described in Invoking the Plug-in Manager in the documentation Using Natural Studio.
Invoke the context menu and choose .
The following dialog box appears.
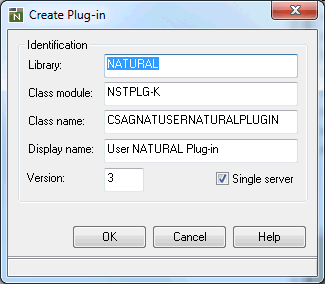
The entries that are proposed in the different text boxes contain your user ID.
Specify all the following information:
- Library
Enter the Natural library into which the plug-in shall be generated. You should ideally use a new library for each plug-in project. If the library is not empty, you will receive a warning. If you generate the plug-in anyway, existing modules will be replaced without further warnings.
Note:
Do not use a library name starting withSYSsince this plug-in library will then be created into the FNAT of the plug-in environment which is not permitted.- Class module
The plug-in consists basically of a Natural class. Choose an eight character name for the class module and enter it here.
- Class name
This name will be used as class name in the
DEFINE CLASSstatement. Choose a 32 character class name and enter it here. This class name combined with the version number will be used as ProgID in the system registry when the plug-in is installed. Therefore you must use a name that is unique among all ActiveX components that are installed on the machine. It is good and common practice to prefix the name with an abbreviation of your company. For instance the class names of the plug-ins delivered with Natural Studio all start with "CSAGNAT".- Display name
This name will be used to display the plug-in in the Plug-in Manager.
- Version
The version number specified here is combined with the class name specified above to form the ProgID of the plug-in, for example "CSAGNATUSERNATURALPLUGIN.3". Different plug-ins with the same class name and different version numbers can coexist in one installation.
- Single server
If this check box is selected, the new plug-in will run in an own Natural server process, distinct from all other plug-ins. This is required only if the plug-in uses generic document windows.
If this check box is not selected, the plug-in will run in the same server process as the Plug-in Manager. This saves an extra Natural server process during execution of the plug-in. However, it does not allow the usage of generic document windows.
Choose the button to generate the plug-in into the specified library. This is a minimal plug-in which you can extend with your own code (this is explained later in this section).
If an error occurs during the generation process, check the
generation log. A common reason for errors is that the example library
SYSEXPLG is not available, is not set as a steplib or was manually
modified. In such a case, you have to reinstall the example library and check
the steplib assignment.
In order to register and activate the plug-in, proceed as described in Installing and Activating the Minimal Plug-in below.
This section describes how to transfer a custom plug-in running in a Natural Version 6 environment to a Natural Version 8 or higher environment.
Note:
Following this approach, the custom plug-in will still run in
the Natural Version 6 environment.
To transfer a plug-in
Start Natural Version 6.x and unload the custom plug-in library to the file system using the Unload Wizard of the Object Handler.
Stop Natural Version 6.x.
Start the Natural Version 8.x Configuration Utility.
Adjust the steplibs as described in Prerequisites.
Add the FUSER setting of the plug-in environment manually to the global configuration file:
In the Configuration Utility open Natural Parameter Files > NATPARM > System Files > User System File.
In the FUSER tab change the values for DBID and FNR to match those of the FUSER of your plug-in environment.
Important:
Never use the FNAT of the plug-in environment as
the FUSER of Natural since an update installation might delete the FNAT.
Save your configuration and exit the Configuration Utility.
Start Natural Version 8.x.
Load the custom plug-in library to the file system using the Load Wizard of the Object Handler.
Note:
If the custom plug-in ported to Natural Version 8.x is
located in an FNAT library (library name starting with SYS), the
library must be renamed to an FUSER library.
Delete incompatible objects:
Delete the INSTAL-N object of the ported
custom plug-in library.
Delete the Resources folder containing a .reg and a .log file.
Use a new GUID and a new version number:
Generate a new GUID by creating a temporary plug-in library and copy the GUID into the clipboard.
Open the INSTALL program located in the
custom plug-in library.
Init the #CLSID variable
with the newly generated GUID value.
Increment the #VERSION
variable value.
SAVE and STOW the INSTALL program.
Open the custom plug-in class in the custom plug-in library.
Init the #CLSID variable
with the newly generated GUID value.
Increment the #VERSION
variable value.
SAVE and STOW the custom plug-in class.
In order to register and activate the plug-in, proceed as described in Installing and Activating the Minimal Plug-in below.
When the minimal plug-in has been created as described above, it can be installed. When it has been installed, it can be activated.
The advantage of an activated plug-in is that you can immediately test whether your own code that you add to the plug-in works as intended.
To install a plug-in
Execute the program INSTALL that was created in
the library specified during the creation of the plug-in.
Restart Natural Studio to make the new plug-in visible in the Plug-in Manager.
Note:
The next time you execute the program
INSTALL, the plug-in is uninstalled.
To activate a plug-in
Invoke the Plug-in Manager.
Activate the new plug-in as described in Activating and Deactivating a Plug-in in the documentation Using Natural Studio.
Note:
When you define automatic activation mode for this
plug-in, the plug-in will be activated each time you start Natural Studio. See
Defining
Automatic or Manual Activation Mode for a Plug-in in the
documentation Using Natural Studio.
Log on to the library into which the plug-in was generated and
open the generated class in the Class
Builder. You will notice that the plug-in is just a Natural class
that implements two specific interfaces, namely
INaturalStudioPlugIn
and INaturalStudioPlugInTree.
These interfaces are specified in the interface modules (copycodes)
NSTPLG-I and NSTPLT-I, which are contained in the
example library SYSEXPLG and are shared by all plug-ins.
The minimal plug-in leaves most of the methods of these interfaces
empty. In fact it really implements only two methods:
OnActivate
and OnDeactivate
of the interface INaturalStudioPlugIn. These methods are
of specific interest: Natural Studio calls the method
OnActivate, when the user chooses the command
in the Plug-in Manager.
OnDeactivate is called when the user chooses the
command in the Plug-in Manager.
If you open the method bodies of
OnActivate and OnDeactivate
in the Class Builder, you will notice that the minimal plug-in does nothing
other than indicating its activation and deactivation by opening a message box.
A real plug-in will of course use these methods to prepare itself for operation
and to initialize and uninitialize its state. In the following section, we will
see what this can mean.
The following topics are covered below:
In order to interact with the user, the plug-in must define
commands and present them to the user in menus or toolbars. Usually this will
be done in the method OnActivate.
Natural Studio passes a handle to the Natural Studio interface
INatAutoStudio to
the plug-in. The plug-in will store this handle and use it to access Natural
Studio during further method calls.
To add a command
As an example, add the code which is indicated in bold to
the method OnActivate:
define data
parameter using nstact-a
object using nsttmp-o
local
1 #controlbars handle of object
1 #commands handle of object
1 #command handle of object
1 #toolbars handle of object
1 #toolbar handle of object
end-define
*
* Keep the Natural Studio Automation interface in mind.
#studio := nstact-a.iNatAutoStudio
* Show that we are coming up.
send "MessageBox" to #studio
with "Activating plug-in!" "Natural Studio Plug-in"
*
* Add a command.
#controlbars := #studio.ControlBars
#commands := #controlbars.Commands
send "Add" to #commands
with 100 "My Command" 1
return #command
*
* Select a toolbar.
#toolbars := #controlbars.Toolbars
send "Item" to #toolbars
with "Tools"
return #toolbar
*
* Insert the command.
send "InsertCommand" to #toolbar
with #command
*
end
This code sequence creates a command with the internal
identifier "100" and inserts it into the Tools
toolbar. Whenever the user chooses the new toolbar button, Natural Studio sends
the command identifier "100" to the method
OnCommand
of the interface INaturalStudioPlugIn.
Initially, Natural Studio shows the new command disabled. In
order to make the command available to the user, the plug-in must implement a
command status handler. In the command status handler, the plug-in can check
any condition necessary to enable the command. In particular, it has access to
the interface INatAutoStudio to
perform operations in Natural Studio. In the simplest case, the plug-in enables
the command without any condition.
To enable the command
As an example, add the code which is indicated in bold to
the method OnCommandStatus
of your plug-in:
define data
parameter using nstcst-a
object using nsttmp-o
end-define
*
decide on first nstcst-a.Command
  value 100
    nstcst-a.Enabled := True
  none
    ignore
end-decide
*
end
In order to react to the command, the plug-in must implement a
command handler. In the command handler, the plug-in can do anything necessary
to implement the command. In particular, it has access to the interface
INatAutoStudio to
perform operations in Natural Studio.
To handle the command
As an example, add the code which is indicated in bold to
the method OnCommand
of your plug-in:
define data
parameter using nstcmd-a
object using nsttmp-o
local
1 #objects handle of object
1 #progs handle of object

end-define
*
decide on first nstcmd-a.Command
  value 100
      #objects := #studio.Objects
      #progs := #objects.Programs
      send "Add" to #progs with 1009
  none
      ignore
end-decide
*
end
Now when the user chooses the new toolbar button, the plug-in opens the program editor with an untitled program.
If you do not want to work with your minimal plug-in any longer, you can deactivate it. If you want to remove your minimal plug-in from the Plug-in Manager, you have to uninstall it.
To deactivate a plug-in
Invoke the Plug-in Manager.
Deactivate your minimal plug-in as described in Activating and Deactivating a Plug-in in the documentation Using Natural Studio.
Note:
When automatic activation mode has been defined for this
plug-in, the plug-in will be activated again the next time you start Natural
Studio. See Defining
Automatic or Manual Activation Mode for a Plug-in in the
documentation Using Natural Studio.
To uninstall a plug-in
Execute the program INSTALL that was created in
the library specified during the creation of the plug-in.
Restart Natural Studio to remove the plug-in from the Plug-in Manager.
Note:
The next time you execute the program
INSTALL, the plug-in is installed again.