
You will now expand your program to include a CALLNAT
statement that invokes a subprogram. In the subprogram, the employees
identified from the main program will be the basis of a FIND
request to the VEHICLES file which is also part of the demo
database. As a result, your output will contain vehicles information from the
subprogram as well as employees information from the main program.
The new subprogram requires the creation of an additional local data area and a parameter data area.
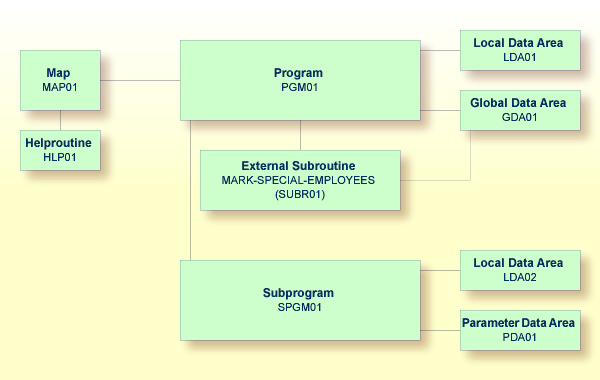
When you have completed the exercises below, your sample application will consist of the following modules:
This document contains the following exercises:
Creating a Parameter Data Area from an Existing Local Data Area
Creating Another Local Data Area Containing a Different View
You will now add more fields to the local data area that you have previously created. These fields will be used by the subprogram that you will create later.
 To add more fields to the local data area
Return to your local data area.
Select the row containing #NAME-END.
From the context menu, choose .
Or:
Choose the following toolbar button:
![]()
The Data Field Definition dialog box appears.
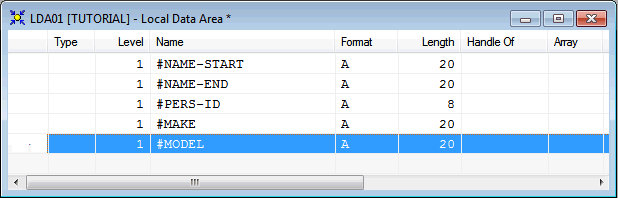
Define the following fields:
| Level | Name | Format | Length |
|---|---|---|---|
| 1 | #PERS-ID |
A | 8 |
| 1 | #MAKE |
A | 20 |
| 1 | #MODEL |
A | 20 |
Choose the button after you have defined a field.
When all fields have been defined, choose the button.
The local data area should now look as follows:
Stow the local data area.
A parameter data area (PDA) is used to specify the data parameters to be passed between your Natural program and the subprogram that you will create later. The parameter data area will be referenced in the subprogram.
With minor modifications, your local data area can be used to create the parameter data area: you will delete two of the data fields in in the local data area and then save the revised data area as a parameter data area. The original local data area remains intact.
Note:
It is also possible to create a parameter data area by
choosing from the
menu.
To create the parameter data area
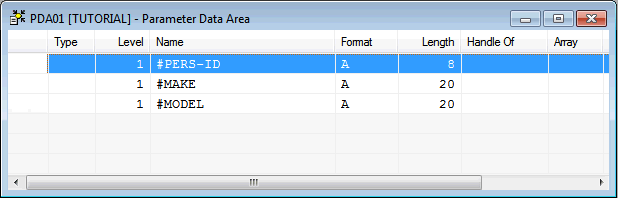
In the local data area, delete the fields
#NAME-START and #NAME-END.
From the menu, choose .
The Save As dialog box appears. Specify "PDA01" as the name for the parameter data area.
Make sure that the library is selected which also contains your program (that is: the TUTORIAL node).
From the Type drop-down list box, choose Parameter.
Choose the button.
The new name and type are now shown in the title bar of the editor window. In the library workspace, the new parameter data area is shown in the Parameter Data Areas node.
The parameter data area should now look as follows:
Stow the parameter data area.
Close the editor window for the parameter data area.
You will now create a second local data area and import fields from
the DDM for the VEHICLES database file. This DDM
is also provided in the system library SYSEXDDM.
This local data area will be referenced in the subprogram.
To create the local data area
In the library workspace, select the library which also contains your program (that is: select the TUTORIAL node).
From the context menu, choose .
Or:
Choose the following toolbar button:
![]()
An editor window appears.
From the menu, choose .
The Import Data Field dialog box appears.
From the Library drop-down list box, select SYSEXDDM.
Select the DDM option button.
In the Object list box, select the sample DDM with the name VEHICLES.
Press CTRL and select the following fields in the Importable Data list box:
PERSONNEL-ID
CAR-DETAILS
MAKE
MODEL
Choose the button.
The View Definition dialog box appears.
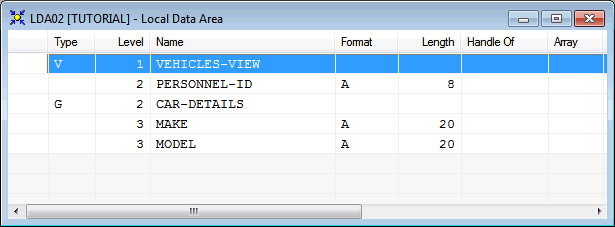
Specify the name "VEHICLES-VIEW" as the name for the view.
Choose the button.
Choose the button to close the Import Data Field dialog box.
Stow the new local data area.
When you are asked to specify a name for the local data area, enter "LDA02" and choose the button.
The local data area should now look as follows:
Close the editor window for the local data area.
You will now create a subprogram that uses a parameter data area and
a local data area to retrieve information from the VEHICLES file.
The subprogram receives the personnel ID passed by the program
PGM01 and uses this ID as the basis for a search of the
VEHICLES file.
To create the subprogram
In the library workspace, select the library which also contains your program (that is: select the TUTORIAL node).
From the context menu, choose .
An editor window appears.
Enter the following:
DEFINE DATA
  PARAMETER USING PDA01
  LOCAL USING LDA02
END-DEFINE
*
FD1. FIND (1) VEHICLES-VIEW
  WITH PERSONNEL-ID = #PERS-ID
  MOVE MAKE (FD1.) TO #MAKE
  MOVE MODEL (FD1.) TO #MODEL
  ESCAPE BOTTOM
END-FIND
*
END
This subprogram returns to a given personnel ID the make and model of the employee's company car.
The FIND statement selects a set of records
(here: one record) from the database based on the search criterion
#PERS-ID.
In the field #PERS-ID, the subprogram receives
the value of PERSONNEL-ID that has been passed by the program
PGM01. The subprogram uses this value as the basis for a search of
the VEHICLES file.
Stow the subprogram.
When you are asked to specify a name for the subprogram, enter "SPGM01" and choose the button.
Close the editor window for the subprogram.
A subprogram is invoked from the main program using a
CALLNAT statement. A subprogram can only be invoked via a
CALLNAT statement; it cannot be executed by itself. A subprogram
has no access to the global data area used by the invoking object.
Data is passed from the main program to the specified subprogram
through a set of parameters that are referenced in the DEFINE DATA
PARAMETER statement of the subprogram.
The variables defined in the parameter data area of the subprogram
do not have to have the same names as the variables in the CALLNAT
statement. Since the parameters are passed by address, it is only necessary
that they match in sequence, format, and length.
You will now modify your main program so that it can use the subprogram you have just defined.
To use the subprogram in your main program
Return to the program editor.
Insert the following directly above the DISPLAY
statement:
RESET #MAKE #MODEL
CALLNAT 'SPGM01' PERSONNEL-ID #MAKE #MODEL
The RESET statement sets the values of
#MAKE and #MODEL to null values.
Delete the line containing the DISPLAY statement
and replace it with the following:
WRITE TITLE
      / '*** PERSONS WITH 20 OR MORE DAYS LEAVE DUE ***'
      / '***     ARE MARKED WITH AN ASTERISK        ***'//
*
DISPLAY   1X '//N A M E' NAME
          1X '//DEPT'    DEPT
          1X '/LV/DUE'   LEAVE-DUE
             ' '         #MARK
          1X '//MAKE'    #MAKE
          1X '//MODEL'   #MODEL
The text defined with the WRITE TITLE statement
will appear at the top of each page in the output. The WRITE TITLE
statement overrides the default page title: the information which was
previously displayed at the top of each page (page number, date and time) is no
longer shown. Each slash (/) causes the subsequent information to be shown in a
new line.
Since the subprogram is now returning additional vehicles
information, the columns in the output need to be resized. They receive shorter
headers. The column in which the asterisk is to be shown (#MARK),
does not receive a header at all. One space will be inserted between the
columns (1X). Each slash in the header causes the subsequent
information to be shown in a new line of the same column.
Your program should now look as follows:
DEFINE DATA
  GLOBAL USING GDA01
  LOCAL USING LDA01
END-DEFINE
*
RP1. REPEAT
*
  INPUT USING MAP 'MAP01'
*
  IF #NAME-START = '.' THEN
    ESCAPE BOTTOM (RP1.)
  END-IF
*
  IF #NAME-END = ' ' THEN
    MOVE #NAME-START TO #NAME-END
  END-IF
*
  RD1. READ EMPLOYEES-VIEW BY NAME
    STARTING FROM #NAME-START
    ENDING AT #NAME-END
*
    IF LEAVE-DUE >= 20 THEN
      PERFORM MARK-SPECIAL-EMPLOYEES
    ELSE
      RESET #MARK
    END-IF
*
    RESET #MAKE #MODEL
    CALLNAT 'SPGM01' PERSONNEL-ID #MAKE #MODEL
*
    WRITE TITLE
      / '*** PERSONS WITH 20 OR MORE DAYS LEAVE DUE ***'
      / '***     ARE MARKED WITH AN ASTERISK        ***'//
*
    DISPLAY   1X '//N A M E' NAME
              1X '//DEPT'    DEPT
              1X '/LV/DUE'   LEAVE-DUE
                 ' '         #MARK
              1X '//MAKE'    #MAKE
              1X '//MODEL'   #MODEL
*
  END-READ
*
  IF *COUNTER (RD1.) = 0 THEN
    REINPUT 'No employees meet your criteria.'
  END-IF
*
END-REPEAT
*
END
Run the program.
Enter "JONES" as the starting name and press ENTER.
The resulting list should look similar to the following:
                *** PERSONS WITH 20 OR MORE DAYS LEAVE DUE ***
                ***     ARE MARKED WITH AN ASTERISK        ***


                             LV
       N A M E         DEPT  DUE           MAKE                MODEL
 -------------------- ------ --- - -------------------- --------------------

 JONES                SALE30  25 * CHRYSLER             IMPERIAL
 JONES                MGMT10  34 * CHRYSLER             PLYMOUTH
 JONES                TECH10  11   GENERAL MOTORS       CHEVROLET
 JONES                MGMT10  18   FORD                 ESCORT
 JONES                TECH10  21 * GENERAL MOTORS       BUICK
 JONES                SALE00  30 * GENERAL MOTORS       PONTIAC
 JONES                SALE20  14   GENERAL MOTORS       OLDSMOBILE
 JONES                COMP12  26 * DATSUN               SUNNY
 JONES                TECH02  25 * FORD                 ESCORT 1.3
Press ESC to close the output window.
Stow the program.
You have successfully completed this tutorial.