
Using Object Compare, you can compare the contents of two different Natural sources.
Supported object types are: program, dialog, class, subprogram, subroutine, text, local data area, parameter data area, global data area, helproutine, copycode, function, and adapter.
Note:
There is no extra Natural Security support for enabling/disabling
the Object Compare plug-in. However, Object Compare uses the system command
LIST to read a Natural source. The same Natural
Security support that is provided for the LIST
command also applies to Object Compare.
This document covers the following topics:
Before Object Compare can be used, you have to proceed as described in the following topics:
Work file 30 is used. Therefore, the profile parameter
WORK must
be set to 30 or higher.
An external tool with a graphical user interface for comparing files must have been installed on the PC. An example of such a tool is ExamDiff. A line command compare tool such as diff.exe does not work.
Object Compare has to be activated in the Plug-In Manager. For detailed information on the activation procedure, see Plug-in Manager in the documentation Using Natural Studio.
When Object Compare has been activated in the Plug-in Manager, additional elements are available in the Natural Studio window:
When the current context (that is, the selected object) allows it, the context menu in the library workspace provides the following additional cascading menu: . This cascading menu contains the following commands: and . See Selecting the Objects to be Compared for further information.
The menu provides the following additional command: . See Starting Object Compare for further information.
An additional toolbar is shown. The button in this toolbar represents the following menu command:
|
|
Note:
The display of this toolbar can be switched on and off by
choosing from the
menu.
The Options dialog box contains an additional page labeled Object Compare. See Setting the Options for further information.
When Object Compare has been activated, you first have to set the options for this Natural Studio extension.
 To set the options
From the menu, choose .
The Options dialog box appears.
Select the Object Compare page in this dialog box.
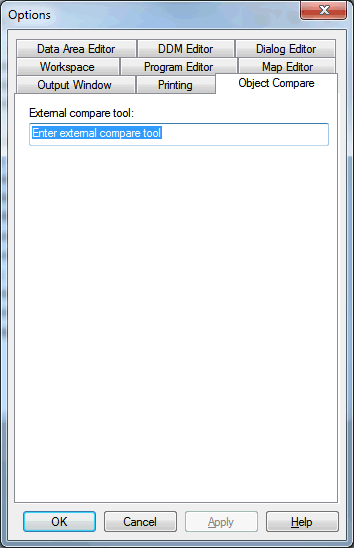
Specify the following information:
- External compare tool
The external tool (including path) that is to be used for comparing files.
Choose the button.
When you select the objects to be compared, copies of these Natural sources are temporarily stored in the subdirectories left and right of the temporary Natural directory which has been defined in the local configuration file. See Installation Assignments in the Configuration Utility documentation.
If a temporary Natural directory has not been defined in the local
configuration file, the copies are stored in the directory defined by the
Windows environment variable TEMP or, if
TEMP is not defined, in the directory defined by
the Windows environment variable TMP.
These copies are the input for the external tool.
To select the objects
In the library workspace, select the first object to be compared.
Invoke the context menu and choose .
The code for this object will be shown on the left side of the external tool.
In the library workspace, select the second object to be compared.
Invoke the context menu and choose .
The code for this object will be shown on the right side of the external tool.
When you start Object Compare, the external tool, which has been defined in the Options dialog box, is invoked with the left and right files you have defined last.
To start Object Compare
From the menu, choose .
Or:
When the Object Compare toolbar is shown, choose the following
toolbar button.
![]()
The following dialog box appears. It shows the file names that are used in the temporary directories. The file names are composed of the following information: host and port (only shown when an object has been selected on a remote development server), database ID, file number, library name, name of the selected object and an extension which indicates the type of Natural object.
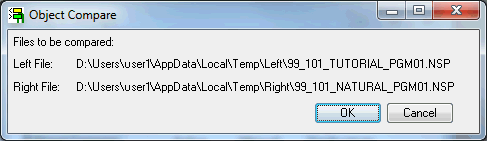
Choose the button to invoke the external tool.