Test Utility WEB-ONL3 with SYSWEB3

The Test Utility Web Online is a component of the Natural Web Interface. You have the ability to check your subprogram locally without involving an HTTP server. The transfer parameters for your web page are transferred into the Test Utility and are posted directly to the business logic. As communication platform, you can choose either RPC or DCOM as in real remote communications. The result is either the web page expected or an error message. The web page can be viewed with the browser or a viewer of your choice. If you receive an error message, you can easily debug your business logic locally without writing an extra test routine. No remote debugging is needed.

Features:

  • Local application checking.

  • No need for remote debugging.

  • Simplified error checking.

  • Comfortable operation by user friendly interface.

  • No need to write an extra test routine.

This section covers the following topics:


Prerequisites

  • Web browser which supports different content types, for example, Microsoft Internet Explorer Version 5.0 or higher.

  • Any available text editor.

Running the Application

Start of instruction setTo define path adjustments

  1. Start the main dialog.

  2. Select a browser and viewer of your choice with Tools > Options...

  3. Set the browser, viewer and work file path.

  4. Press the OK button.

Start of instruction setTo start the application

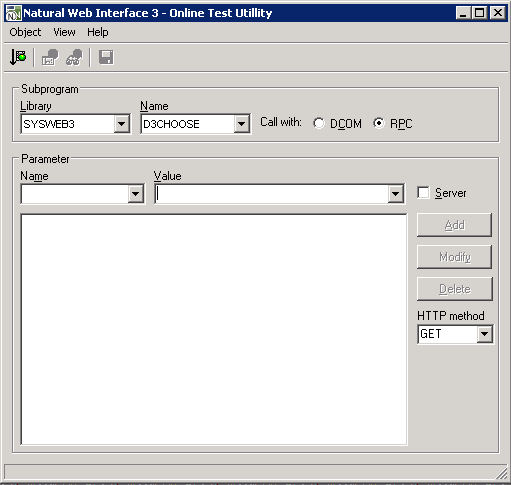
  1. Start the dialog WEB-ONL3.

  2. Select a library and subprogram name.

  3. Optional: add parameters.

  4. Choose RPC or DCOM.

  5. Press the Execute button.

  6. View the result by pressing either the Result... or the Browse... button.

Supported Content Types

The following Content Types are supported by the Test Utility:

Content Type Extension
"application/rtf" "rtf"
"application/powerpoint" "ppt"
"application/msword" "doc"
"application/excel" "xls"
"text/html" "htm"
"text/plain" "txt"
"text/xml" "xml"
"text/richtext" "rtf"

If you need further Content Types, change the subroutine HTML2CONTENT-TYPE (SYSWEB3/W3CO2EXT) and extend the translation table to your own needs.

Input/Output Fields

Field Explanation

Subprogram:
Library
Name

Enables you to specify the library and the name of the required subprogram. The available libraries and subprograms are automatically taken from the library workspace and listed in selection boxes.
Interface

Can be selected with either DCOM or RPC as communication form. For DCOM, you have to register your classes first.

Default: RPC

Parameters:
Name
Value
Server

Here you can enter the name-value-pairs required from the subprogram. To add them to the parameter list, use the Add button. To modify the entries, use the Modify button. You do not have to substitute &, =, %; this will be done by the WEB-ONL3 program. If you use server parameters, check the Server toggle button before you add the parameter to the parameter list.

In the parameter list, all name-value-pairs are displayed. &, =, % are substituted. To delete a pair, select the item and press the Delete button. Every selected item will be inserted into the Name and Value fields. If you wish to modify a pair, select the item, change it in the Name and Value fields and press the Modify button.

Server:
If any of the name-value-pairs are server variables, you need to check this toggle button. Note that any status will last until you change it again.

HTTP Method

In this drop-down list you can select the HTTP request/submit method to be used:

  • HEAD
    Identical to a GET request, but without the response body. This is useful for retrieving meta-information written in response headers, without having to transport the entire content.

  • GET
    Requests a representation of the specified resource.

  • POST
    Submits data from the identified resource. The data is included in the body of the request.

    You can use this method to submit data with a different content type, for example XML files or binary data (such as graphics).

    If you specify this method, an additional Browse... button and the Binary checkbox are available on the screen.

    Use the Browse... button to choose a file and the Binary checkbox, if you want to submit binary data.

    If you specify this method without an input file, the default mime type "application/x-www-form-urlencoded" is set. If you use an input file, the content type of that file will be used, for example with an XML file, the content type will automatically be set to "text/xml". You can specify a different mime type in the input field manually.

    Note:
    A mime type which has been set manually will always override the default mime type.

  • PUT
    Uploads a representation of the specified resource.

    You can use this method to submit data with a different content type, for example XML files or binary data (such as graphics).

    If you specify this method, an additional Browse... button and the Binary checkbox are available on the screen.

    Use the Browse... button to choose a file and the Binary checkbox, if you want to submit binary data.

Object

Execute Subprogram

Starts the editor chosen with the Options dialog.

Save to Natural Text

Saves the returned data as Natural object of the type Text.

Exit

Leaves the dialog.

View

Result...

Executes the selected subprogram.

Browser...

Starts the browser chosen with the Options dialog.

Options...

Opens the Options dialog.

Help

Contents

Displays this HTML-based help file.

About

Provides general program information.