
A Natural application is a collection of Natural objects and non-Natural objects which build a functional unit from the business point of view. Such an application does not contain the objects themselves. It is just a collection of links to the objects or to other applications. Each link describes where the corresponding object or application is stored. Each object or application can be linked to more than one application.
All applications are managed by the Natural Development Server and are stored in the Natural Development Server file (see the Natural Development Server documentation for further information).
This document covers the following topics:
Note:
This document describes only those commands which are not
available in the library workspace; for the other commands see the
documentation Using Natural
Studio.
Applications are created and maintained in Natural Studio's application workspace. Initially, the application workspace is not shown. For information on how to display it, see Application Workspace in the documentation Using Natural Studio.
The application workspace shows the mapped applications and their linked objects in a tree structure. It provides the same views as the library workspace (logical view, file view and flat view).
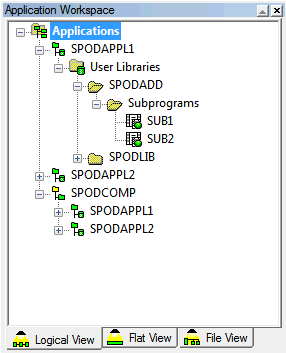
When the application workspace is displayed for the first time, it does not contain any applications; only the Applications node is shown.
Before you can map or create your first application, you have to start a session on the development server. This session, which is called "application server session", is used to access application data.
The information that you specify in a dialog box when connecting the application server (see below) is stored in the user profile. When you start Natural Studio the next time and expand the Applications node, the session is automatically started. If a password is required, the dialog box in which you have specified the connection information is shown again.
 To connect to an application server for the first time
In the application workspace, select the Applications node, invoke the context menu and choose either or (these commands are described later).
Or:
Try to expand the Applications
node.
When an application server has not yet been connected, the following dialog box appears. Your user ID is automatically provided.
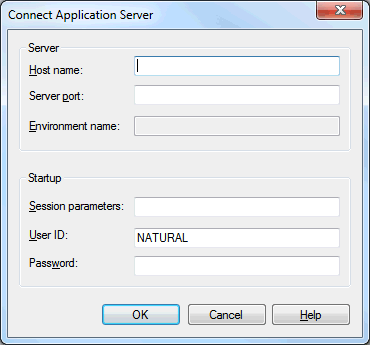
Specify the following information:
| Option | Description |
|---|---|
| Host name | The name of the development server on which the application data are stored. |
| Server port | The TCP/IP port number of the development server. |
| Environment name | Does not apply in this case. |
| Session parameters | If dynamic parameters are required for your development server, specify them in this text box. Otherwise, leave this text box blank. |
| User ID | If you want to connect to the development server using a different user ID, specify it in this text box. |
| Password | If Natural Security is installed on the development server, specify the required password in this text box. Otherwise, leave this text box blank. |
Choose the button.
The application server is connected.
When you have previously chosen the or command, the corresponding dialog box appears, and you have to proceed as described under Creating a New Application or Mapping and Unmapping Applications.
There are two types of applications:
Base Application
A base application is defined as a set of Natural object links.
The associated Natural objects pertain to one specific development server and
are all located on the same FUSER system file. You can link
objects of different libraries to a base application.
Compound Application
A compound application enables you to combine several base
applications. It is defined as a set of links to these base applications. The
base applications involved in a compound application can be spread across
different FUSER system files or different development servers.
Each base application may have a different parameter setting.
To create a new application
In the application workspace, select the Applications node.
Invoke the context menu and choose .
Note:
When an application server session has not yet been
established, a dialog box appears first in which you specify the development
server that you want to use. See Connecting to an Application
Server.
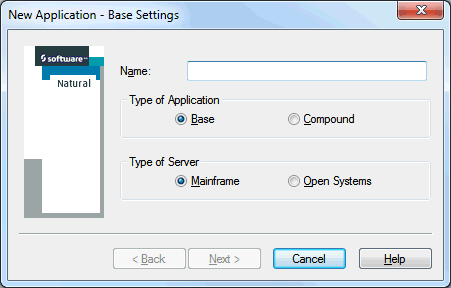
With this dialog box, you can either define a base application or a compound application.
In the Name text box, specify a name for your application. The name must be unique among all applications and it may be up to 32 characters long.
Select the option button for type of application that you want to create: Base or Compound.
The option buttons for the type of server are only available when you have selected the option button for a base application. The type of server on which your application server session is running is automatically selected. Since it is possible to store mainframe applications on a UNIX or Windows development server, and vice versa, you can select a different type of server.
For a base application: Select the option button for the type of server:
Mainframe, or
Open Systems (for example, a UNIX or Windows server).
Choose the button.
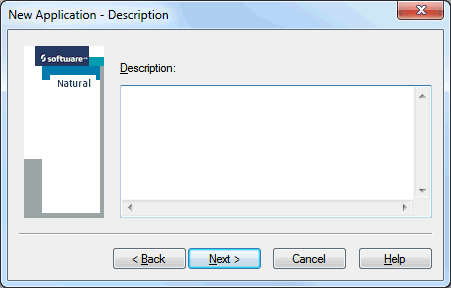
The following dialog box appears.
Note:
When you have selected a compound application, a
button is shown instead of the
button which is shown for a base
application.
Optional. Enter a description for your application. This can be any text.
For compound application, choose the button to create a node, with the name you have specified, in the application workspace. You can now proceed as described under Linking Objects and Applications.
Or:
For base application, choose the
button to display a dialog box (see below) in which you have to define the
environment settings for the session that is to be started when the application
is mapped.
Name and port number of the application server to which you are currently connected are provided as the default values for the new base application. It is also possible to use another development server.
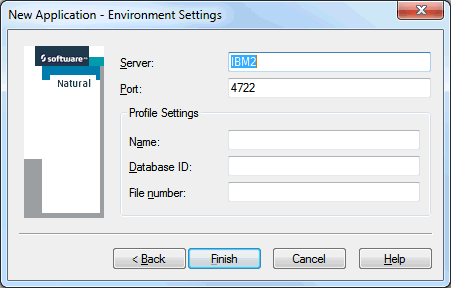
The following dialog box appears when you have selected the server type Mainframe.
The following dialog box appears when you have selected the server type Open Systems.
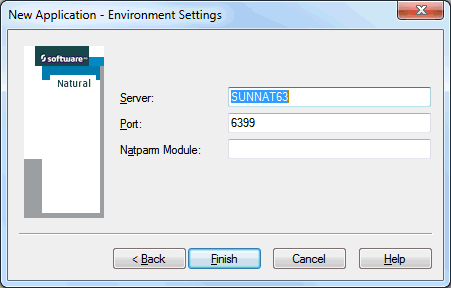
The server name and port number are mandatory; the profile
settings (name, database ID and file number) for server type
Mainframe or the NATPARM module name setting
for server type Open Systems are optional. The text boxes
are pre-filled with the settings of the application server session.
Change the settings as needed.
Choose the button to create a node for the base application, with the name you have specified, in the application workspace. You can now proceed as described under Linking Objects and Applications.
Note:
If a password is required, the dialog box in which you have
specified the connection information is shown again. Server name, port number
and session parameters cannot be changed in this dialog box. They are fixed for
an application.
When you have created a new application, it is empty. You must then create the links to the Natural objects that are to be part of the application.
Since an application contains just links to Natural objects, it
knows only the location where a Natural object is stored. The contents of this
object are not part of the application data. The Natural object is stored in
the FUSER system file which is defined by the environment settings
(server, server port and profile) of the application.
For this reason, not all of the commands which are available for a Natural object in the library workspace are available for the same object in the application workspace. It is not possible to delete, rename or move a Natural object in the application workspace. However, all commands which are needed to change the source and the executable object of a Natural object are available in the application workspace.
The following topics are covered below:
You can link any existing Natural object of the connected application server (for example, a program or map) to your application.
To link objects to a base application
In the application workspace, select the base application.
Invoke the context menu and choose .
The following dialog box appears.
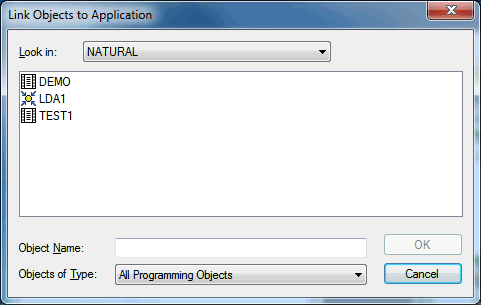
From the Look in drop-down list box, select the library which contains the objects that you want to link to your application.
The content of the selected library is now shown in the dialog box.
Optional. If you want to restrict the list of shown objects to a specific type, select the type from the Objects of Type drop-down list box.
Note:
When you select DDMs from this
drop-down list box, all DDMs are shown in the dialog box. Since DDMs do not
belong to a library, the Look in drop-down list box is not
available in this case.
Select all objects that you want to link to the application.
Choose the button.
The linked objects are now available in the application workspace. The sub-nodes of an application node are the linked objects, ordered by the library where they are located. These nodes appear in a similar manner to the nodes for the Natural objects in the library workspace.
If you have linked DDMs to your application, they are available in a DDMs node.
You can link any existing base application on the connected application server to a compound application. You can also link base applications which have different development server settings (that is, the session that is started for the application server may run on a different development server). A compound application thus allows you to combine objects that cannot be combined in the library workspace.
To link objects to an application
In the application workspace, select the compound application.
Invoke the context menu and choose .
The following dialog box appears. It contains all available base applications (including those that you have not yet mapped).
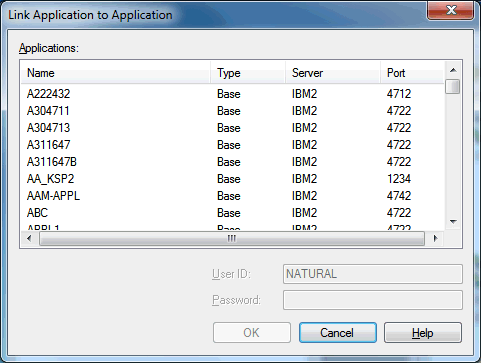
Select all base applications that you want to link to the compound application.
Choose the button.
The linked base applications are now available in the node of the corresponding compound application.
In addition to the way objects or applications can be linked as described above, you can use the drag-and-drop feature. Objects can be linked to base applications by dragging them from the library workspace to the application workspace and dropping them on the target application. This applies to single objects, libraries or groups (for example, all the programs in a library) under the following conditions:
The session in the library workspace must be started with the
same server name and port number as the application session in the application
workspace. The database IDs and file numbers of the FUSER of both
sessions must be the same.
Both sessions must be connected.
Only sources can be linked to applications.
When the corresponding environment has been mapped in the library workspace (see the above conditions), you can copy objects, libraries or groups in the library workspace and paste links to these items into a base application.
To link an object to a base application using copy-and-paste
Copy the objects, libraries or groups in the library workspace. See also Copying Objects in the documentation Using Natural Studio.
In the application workspace, select a base application.
Invoke the context menu and choose .
Or:
When the Edit toolbar is shown, choose the following toolbar
button.
![]()
Or:
Press CTRL+V.
A link for each copied item is now available in the node of the corresponding base application. It is placed into a library node which corresponds to the library node in the library workspace.
You can also link objects to an application by adding them in the application workspace. When you add, for example, a new program in the application workspace, it will be visible in both the library workspace (when the corresponding environment has been mapped; see the above conditions) and the application workspace. Remember that the object in the application workspace is just a link. Creating a new object in the application workspace is similar to the procedure used in the library workspace. See Creating a Natural Object in the documentation Using Natural Studio.
If you want to edit an object, you can do this either in the library workspace or in the application workspace. When an object is currently being edited by another user, the corresponding lock message is shown. A lock message is also shown when you try to open an object in the library workspace that you are currently editing in the application workspace (and vice versa).
You can unlink objects from a base application and you can unlink base applications from a compound application.
Note:
When you delete an object in the library workspace, the
corresponding link in the application workspace is removed (you may have to
refresh the
display to see the change). Libraries are only known to an application when
they contain objects. When you delete all objects of a library in the library
workspace, this library is no longer shown in the application workspace.
To unlink objects or applications
In the application workspace, select the object or application that you want to unlink.
Tip:
As in the library workspace, you can open a list view
window from the application workspace. In the list view window, it is possible
to select several objects at the same time (which is not possible in the tree
view window). See
List
View Windows in the documentation Using Natural
Studio for further information.
Invoke the context menu and choose .
In addition to the applications you create yourself, you can also map other applications so that they are shown in the application workspace.
A mapped application is displayed in the application workspace until you unmap this application. An application can be mapped by several users at the same time. It will only be locked momentarily when a command changes the application settings (for example, links an object).
When you map a base application, a session is started on the specified development server for working with the linked objects. The profile settings for this session are defined by the base application.
When you unmap an application, it is removed from the application workspace. Unmapping is an action that has a visual effect only. It has no influence on the changes that a user has applied to the application.
See also the descriptions of the system commands
MAP and
UNMAP.
To map an existing application
From the menu, choose .
Or:
In the application workspace, select the
Applications node, invoke the context menu and
choose .
Or:
When the Tools toolbar is shown, choose the following toolbar
button.
![]()
The following dialog box appears providing a list of all defined applications.
Note:
When the connection to the application server session has
not yet been established, a dialog box appears first in which you specify the
development server that you want to use. See
Connecting to an
Application Server.
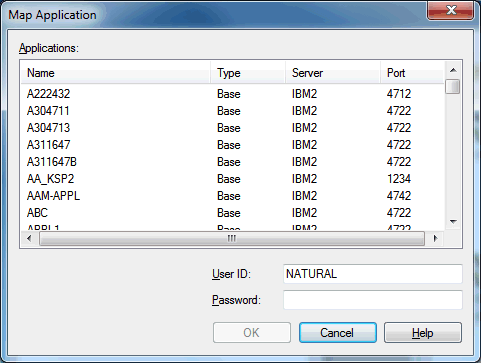
Select all applications that you want to map.
Optional. If a password is required for the application server session, specify it in the Password text box. If you do not specify a required password, an additional dialog box will later prompt you for this information.
Choose the button.
The applications are now shown in the application workspace.
To unmap an application
In the application workspace, select the application that you want to unmap.
Tip:
As in the library workspace, you can also open a list view
window from the application workspace. In the list view window, it is possible
to select several objects at the same time (which is not possible in the tree
view window).
From the menu, choose .
Or:
Invoke the context menu and choose
.
Or:
When the Tools toolbar is shown, choose the following toolbar
button.
![]()
When you create a new base application or map an existing base application, the application is automatically mapped and connected.
Note:
When you map a compound application, all linked base applications
are initially disconnected.
When you terminate Natural Studio, the base applications remain mapped but are disconnected. When you restart Natural Studio, all mapped base applications are initially disconnected.
A mapped base application can thus be in one of the following states:
Connected
A server session is running for this application. A connected
application can be identified by its colored icon in the tree.
Disconnected
No server session is currently running for this application. A
disconnected application can be identified by its greyed icon in the tree.
If you want to work with the linked objects of a base application, the application must be connected.
To connect a disconnected base application
Expand the node of the base application.
Or:
Select the base application, invoke the context menu and
choose .
Or:
From the menu, choose
.
Or:
When the Tools toolbar is shown, choose the following toolbar
button.
![]()
If a password is missing or incorrect, a dialog box appears.
To disconnect a connected base application
Select the base application, invoke the context menu and choose .
Or:
From the menu, choose
.
Or:
When the Tools toolbar is shown, choose the following toolbar
button.
![]()
Note:
When you disconnect a compound application, all of its base
applications are disconnected.
By displaying the properties of the application server, you can obtain general information about the mapped applications.
You can also connect to a different application server as described below. However, changing the application server settings is basically not necessary, since all application data should be stored in one Natural Development Server file (see the Natural Development Server documentation for further information).
Important:
Keep in mind that all mappings in the application workspace
are lost if you change the application server settings, because it is uncertain
which Natural Development Server file will be used from the new application
server.
To display/change the properties of the application server
In the application workspace, select the Applications node.
From the menu, choose .
Or:
Invoke the context menu and choose
.
Or:
Press ALT+ENTER.
A dialog box appears displaying the properties of the application server. The following tabs are shown in the dialog box:
General
Shows the state (connected or disconnected) of the
application server. If the state is "connected", the
number of mapped applications, the database ID and file number of the Natural
Development Server file are shown. This information cannot be changed.
Application Server
Shows the information that has been specified for
connecting application server session on the development server. This
information can be changed. For a description of the options in this dialog
box, see Connecting to an
Application Server.
Choose the button to close the dialog box.
When you have changed the application server settings, a dialog box appears in which you have to confirm your changes. When you choose the button in this dialog box, the started application server session is shut down, all currently mapped applications are unmapped, and a new application server session is started.
All changes that are applied to an application (for example, when you rename it or link objects), are stored directly in the Natural Development Server file (see the Natural Development Server documentation for further information).
Caution:
If you change the environment settings of an application, keep
in mind that changing the FUSER and FDIC settings can
have the result that the Natural objects linked to the application are no
longer found. Moreover, the FDIC settings should never be changed
in the application workspace, because this implies that a different application
data pool is used.
To display/change the properties of the application server
In the application workspace, select a base application or compound application.
From the menu, choose .
Or:
Invoke the context menu and choose
.
Or:
Press ALT+ENTER.
A dialog box appears displaying the properties for the selected application. The following tabs may be shown in the dialog box:
General
Shows the name of the application, the type of application
(for a base application, the platform is also shown), the date and time when
the application was created and last modified, and the ID of the user who
created/changed the application. For a base application, the state (connected
or disconnected) is also shown. This information cannot be changed.
Description
Shows the description of the application. This information
can be changed.
Environment
Only shown for base applications. Shows the startup
parameters for the application server session, which is started for the
selected application. These are the same environment settings that are
specified when creating a new
application.
The server name and port number can be changed as long as
no objects have been linked to the application. All other settings can be
changed at any time. These are the user ID and the profile settings (name,
database ID and file number) for server type Mainframe or
the NATPARM module name setting for server type Open
Systems.
Entry Points
Only shown for base applications (including those which
have been linked to compound applications), and only when the base application
is connected. The information on this tab is only used by XRef Evaluation.
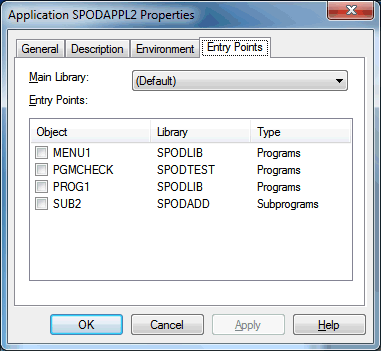
You can use this tab for descriptive purposes. XRef Evaluation will use the information specified here for cross-reference analysis of an application.
The Main Library drop-down list box provides for selection of the libraries which contain the currently linked objects. You can select the logon library from which your application is to be started.
The Entry Points list box contains all objects that are linked to the application and that are possible entry points. You can select one ore more objects to become entry points for your application.
Choose the button to close the dialog box.
When you have changed any settings, they are saved.
You can copy, rename or delete each application in the application workspace.
You rename or delete an application in the same way as you rename or delete a node in the library workspace. See Renaming Objects and Deleting Objects in the documentation Using Natural Studio.
When you delete an application, it is removed physically. It is not possible to redisplay it in the application workspace. The objects linked to the application, however, are not deleted; they are still available in the library workspace.
For copying applications, the application workspace provides a special command; see below.
To copy an application
In the application workspace, select a base application or compound application.
Invoke the context menu and choose .
A copy of the selected application is placed in the application workspace. This may take a while. The copied application has the old name plus the addition "-1". This number is incremented by one for each new copy of the original application.
The following exception applies in the application workspace when cataloging the objects in a library: only the objects that have been linked with the application are cataloged (i.e. only the objects that are shown in the application workspace). The objects that are only shown in the library workspace are ignored. See also Cataloging the Objects in a Library in the documentation Using Natural Studio.