
This document is a simple tutorial that demonstrates how to add the components of an event-driven application one after the other. The tutorial describes how to develop a small sample application consisting of one dialog. The application you will create is a degressive depreciation calculator.
You can use this calculator, for example, to find out the value of your car by entering how much the car was worth when you bought it, how many years you have owned it, and the percentage by which the value of the car decreases each year.
You can save your application at any stage, allowing you to interrupt the tutorial and continue at a later time where you left.
 To develop the sample application
Create a new dialog (represented by a window).
Assign the attributes to your dialog (decide the window's settings).
Create the dialog elements in the dialog (decide how the user can interact).
Assign the attributes to your dialog elements (decide attribute settings).
Create the application's local data area (define the variables that allow the event handler to use the end user's numeric input).
Attach event handler code to the dialog element (decide what happens at runtime when the user interacts).
Check, stow and run the application.
Apart from creating the local data area, this is the minimal number of steps required to create any event-driven application.
The above steps are described in detail in the following topics:
To create a new dialog
Invoke Natural.
From the menu, choose .
The Natural window displays the menus and the toolbar for the dialog editor. It displays an editing window called Untitled1 - Dialog. You can resize this editing window.
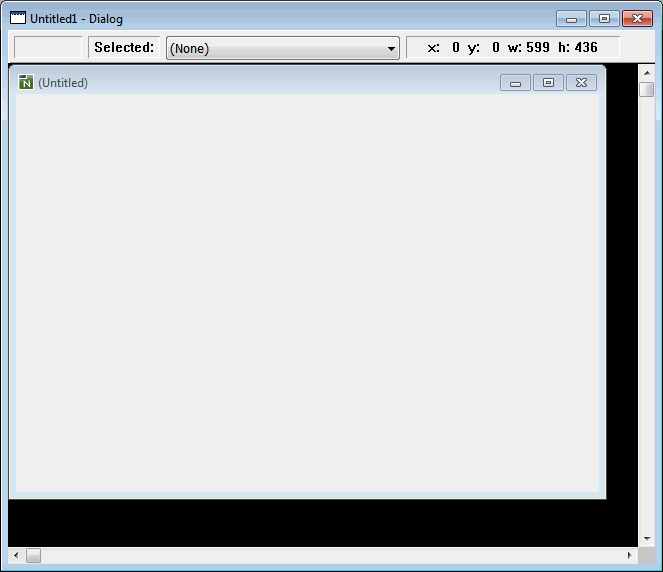
The editing window contains the new dialog window, titled (Untitled). You can also resize this new dialog window, or use the editing window's scroll bars.
To assign attributes to the dialog
From the menu, choose .
Or:
Double-click inside the dialog window.
The Dialog Attributes dialog box appears.
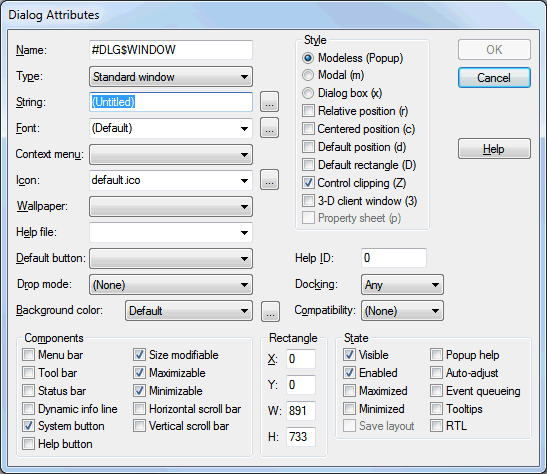
With the cursor in the String text box, type in the new dialog window's title: Degressive Depreciation.
From the Background color drop-down list box, select the desired color, for example Gray.
Choose the button.
The Dialog Attributes dialog box closes.
You have set the attribute
STRING to the value
Degressive Depreciation and the attribute
BACKGROUND-COLOUR-NAME
to the value of your desired color, for example
GRAY.
To create the dialog elements inside the dialog
From the menu, choose .
The Options dialog box appears.
Select the Dialog Editor page.
Make sure that the Display grid check box is selected and select the Lines option button.
This decides the way your grid will be displayed.
Choose the button to confirm the change.
The grid now helps you position and align the dialog elements.
Note:
When the grid is not visible, you may have to change the color for
the grid (on the Dialog Editor page of the
Options dialog box). This may be the case when
a gray grid and a gray background have been defined.
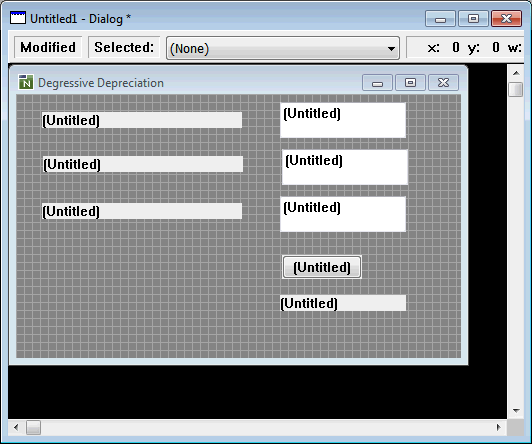
From the menu, choose .
Or:
Choose the toolbar button representing a
text constant
control.
Move the cursor to the upper left corner of the dialog window.
Ensure that the editor window's status bar displays an x and a y value of less than 50. Note that at this time, the text constant control's width and height has an undefined value.
Click to fix the text constant control's position.
A grey rectangle representing the dialog element appears, surrounded
by small black squares. At the same time, the status bar indicates that
#TC-1 is selected.
Point to one of the small black squares.
The cursor shape now indicates the direction in which you can resize the text constant control.
Resize #TC-1 to a width of about 200.
Make sure that the text constant control is selected.
From the menu, choose .
From the menu, choose .
A new text constant control #TC-2 is created on top of
#TC-1.
Move the new text constant control to a position below the first one by clicking and dragging via the mouse, or via the keyboard arrow keys with the SHIFT key held down.
Create another text constant control below the previous text control (in the same way).
From the menu, choose .
Or:
Choose the toolbar button representing an
input field
control.
Position the input field control in the upper right corner of the dialog window, next to the first text constant control (in the same way as described above for the text constant control).
Create two more input field controls (by duplicating the first, as above). These input field controls should have a height of 36. Align them horizontally with respect to each other and vertically with respect to the three text constant controls (as shown below).
From the menu, choose .
Or:
Choose the toolbar button representing an
push button
control.
Position the push button control below the three input field controls.
Create a text constant control below the push button control.
Your dialog should now look like this:
To assign attributes to the dialog elements
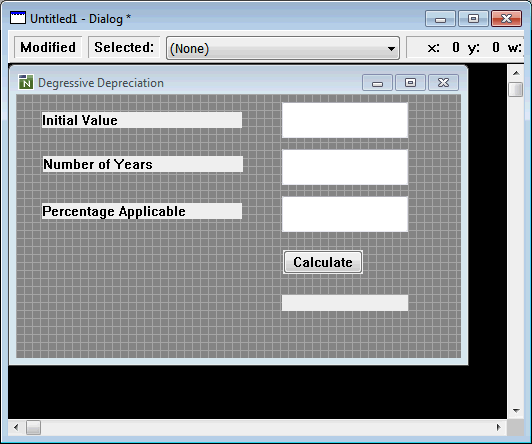
Select the first
text constant
control #TC-1 and from the
menu, choose .
Or:
Double-click the first text constant control #TC-1.
The corresponding attributes dialog box appears.
In the String text box, type in the text string
to be displayed: Initial Value.
Choose the button.
The attributes dialog box closes.
Set the following text strings for the two text constant controls
below: Number of Years for #TC-2 and
Percentage Applicable for #TC-3.
From all three
input field
controls and from the fourth text constant control, remove any text
strings (that is, the Untitled strings).
Set the following text string for the push button control: .
Your dialog should now look like this:
The local data area in this application defines the application's linked variables. These linked variables receive the numeric values that the end user has entered in the input field controls. The variables and their values are used in the calculation of the push button control's click event handler code.
To prepare the creation of your local data area, your input field
controls must use linked variables
Select the first input field control #IF-1 and from the
menu, choose
.
Or:
Double-click the first input field control #IF-1.
The corresponding attributes dialog box appears.
Choose the browse button (that is: the button with the three dots) to the right of the String text box.
The Source for #IF-1.STRING dialog box appears.
Select (and enable) the Linked variable option button.
In the Variable name text box, enter:
#INITIAL-VALUE.
Choose the button to close the Source for #IF-1.STRING dialog box and then choose the button to close the attributes dialog box.
Set the following linked variable names for the remaining two input
field controls: #YEAR-NUM for #IF-2 and
#PERC-APPLIC for #IF-3.
To create the application's local data area
From the menu, choose .
The Dialog Local Data Area dialog box appears.
Define your local data as follows:
1 #INITIAL-VALUE (N6.2)
1 #PERC-APPLIC (N2.1)
1 #YEAR-NUM (N2)
Choose the button.
Natural will now be able to process the input data.
To attach event handler code
Select the push button control labeled .
From the menu, select .
A dialog box for the corresponding event handler definition section appears.
The CLICK event is preselected: when the end user clicks
on this push button control, the specified Natural code will be triggered.
In the event handler editing area, enter the following Natural code in free form:
#RESULT:= #INITIAL-VALUE * ( ( ( 100 - #PERC-APPLIC )
/ 100 ) ** #YEAR-NUM )
MOVE EDITED #RESULT (EM=Z(5)9.99) TO #TC-4.STRING
Choose the button to close the dialog box.
To check the application for syntax errors
From the menu, choose .
A dialog box comes up with a Natural error: a variable needs to be declared.
In the dialog box, choose the button.
The dialog's code is displayed, the cursor pointing to the error
(#RESULT).
Choose the button.
From the menu, choose .
Add the following definition:
1 #RESULT (N6.2)
Choose the button.
Check your application again.
The information message box should now confirm that the check was successful.
To stow your application
From the menu, choose .
The Stow Dialog As dialog box appears.
Enter the name Degrdep.
From the Libraries drop-down list box, select the library where you want the dialog to be stowed.
Choose the button.
The information message box now confirms that the dialog was stowed successfully.
To run your application
From the menu, choose .