Using Local Versioning, you can use the source control system Subversion (SVN) or Concurrent Versions System (CVS) from within your Natural environment.
To use this functionality, you must have the Subversion or CVS client part (svn.exe or cvs.exe) installed on your PC and you must have access to a Subversion or CVS repository server which has been installed locally or on a server. When you search the internet, you can find these Subversion or CVS components on several download sites.
This document covers the following topics:
The following topics are covered below:
Natural Security is partly supported. When a logon to a library is disallowed, this library will not be shown in the tree view and Local Versioning commands cannot be executed. However, when the , or commands are disallowed for a Natural object in a library, it is still possible to read Natural objects and commit them to a repository as well as check out Natural objects from a repository and import (and maybe replace) them in Natural.
For accessing the Natural Development Server (NDV),
Local Versioning uses Object Handler routines. Therefore, a utility profile for
the Object Handler (SYSOBJH) must be defined in Natural Security
in which Load and Rep are allowed.
Furthermore, Applies as default profile must be set to
"Y" to activate the utility profile.
Local Versioning does not cover all Subversion and CVS functions. Therefore, for some tasks it may be necessary to use the command line interface of a repository (svn.exe or cvs.exe) or free third-party software such as TortoiseSVN or TortoiseCVS.
Although the system library for Local Versioning is called
SYSPLCVS, it contains the objects for both repositories,
Subversion and CVS.
The current version of Local Versioning is designed for online use. For accessing a repository in batch mode, use the Object Handler.
If you want to load Natural sources from a repository in batch mode, proceed as described below:
Check out a repository module with the structure of a system
file (FUSER) into a local workspace.
Create a
FILEDIR.SAG
file for each library using the FTOUCH utility. To get the
parameters for the FTOUCH utility (for example, structured mode),
you can read the source header, if there is one. Or, if you have disabled the
source header in the options,
you can use user-defined default values for each source that you have
committed.
This makes a system file (FUSER) out of the
workspace, which can either be used locally or processed further by Natural in
batch mode.
If you want to bring the sources to a remote development environment (NDV), continue with the following steps.
Use the Object Handler to unload the system file
(FUSER) in batch mode to a local file.
Map to a remote development environment in batch mode.
Use the direct commands to load the previously unloaded sources into the remote development environment.
For further information, see Batch Processing in a Remote Environment in the Object Handler part of the Tools and Utilities documentation.
Before Local Versioning can be used, you have to proceed as described in the following topics:
Using Natural Version 8.3 or above, a second Natural session for plug-ins will be started from C:\Program Files (x86)\Common Files\Software AG\Natural\V1\bin. It also uses a separate NATPARM parameter module. The FNAT (especially the libraries SYSPLCVS) and the FUSER are different in the Natural plug-in session and in your Natural session. See also the information on the Natural parameter file in the section Plug-Ins under Natural Security of the Natural Security documentation.
To be able to access the FUSER of the standard Natural installation with the Local Versioning plug-in, you need to define and set the FUSER of the standard Natural in the separate Local Versioning NATPARM parameter module. This can be achieved by starting the natparm.exe in the directory C:\Program Files (x86)\Common Files\Software AG\Natural\V1\bin.
To be able to use Local Versioning for an inactive system file of the standard Natural installation, the inactive system file needs to be set and defined in the separate Local Versioning NATPARM parameter module.
Local Versioning uses the Subversion or CVS command interface
svn.exe or cvs.exe (exactly with this
name) which must be installed on the PC running Local Versioning. Make sure
that the command interface is accessible (for example, by adding
svn.exe or cvs.exe including its path
to the Windows environment variable %PATH%).
In the Windows registry, the command extensions for cmd.exe must be enabled. This is enabled by default.
You must have access to the repository of your source control system. This repository can be installed locally or on a server. The repository must be operational before you start using Local Versioning.
A Natural object should not be archived with its line numbers or line number references. Local Versioning removes the line numbers when a Natural object is copied to a workspace. Line numbers are removed so that sources in which just one line has been added or removed do not differ because only the line number is different. We recommend that you switch on line number suppression for a library which is used as a workspace; see Suppressing Line Numbers in the Source Code in the documentation Using Natural Studio. However, Local Versioning is also able to work with line numbers.
Local Versioning stores a Natural object in a repository using its file system name. When there are special characters in the name of a Natural object, its Natural name and file system name will be different. For Natural objects with special characters coming from a remote mainframe development server (NDV) to a workspace outside Natural, a file system name is not available. Local Versioning does not support such Natural objects. We strongly recommend that you do not use special characters in Natural names.
Special characters are the following:
.
#
@
all lowercase characters (a through z)
#
$
%
+
/
@
§
all lowercase characters (a through z)
Local Versioning has to be activated in the Plug-In Manager. For detailed information on the activation procedure, see Plug-in Manager in the documentation Using Natural Studio.
When Local Versioning has been activated in the Plug-in Manager, additional elements are available in the Natural Studio window:
The menu provides the cascading menu with commands for processing an object. These commands can also be found in the context menu (see below). You can use the commands from the menu when a context menu is not available for a Natural object (for example, for resources and error messages).
The menu provides the cascading menu with commands for processing a library. These commands can also be found in the context menu (see below). You can use these commands, for example, to add a new library in your source control system. Alternatively, you can create a new library in Natural and perform commands on the empty library.
The menu provides the cascading menu with the command. It is used to define and maintain projects for Local Versioning.
An additional toolbar is shown. The button in this toolbar represents the following menu command:
|
|
Note:
The display of this toolbar can be switched on and off by
choosing from the
menu.
When the current context (that is, the selected object) allows it, the context menu provides the following additional cascading menu: .
Note:
Local Versioning commands can be applied to Natural resources
and Natural error messages, although the context menu does not show the
cascading menu . In these cases, use the
menu commands instead.
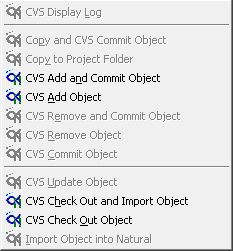
Depending on the context, the cascading menu contains different commands.
Depending on the project definition, the status of the project folder or the setting of the option , several of the commands in the cascading menu may be disabled.
- System File Level
When a system file is currently selected (for example, the node for
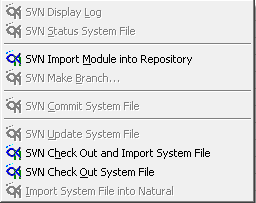
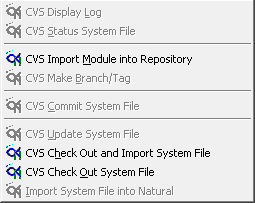
FUSERorFNAT), the following commands are available in the cascading menu:
Commands for Subversion Commands for CVS - Library Level
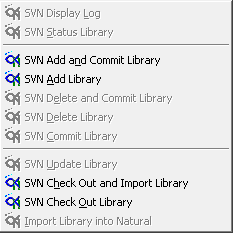
When a library is currently selected, the following commands are available in the cascading menu:
Commands for Subversion Commands for CVS No command available - Natural Object Level
When a Natural object is currently selected, the following commands are available in the cascading menu:
Commands for Subversion Commands for CVS No command available No command available
The above commands correspond to the commands used by Subversion and CVS.
The Options dialog box contains an additional page labeled Local Versioning. See Setting the Options for further information.
When Local Versioning has been activated, you can set the options for this Natural Studio extension.
 To set the options
From the menu, choose .
The Options dialog box appears.
Select the Local Versioning page in this dialog box.
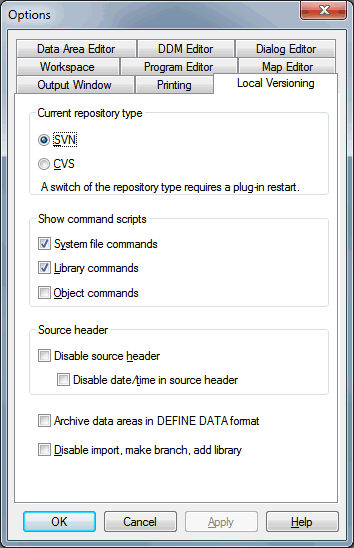
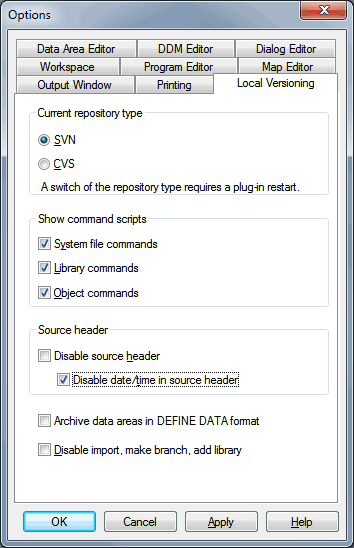
You can set the following options:
- Current repository type
Choose the option button for the repository type (either SVN for Subversion or CVS) to which you want commit or from where you want to check out Natural object sources.
Each time you switch the repository type, you have to restart (that is: deactivate and then activate) Local Versioning in the Plug-in Manager. For detailed information, see Plug-in Manager in the documentation Using Natural Studio.
- Show command scripts
When the check boxes in this group box are selected, the window for the Windows command prompt appears each time a Subversion or CVS command is issued which is implemented in Local Versioning. You can then see whether the Subversion or CVS command was successful.
System file commands enables/disables the window on system file level, Library commands on library level and Object commands on Natural object level.
When the windows for the above commands have been disabled, you can use the different commands which are provided by Local Versioning for displaying the status. Or you can use a third-party tool such as TortoiseSVN or TortoiseCVS to check whether a command has been successful.
For getting started or for testing purposes, all levels may be enabled. Since there may be numerous windows on object level when many object are selected at once (for example, the objects of a whole library), it is advisable to switch off the object level. There will be a warning when the number of selected objects is bigger than 10.
The processing of the selected objects can be canceled by pressing ESC. However, when the options in this group box are selected and there are numerous command windows, Natural hardly gets control.
Exception: The command prompt window appears always when you issue the commands for displaying the status of a library or system file, or when you choose the button in the dialog box containing the project definition. This does not depend on the setting of these options.
- Source header
Before a Natural source is copied to the workspace, Local Versioning adds a header to the source. The header contains the Natural name of the object, the source user ID, the mode, the code page, the source date and the source time. This information is used when a source object is imported back into Natural after a checkout from a repository.
When Local Versioning does not find a header in the source before importing it, default values are used. The default values are:
Header Type Default Value Mode Structured. Natural name of the object Name of the file in the workspace/repository. User ID *USERCode page *CODEPAGESource date *DATNSource time *TIMNSince the source date and source time may change without any change of the source, source date and source time may be disabled, while the other header parameters remain. The following check boxes are available in this group box:
Disable source header
When this check box is selected, the whole source header is disabled, including source date and source time.
Disable date/time in source header
When this check box is selected, there will be no source date and source time in the header. The other parameters depend on the setting of Disable source header check box.
Local Versioning is able to process Natural sources with a header from Natural for Eclipse.
- Archive data areas in DEFINE DATA format
When this check box is selected, data areas are converted to the
DEFINE
                                                             DATA
format before they are copied to the workspace and committed to a repository.When this check box is not selected, data areas are archived in the Natural-internal format for data areas in the file system.
The
DEFINE DATAformat is readable. A data area in internal format does not need to be converted when you want it to bring it into Natural with theFTOUCHutility or the Natural import function.Data areas containing views with fields marked as multiple fields or periodic groups (this is for documentation only and will not be considered when using the view) and which are converted to the
DEFINE DATAformat, loose the information about multiple fields or a periodic groups.- Disable import, make branch, add library
When this check box is selected, the following commands are disabled:
Commands for Subversion Commands for CVS No command available
Choose the button.
The following topics are covered below:
Before you can start using Local Versioning, you must define a project. Each project belongs to a specific system file and is identified by the environment, the database ID (DBID) and the file number (FNR).
A Natural system file is the development environment in which the
sources of a project are created, changed and tested. Such a Natural system
file is usually the FUSER, either in the local environment or on a
remote development server. Since Local Versioning supports all types of Natural
system files, it can also cope with FNAT or an inactive
environment. An inactive environment is a file which is defined as a system
file in the global
configuration file of the Configuration Utility. It is accessible
from the library workspace of Natural Studio. Sources cannot be modified in an
inactive environment, but they can be copied to an inactive environment.
The workspace may be outside Natural, in an ordinary Windows
folder, or it may also be a Natural system file. Using an inactive Natural for
Windows system file for a repository workspace has the advantage that the user
has a view on the repository workspace within the Natural library workspace. It
is also possible to use an active system file (for example, an
FUSER) for both, the place where a user holds the development
sources and as a repository workspace. In this case, the user must take care
when a source is meant to be in the FUSER and when it is in the
repository workspace. Sources in an FUSER usually do not have a
header; they may have line numbers and line number references. Sources in a
workspace usually have a header, but no line numbers and no line number
references.
Each workspace can refer to one Subversion or CVS repository only. A repository may refer to more than one workspace.
You may define more than one repository, including workspace, to one Natural system file. If so, a dialog box appears prompting you to select one or more repositories, including workspace, when you perform commands on Natural objects in such a system file.
You may also define more than one Natural system file to one repository, including workspace.
If you have set up a project with the command which requires user attention so that Natural libraries or objects in a repository are not mixed up or overwritten, a warning appears. In such a case, you have to take care that you do not unintentionally overwrite objects, or unintentionally commit or check out objects to wrong libraries or system files.
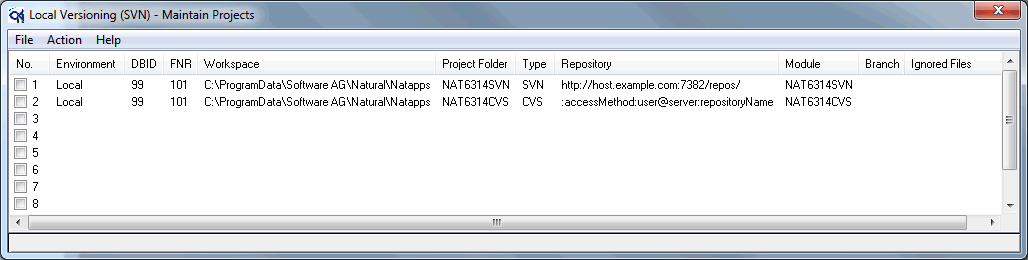
To display the list of projects
From the menu, choose .
Or:
When the Local Versioning toolbar is shown, choose the
following toolbar button.
![]()
The following window, which contains the project list, appears. You can define up to 10 projects, which you can enable or disable using the check box in the first column. Initially, the project definitions are empty. The repository type which is currently used is indicated in the title bar. Example:
Note:
The list of defined projects is stored as a resource
(text document) in the system library SYSPLCVS. The name of this
file is lv_projects.txt. Do not delete this file;
otherwise you will loose all project definitions. During an installation of the
plug-in and even during a new Natural installation, an old
lv_projects.txt file is kept. If there is no
lv_projects.txt file at plug-in activation, it will be
created with default values.
To define a project you have to select one of the empty entries in the project list and then edit the project definition.
To edit the project definition
Select the project and from the menu, choose .
Or:
Select the project, invoke the context menu and choose
.
Or:
Double-click the project.
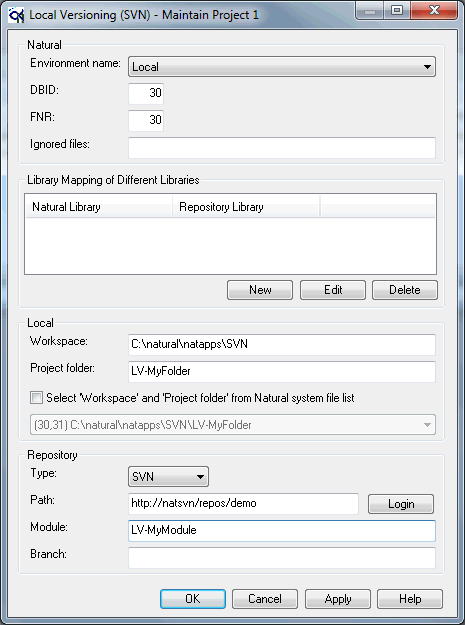
The following dialog box appears:
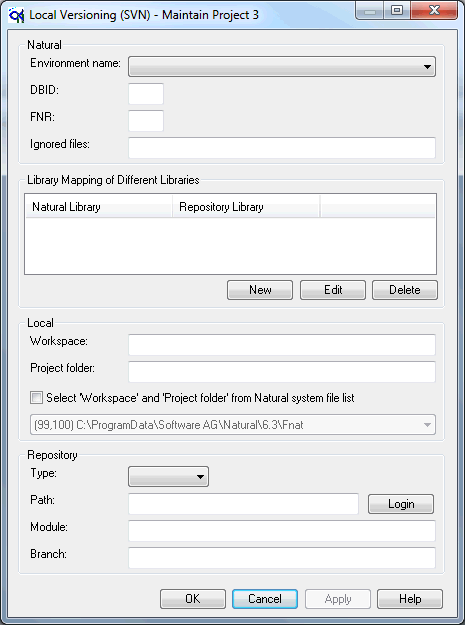
Specify the following information:
- Environment name
From the drop-down list box, select the environment (local or any remote development server) of the Natural system file from where you want to bring Natural sources into your source control system.
- DBID
The database ID of the Natural system file from where you want to bring Natural sources into your source control system.
- FNR
The file number of the Natural system file from where you want to bring Natural sources into your source control system.
- Ignored files
Optional. You can specify the Natural sources which are to be ignored - even if they are selected. The ignored Natural sources are not handled by Local Versioning.
A Natural source name and the input in this field are case-sensitive. There may be lowercase characters in the name of a Natural object when an ampersand (&) in the name is replaced by the language code. In most cases, however, a Natural source name is in uppercase characters.
The character which is used to separate the source names is a semicolon (;). It is not allowed to specify file extensions. Wildcards are also not allowed.
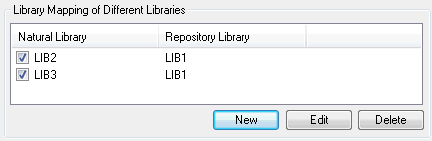
- Library Mapping of Different Libraries
Optional. Use the button to specify a Natural library and map it to another library in your source control system if you want to change the library for committing and checking out of objects. A library mapping can be enabled or disabled. Example:
- Workspace
The path to a local working folder in which Natural objects are held before they are copied to your source control system. The workspace usually parallels a Natural system file such as
FNATorFUSER(for example, outside Natural or in an inactive Natural environment). However, it may also be in an active system file (for example,FUSER). For example:c:\natural\cvsUNC paths (such as \\nat\cvs) are not supported since cmd.exe does not support UNC paths.
Note:
For performance reasons, you may define a workspace outside of Natural. Since no interaction with Natural is necessary, working with a workspace outside of Natural is faster.- Project folder
A subfolder within the workspace.
It is recommended that you define a separate subfolder for every module and every branch in your source control system.
Notes:
- Using an inactive system file as the workspace/project folder has the advantage that the workspace is visible within the Natural environment.
- When the workspace is a Natural system file, the repository creates folders for Subversion or CVS status information (with the names .svn or CVS) in the Natural system file. When you use CVS, you may run into problems with a library called CVS in your
FUSER. If you have a library with this name, CVS will put administration files into the CVS folder. When you delete a whole Natural library, the files or folders unknown to Natural (such as .svn or CVS) are not deleted.- When Natural sources are copied to the project folder using the command , or , the line numbers are removed from the sources (this is done so that sources where just one line has been added or removed do not differ because only the line number is different); line number references are resolved by a symbolic label. When you have defined your
FUSERas the project folder, you also have to perform these commands in order to remove the line numbers.- When you check out a Natural source from Subversion or CVS directly to an
FUSERand this source does not yet exist on thisFUSER, you will not see this source in Natural. This is because the file FILEDIR.SAG will not be updated. You need to import the source into Natural.- Missing workspace/project folder directories will be created with the first use.
- Type
The repository type may either be SVN (for Subversion) or CVS.
- Path
The full connection string to your source control system.
Subversion
For Subversion this string may be entered in one of the following formats (depending on the Subversion configuration):file://d:...svn://...http://...For example:
http://natsvn/repos/proj1/dev/vers/fuser100Note:
For Subversion, the path is only used for the commands which check out and import into the repository. Other Subversion commands use the path specification in the .svn directories.CVS
For CVS this string must be entered in the following format::protocol:user-name@server-name:repository-folderFor example:
:pserver:natural@cvs.myserver.com:/cvsroot/Repositories/DevSourcesTip:
Copy the string directly from your source control system and paste it in this text box.- Login
When you choose this button, the command prompt window appears and you are prompted to enter your repository password. This corresponds to the
svn infoorcvs logincommand which is used to confirm your password and to store it for later use in your home directory.- Module
The name of the Subversion or CVS module that you want to use or create.
- Branch
Optional.
For Subversion, the name of a new directory which is to contain a branch of the main version.
For CVS, the name of the branch on which you want to work or that you want to create.
If you do not specify a branch, the main branch is used.
Choose the button.
You can delete any project which is currently defined in the Maintain Projects window.
To delete a project
Select the project and from the menu, choose .
Or:
Select the project, invoke the context menu and choose
.
All information which has previously been specified in the project definition is deleted.
Alternatively, you can delete a project in the file
lv_projects.txt which is stored as a resource (text
document) in the system library SYSPLCVS.
This section contains a brief tutorial which shows how to interact with a source control system. It applies to both Subversion and CVS.
The following topics are provided:
This tutorial assumes that the values below have been specified in the project definition.
For Subversion:
For CVS:
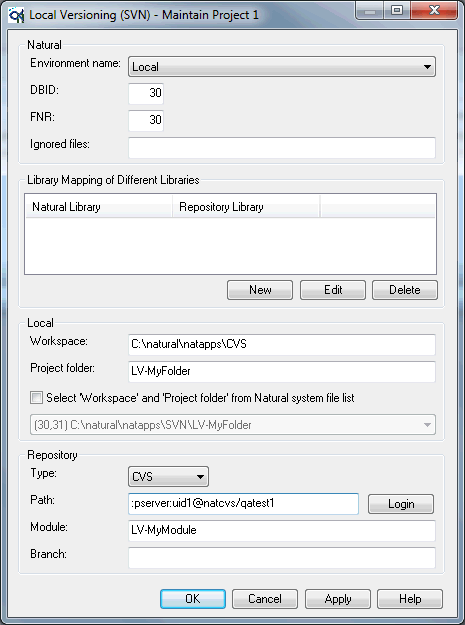
Make sure to specify the correct values for your Natural environment (environment name, DBID and FNR) and repository (repository type and path). For the workspace, project folder and module name, use the above values. Leave the remaining text boxes blank.
Use the Configuration Utility to define the workspace as an inactive environment (in the example below, DBID 30 and FNR 31 point to the project folder C:\natural\natapps\SVN\LV-MyFolder in the workspace for Subversion).

The inactive environment will then appear in Natural Studio's library workspace.

This tutorial assumes that the options below have been enabled.
For Subversion:
For CVS: Use the same options, but specify CVS as the repository type.
This tutorial assumes that a library with the name
LV-TEST exists and that this library contains a program named
PGM1 and a subprogram named SUBPGM1.
With this exercise, you will now learn how to set up a new project in a new module and how to add and commit an entire Natural library to your source control system.
Note:
The descriptions in this tutorial apply when you are working
with the logical view of your library workspace.
To set up a new project in your source control system
Select the node for the system file (for example, "User Libraries") in which your Natural sources reside.
Invoke the context menu for the selected node and display the commands in the cascading menu .
The commands below are shown.
| For Subversion: | For CVS: |
|
|
|
Since a branch has not been specified in the project definition, the command for making a branch/tag is disabled.
Since a workspace under Subversion or CVS version control does not yet exist, further commands are also disabled.
Note:
When none of the above commands is enabled, the selected
system file and your specification in the project definition do not
match.
To set up a new project in a new module, choose the command or from the context menu.
A dialog box appears, prompting for a log message for the import command. Do not change the preset log message.
Choose the button to proceed.
Since the options in the Show command scripts group box have been enabled, the command prompt window appears, showing the commands that have been executed by your source control system and the result of the execution.
Press ENTER to proceed.
When you check your repository now (for example, by invoking ViewCVS in your browser which works for both CVS and Subversion), you can see that the module LV-MyModule has been created in the repository that has been specified in the project definition.
When you check your local workspace (for example, using the Windows Explorer), you can see that the folder LV-MyFolder has been created. It includes a folder with the name .svn or CVS. This folder has been created by an implicit checkout of the new module LV-MyModule.
Now that the project has been set up for a system file, it is possible to add libraries to your source control system.
Select the node for a library (this tutorial assumes that the name of this folder is LV-TEST), invoke the context menu and display the commands in the cascading menu .
The commands below are shown.
| For Subversion: | For CVS: |
|
|
|
Since the selected library is not yet under version control in the workspace (no object has been added and objects have not been checked out), only the commands for adding a library and for checking out a library are enabled. All other commands in this context menu are disabled.
To add the selected library to your source control system, choose the command or from the context menu.
Subversion: Then choose the command to commit the library.
Note:
When the command prompt window with the executed commands
is shown, proceed as described above. The corresponding instructions will no
longer be given in this tutorial.
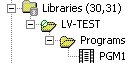
In Natural Studio's library workspace, you can now see that
the library LV-TEST has also been created in the inactive system
file (30, 31) which you have previously defined as the workspace.
![]()
When you check your repository now (for example, by invoking ViewCVS in your browser which works for both CVS and Subversion), you can see that the folder LV-TEST (which corresponds to the Natural library with the same name) has been created in the module LV-MyModule.
When you check your local project folder LV-MyFolder (for example, using the Windows Explorer), you can see that the folder LV-TEST has been created.
Since the directories which correspond to a Natural library have been created, all commands in the context menu for this library are now enabled.
Note:
CVS only: Unlike objects, you need not commit directories
to CVS. Directories are created in CVS without a commit.
Select the node for an object in the library (this tutorial
assumes that the name of this object is PGM1), invoke the context
menu and display the commands in the cascading menu .
The commands below are shown.
| For Subversion: | For CVS: |
|
|
|
Since the selected object has not yet been added to your source control system (is not under version control), only the commands for adding an object and checking out an object from CVS are enabled.
Notes:
PGM1 were
already stored in your source control system (in
LV-MyModule\LV-TEST\SRC\) you could read it with this
command.
Choose the command or from the context menu.
The subfolder SRC is automatically created and committed to your source control system since it does not yet exist.
The object is copied to your project folder
(PGM1 is now shown in the inactive environment) and, at the same
time, it is prepared to be copied to your source control system.
When you check the SRC folder in your local project folder (for example, using the Windows Explorer), you can see that the file PGM1.NSP has been created. This corresponds to the object PGM1.NSP in the file system (in a remote development environment, this applies only to UNIX and OpenVMS platforms, not to mainframe platforms where objects are stored in Adabas).
Natural objects which have been added to the local project folder no longer contain line numbers. When you look at your workspace in the inactive environment, you can see a green symbol on the library folder. This is the symbol for line number suppression.
When you check your repository now (for example, by invoking ViewCVS in your browser which works for both CVS and Subversion), the added object is not yet visible in the SRC folder and a version has not yet been created for this object. In order to see the added object in your source control system, you have to commit it. This is explained later in this tutorial.
Select the node for the library LV-TEST, invoke
the context menu and choose the command or .
The command prompt window appears, indicating that the
object PGM1 has been added locally.
Example for Subversion:
A SRC\PGM1.NSP
Example for CVS:
cvs status: Examining .
cvs status: Examining SRC
File: PGM1.NSP          Status: Locally Added
Press ENTER to proceed.
Select another Natural object in the library
LV-TEST (this tutorial assumes that you add a subprogram with the
name SUBPGM1) and from the context menu choose the command
or
to copy another
Natural module to your project folder and thus add it to your source control
system.
Make a small change in the program PGM1 using
the program editor and save this change. Then select PGM1, invoke
the context menu and choose the command . This copies the program from the system file
to the project folder. You can use this command since you have already added
the program to your source control system.
Note:
As an alternative, you can also use the command
or
. In this case,
the addition to your source control system is ignored, but the object is copied
to the project folder.
You will now commit all added objects to your source control system in one step.
Select the node for the library LV-TEST, invoke
the context menu and choose the command or .
Note:
You can also commit each object separately to your source
control system using the command
or . Or if you want to add and
commit an object in one step, use the command or .
In this case, you can enter a different commit log message for each single
object.
A dialog box appears in which you can enter a log message. A string including the current date and time, and your user ID is automatically provided.
Choose the button to proceed.
Since the options in the Show command scripts group box have been enabled, the command prompt window appears, showing the commands that have been executed by your source control system and the result of the execution.
Example for Subversion:
C:\natural\natapps\SVN\LV-MyFolder>svn update LV-TEST
At revision 651.
C:\natural\natapps\SVN\LV-MyFolder>svn commit -m "Commit_date:2007-06-25_time:15
:31:56_uid:USER1" LV-TEST
Adding LV-TEST\SRC\PGM1.NSP
Adding LV-TEST\SRC\SUBPGM1.NSN
Transmitting file data ..
Committed revision 652.
Example for CVS:
cvs update: Updating LV-TEST
cvs update: Updating LV-TEST/SRC
A LV-TEST/SRC/PGM1.NSP
A LV-TEST/SRC/SUBPGM1.NSN

cvs commit: Examining LV-TEST
cvs commit: Examining LV-TEST/SRC
/qatest1/Fuser200/LV-TEST/SRC/PGM1.NSP,v <-- LV-TEST/SRC/PGM1.NSP
initial revision: 1.1
/qatest1/Fuser200/LV-TEST/SRC/SUBPGM1.NSN,v <-- LV-TEST/SRC/SUBPGM1.NSN
initial revision: 1.1
To synchronize the LV-TEST library tree with
the repository, a Subversion or CVS update command
is issued before the Subversion or CVS commit
command.
In CVS, you can see that PGM1.NSP and SUBPGM1.NSN have been committed, each with the version 1.1. In Subversion, you can see that PGM1.NSP and SUBPGM1.NSN have been committed under a new revision; in the above example, this is the revision 652. The objects are now resident in your source control system.
When you check your repository now (for example, by invoking ViewCVS in your browser which works for both CVS and Subversion), you can see that these objects are contained in the folder LV-MyModule/LV-TEST/SRC.
Now that the first version of your project is ready and has been committed to the module LV-MyModule, you will make a branch from this module and call it "Beta1". This branch will always show you which objects of which revision are included in the first version of your project. In case you need to make changes later to the first version of your project (for example, if somebody reports a bug in this version), you use the Beta1 branch. In the meantime, you may continue developing the second version of your project on the main branch.
In CVS, a branch is created with the CVS command
tag. In Subversion, a branch is created with the
Subversion command copy. Before you can create a
branch, you first have to enter a name for this branch (Beta1) in the project
definition.
To make a branch
Invoke the dialog box for the project definition that you have used for the previous exercise and enter the name "Beta1" in the Branch text box. Leave all other entries unchanged.
In the Natural library workspace, select the node for the system file, invoke the context menu and from the cascading menu , choose the command or .
Note:
Since a branch has been specified in the project
definition, the command is now enabled.
Since the options in the Show command scripts group box have been enabled, you can see that all objects in the module LV-MyModule are tagged with "Beta1".
Example for Subversion:
C:\natural\natapps\SVN\LV-MyFolder>svn copy http://natsvn/repos/user1/LV-MyModule
http://natsvn/repos/user1/Beta1/ -m "make branch"

Committed revision 653.
Press any key to continue . . .
Example for CVS:
$ cvs -d :pserver:natsvn:/qatest1 tag -b Beta1
cvs tag: Tagging
cvs tag: Tagging LV-TEST
cvs tag: Tagging LV-TEST/SRC
T LV-TEST/SRC/PGM1.NSP
T LV-TEST/SRC/SUBPGM1.NSN
Note:
In the next exercise, you will continue to work on the
main branch (not on the Beta1 branch). In order to work with the Beta1 branch,
you have to check it out in a separate step. In this case, you should also
specify a different project folder for the Beta1 branch so that you do not mix
up the main branch with another branch. This will be explained later in this
tutorial.
Now that you have created the branch Beta1, you will continue to work with the project on the main branch. To do so, you have to remove the branch Beta1 from the project definition.
Since you did not delete or change the project folder for the main version, you do not need to check out the main version. The objects are already there. You just have to make sure that the project folder entered in the project definition equals the local project folder. Furthermore, you have to make sure that the Natural objects in the Natural environment and the Natural objects in the project folder are still the same. If this is not the case after a checkout, you have to import the modules using the command of Local Versioning.
To continue work on the main branch
Invoke the dialog box for the project definition that you have used for the previous exercise and remove the name "Beta1" from the Branch text box. Leave all other entries unchanged.
To make sure, that you have the latest version of your
project in your FUSER, select the library LV-TEST,
invoke the context menu and choose the command or .
For each Natural source which already exists you will be asked whether you want to replace the object.
To replace the objects, choose the button for both objects.
To continue development of your project, apply a small
change to your program PGM1 and then save or stow it.
To put this change into your source control system, select
the object PGM1, invoke the context menu and choose the command
.
To check the status of your project folder, select the
library LV-TEST, invoke the context menu and choose the command
or
.
When you use Subversion, you will see that
SRC\PGM1.NSP is marked with "M"
(modified). SUBPGM1 is not listed since it is up to date.
When you use CVS, you will see that the status of
PGM1 is "Locally Modified" whereas
SUBPGM1 has the status "Up-to-date".
This is the expected status: since you have last committed
the library to your source control system, you have changed PGM1
but you did not change SUBPGM1.
Now that you have completed all required changes, you can commit them.
Select the node for the library LV-TEST, invoke
the context menu and choose the command or .
A dialog box appears in which you can enter a log message.
Choose the button to proceed.
In Subversion, a new revision is created. In this example,
this is the revision 654. This revision contains the changed PGM1
and the old SUBPGM1. This is the new version of your project. It
is different from the Beta1 branch which has the revision 653.
In CVS, a new version of PGM1 is created, that
is version 1.2. Now you have a new version of your project which is different
from the version tagged with "Beta1". In fact, only
PGM1 is different. SUBPGM1 belongs to the branch
Beta1 and to the main branch.
Suppose you have shipped the version Beta1 to a customer and the customer reports a bug that you want to fix. You know that the customer works with the branch Beta1. Since you need the sources from this branch, you have to change the project definition again. In this case, you have to specify a new project folder, in addition to the branch name. It is important that you specify a new project folder so that you do not mix up the main branch with the Beta1 branch.
To work on the branch Beta1
Invoke the dialog box for the project definition that you have used for the previous exercise and proceed as follows:
For Subversion, replace the repository module "LV-MyModule" in the Module text box with the name "Beta1".
For CVS, specify the name "Beta1" in the Branch text box.
For Subversion and CVS, specify the name "LV-MyFolder-Beta1" in the Project folder text box.
Use the Configuration Utility to define the workspace as an additional inactive environment (for example, DBID 30, FNR 32 pointing to the project folder C:\natural\natapps\SVN\LV-MyFolder-Beta1 in the workspace for Subversion).
The new inactive environment appears in Natural Studio's library workspace.
To ensure that you do not have obsolete Natural objects in
the library LV-TEST, delete this library on your
FUSER.
Select the node for the system file, invoke the context menu and choose the command or .
Subversion: The objects in the repository module
Beta1 (created equally and in parallel to the module
LV-MyModule) are checked out: PGM1 and
SUBPGM1 from revision 653 are read into the project folder
LV-MyFolder-Beta1 and are imported into library
LV-TEST on your FUSER. Note that in this example the
latest version of PGM1 and SUBPGM1 in the main branch
of the project is revision 654.
CVS: The objects in the Beta1 branch are checked out:
PGM1 (revision 1.1) and SUBPGM1 (revision 1.1) are
read into the project folder LV-MyFolder-Beta1 and
imported into the library LV-TEST on your FUSER. Note
that the latest version of PGM1 in the main branch of the project
is revision 1.2.
In your Natural environment, library LV-TEST is
created on the FUSER and on the inactive environment pointing to
the workspace. SUBPGM1 is the same in the main branch and in the
Beta1 branch. PGM1 is different, since there has been a source
change after Beta1.
Apply your changes to PGM1 (that is: fix the
bug).
To put your changes into your source control system, select
the object PGM1, invoke the context menu and choose the command
.
The changed program PGM1 is copied to the
folder LV-MyFolder-Beta1. This is the folder that you have
previously specified for the Beta1 branch.
To check the status of your project folder, select the
library LV-TEST, invoke the context menu and choose the command
or
.
When you use Subversion, you will see that the status of
PGM1 is "M" (modified).
SUBPGM1 is not listed since it has not changed.
When you use CVS, you will see that the status of
PGM1 is "Locally Modified". The status
of SUBPGM1 is "Up-to-date".
You have now completed all required changes for the Beta1 branch and you will now commit them.
Select the node for the library LV-TEST, invoke
the context menu and choose the command or .
A dialog box appears in which you can enter a log message.
Choose the button to proceed.
Since the Library commands option (in the Show command scripts group box) has been enabled, you can see what happens in your repository.
Subversion creates a new revision (655 in this example)
which contains the new version of PGM1 and the version of
SUBPGM1. When you display the Subversion information with ViewCVS
(which also works for Subversion), you can find the Beta1 version in the
Beta1 module of the repository.
CVS creates a new version of PGM1 which has the
revision 1.1.2.1. Remember that this program has the revision 1.2 on the main
branch. When you display the CVS information with ViewCVS, you can see that CVS
has started a branch from revision 1.1.
Your latest version in the branch Beta1 is now stored in your source control system. You have now completed this tutorial.
This section explains all commands which are available with Local Versioning. The following topics are available:
Note:
When you issue a command which is implemented by Local
Versioning, all selected Natural objects are processed. When you select more
than one object (for example in a
list view
window for a program node), the Local Versioning commands are
applied to all of these objects. When the options in the Show command
scripts group box have been enabled, a separate command prompt
window appears for each selected object.
When you want to set up a new project in a new module, you use the command or . This command uses the following information:
The repository as specified in the project definition is accessed in your source control system.
A module with the name as specified in the project definition is created in the repository.
The workspace folder and the project subfolder are created as specified in the project definition.
When you want to start a new project, it is important that the project folder is empty. If the project folder exists already and if it contains modules, these modules will be added to your source control system (known as "vendor branch" in the Subversion or CVS documentation).
Note:
If you want to get an existing project from your source control
system, use the command or
and the command
Import System File into Natural. You can also perform the
above two steps with a single command: or . See Getting
Existing Objects from Your Source Control System and
Importing into
Natural for further information.
To set up a new project
Select the node for the system file which contains the sources that you want to store in your source control system.
Invoke the context menu and choose or .
Note:
The usage of this command can be disabled in the
options.
When you add a library to CVS, it is immediately visible in CVS. Unlike objects, you need not commit libraries. CVS directories for the Natural libraries are created in CVS without a commit.
Unlike CVS and like objects in CVS and Subversion, a library must be added and committed before it is visible in Subversion.
To add a library
Select the node for the library.
Invoke the context menu and choose or .
Subversion only: Invoke the context menu and choose .
To add and commit a library (Subversion only)
Select the node for the library.
Invoke the context menu and choose .
Note:
The command for adding a library can be disabled in the
options.
To put objects into your source control system, you first have to add the object and then you have to commit the added object. It is also possible to add and commit an object in one step, to commit the contents of an entire library, or to commit a system file with several libraries.
When you add an object to your source control system, it is copied to your project folder.
Tip:
When you switch to the file view in the library workspace and
open the Src (source) node for a library so that a
list view window is shown, you can add all objects of this library in one step.
You can also commit several objects at a time with a single or
command, which enables you to store a different commit comment for each object
in the commit log message (a separate dialog box is shown for each selected
object). When you do not need a different commit comment for each object, use
the or command to commit several objects with one command.
To add an object
Select the node for the object.
Invoke the context menu and choose or .
To commit an object
Select the node for the object.
Invoke the context menu and choose or .
A dialog box appears in which you can enter a log message. If available, a string including the date and time when the object has been saved last and the ID of the user who saved the object is automatically provided. Save data is not available for resources and error messages.
Choose the button.
To add and commit an object in one step
Select the node for the object.
Invoke the context menu and choose or .
A dialog box appears in which you can enter a log message. If available, a string including the date and time when the object has been saved last and the ID of the user who saved the object is automatically provided. Save data is not available for resources and error messages.
Choose the button.
To commit the contents of an entire library
Select the node for the library.
Invoke the context menu and choose or .
Note:
The above commands perform a Subversion or CVS
update command before committing the library.
A dialog box appears in which you can enter a log message. A string including the current date and time, and your user ID is automatically provided.
Choose the button.
To commit the contents of an entire system file
Select the node for the system file.
Invoke the context menu and choose or .
Note:
The above commands perform a Subversion or CVS
update command before committing the system
file.
A dialog box appears in which you can enter a log message. A string including the current date and time, and your user ID is automatically provided.
Choose the button.
When an object has already been copied to the project folder for the first time (using the command or ), you can use the command to copy to the project folder any changes you have applied to the object in the meantime.
Note:
Alternatively, you can use the command or .
To copy an object to the project folder
Select the node for the object.
Invoke the context menu and choose .
Note:
When the object has not yet been added to the project
folder, you will be asked whether you want to add the object.
To copy and commit an object to the project folder
Select the node for the object.
Invoke the context menu and choose or .
When you want to get an existing project from your source control system, you can check out the entire system file. It is also possible to check out only a library. Using CVS, it is possible to check out a single object. Subversion does not support to check out a single object.
When you check out a library and the corresponding project folder in the workspace does not yet exist, the project folder is created. In this case, however, the project folder is not under version control and some commands which require that the project folder is under version control (such as or , or or ) cannot be performed. When you use CVS, the same applies for the check out of an object where its library does not exist or where its library is not under version control.
When you check out objects, the files will be copied from your source control system into the project folder of your local workspace.
To check out a system file
Select the node for the system file.
Invoke the context menu and choose or .
To check out a library
Select the node for the library.
Invoke the context menu and choose or .
To check out an object (CVS only)
Select the node for the object.
Invoke the context menu and choose .
When you have checked out objects from a repository and you want
to work with them in Natural (usually in the FUSER), you have to
import the objects into Natural. You can do this either with one command which
combines check out and import, or you can use one of the import commands after
you have checked out the objects to a project folder in a workspace.
To check out and import a system file in one step
Select the node for the system file.
Invoke the context menu and choose or .
To import a system file
Select the node for the system file. This system file must be checked out.
Invoke the context menu and choose or .
To check out and import a library in one step
Select the node for the library.
Invoke the context menu and choose or .
To import a library
Select the node for the library. This library must be checked out.
Invoke the context menu and choose or .
To check out and import an object in one step (CVS only)
Select the node for the object.
Invoke the context menu and choose .
To import an object
Select the node for the object. This object must be checked out.
Invoke the context menu and choose or .
When you work on a project in a team, another developer may have changed a source on which you are also working. The update command brings changes from the repository into your working copy.
To update a system file
Select the node for the system file. This system file must be under version control.
Invoke the context menu and choose or .
To update a library
Select the node for the library. This library must be under version control.
Invoke the context menu and choose or .
To update an object
Select the node for the object. This object must be under version control.
Invoke the context menu and choose or .
To delete objects from your source control system, you first have to delete the objects and then you have to commit the deleted objects. It is also possible to delete and commit objects in one step, or to delete the contents of an entire library (either with the library itself or without the library).
Caution:
The deletion is done as a forced deletion. Modified objects
and objects not under version control are also deleted.
You are always asked to confirm the deletion. Objects and libraries are only deleted from the workspace, not from the Natural development environment.
However, if your Natural development environment (usually the
FUSER) and the workspace are identical, the objects are also
deleted from your Natural development environment. In this case, you may delete
and commit an object or library with one command, since a library or object
disappears after the deletion. Or you commit the deletion using the next higher
node (that is, use the system file node to commit a library, or use the library
node to delete an object).
To delete an object
Select the node for the object.
Invoke the context menu and choose or .
To commit the deleted object, invoke the context menu and choose or .
To delete and commit an object in one step
Select the node for the object.
Invoke the context menu and choose or .
To delete a library
Select the node for the library.
Invoke the context menu and choose or .
To commit the deleted library, invoke the context menu and choose or .
To delete and commit a library in one step
Select the node for the library.
Invoke the context menu and choose or .
When you display the status of a library or system file in the project folder, you can check whether an object has been modified.
When an object has been modified in Subversion, it is marked with "M". When an object has been modified in CVS, its status is "Locally Modified". The latest changes have not yet been committed to your source control system.
When the status of an object is not listed (Subversion) or is "Up-to-date" (CVS), it has not been changed since it has last been committed.
Note:
For a description of any other status, see the Subversion or
CVS documentation.
To check the status of a library
Select the node for the library.
Invoke the context menu and choose or .
To check the status of a system file
Select the node for the system file.
Invoke the context menu and choose or .
You can print out history information for files, that is, the commit log messages.
To display the log
Select the node for a system file, library or object.
Invoke the context menu and choose or .
You can only make a branch when a branch name has been specified in the project definition.
Subversion: When you make the branch, all objects in the specified module are copied to another module when the module name is the branch name.
CVS: When you make the branch, all objects in the specified module are tagged with the branch name that you have specified in the project definition.
Note:
If you want to work with the new branch, check it out in a
separate step. It is recommended that you use a different project folder for
each branch.
To make a branch
Select the node for the system file.
Invoke the context menu and choose or .
Note:
The usage of this command can be disabled in the
options.
Subversion only: a dialog box appears.
Note:
A dialog box does not appear for CVS since the version is
only tagged and not copied to a new module. In addition, the
switch command is not available in CVS.
Specify a new module name (branch) in the dialog box.
In addition, you can select the Switch current workspace to new module check box. Keep in mind that one workspace can serve only one repository, since the repository address is kept in the .svn status folder. When you switch to the new module, your workspace is updated with a new repository address.
Choose the button.
Local Versioning writes a log file which is stored as a resource
(text document) in the system library SYSPLCVS. The name of this
file is lv_log.log. This log file may contain information
on the processed steps or, in some cases, error information.
You can use this log file if for some reason Local Versioning stops during the processing of several objects. In the log file, you can see which object was processed last.
The Local Versioning commands in the context menu (such as
or ) are controlled via Windows command scripts. These
command scripts are stored as resources in the system library
SYSPLCVS.