
The Class Builder is a tool which can be used to display a Natural class in a structured hierarchical order, and also to manage the class and its components efficiently.
A Natural class can be composed of various components: "real" Natural objects (for example, an object data area) or objects which exist only in the class source (for example, interface components).
The Class Builder represents each component of the class in the form of a node. By selecting these nodes, the class and its components can be managed in a context-sensitive manner.
The Class Builder documentation explains how to create and modify a Natural class with the Class Builder. Please refer to Defining Classes in Introduction to NaturalX (Programming Guide) to become acquainted with the general usage of Natural classes.
The Class Builder provides the following features:
It is fully integrated in the general Natural user interface.
The components of a class are displayed as nodes in the same way as Natural modules. Every type of node has a special icon assigned which provides detailed information for that component.
Natural objects which are used by a class (for example, ODA), can be managed (edit, stow, ...) by the Class Builder.
Class and interface GUIDs (Global Unique IDs) are generated and hidden.
Class comments (one comment for every class component) can be created and changed by the Class Builder.
The class source is generated automatically.
The Class Builder can manage any syntactically correct class. Even if it is possible to change the class source with the program editor as well, the Class Builder is the recommended editor for changing classes. Please note that a class, which has been changed with the program editor and saved with syntax errors, can no longer be opened using the Class Builder.
The class syntax is highly "flexible", i.e., it is possible to obtain the same runtime behavior with different syntax constructs. This was important for earlier Natural versions, because the user had to type all class code himself. With the Class Builder, this is no longer necessary; the Class Builder will generate the class code and create Natural objects, which are used by the class. The Class Builder will generate only the most reasonable code.
For this reason, the following features are not supported by the Class Builder:
create a new GUID LDA:
The Class Builder generates a GUID for the class and the interfaces
of the class. If you want to define the GUID yourself, you must create a LDA
outside of the Class Builder and then link it to the class.
create new inline data definitions:
The Class Builder only provides for the creation of new data areas.
This is because data definitions are usually used in several places (for
example, method parameter in class and method subprogram) and it is fault-prone
if the same inline data definitions have to be used more than once.
use data from inline data definitions for assignments in the
Class Builder:
If data definitions have to be assigned to class components in the
case of unique IDs and property implementations, the Class Builder offers a
list of all data definitions from the corresponding data areas. Data from
inline data definitions will not be included in these lists. This means, for
example, that the object data variable which is defined inline cannot be used
as property implementation.
Although the Class Builder does not permit the creation of all class syntax constructs, it can nonetheless read existing classes with these constructs and can be used to modify these constructs.
If the Class Builder cannot read a class because it is syntactically incorrect, it displays an error message and activates the program editor. The syntax error must be corrected in the program editor. After the class has been saved, it can be opened with the Class Builder.
Note:
If you save a class with the Class Builder, the class source will be
generated. This means that any special source formats, such as indentation,
will be lost.
When a class is opened in the Class Builder, the contents are read from the class source and stored in an internal structure. If you then change the class, these changes are performed only on the internal structures. The changes are visible in all views of Natural. So, for example, when a new interface is added in the library workspace, a node for this interface will also be created in the "Interfaces" list view of the class. If you want to save your changes, you must execute , or for the class.
If you create a new class, this does not automatically create a new class module. This is only done when , or is executed for the class. For this reason, a "new" class will not be visible in the File View of the library workspace until it is saved the first time.
If you want to remove the changes which you applied to a class, you can use the command. This command will restore the class as it is contained in the class module, i.e., the last saved state.
If Natural is ended and unsaved classes exits, the user will be asked if the classes should be saved.
The Class Builder tries to assign every comment found in the class source to one component of the class. A comment is usually assigned to the following class component. For example a comment which is found before the definition of an interface is taken as comment for this interface.
The comments can be changed and created via the menu item, which is available for all class component nodes. For more information, see Node Properties.
Note:
If a class is read by the Class Builder for the first time, it is
possible that the Class Builder assigns the comments to a component other than
the one the user expects. No comment will be lost when the class is saved, but
the user should check if the comments are assigned to the correct
components.
When a class is saved by the Class Builder for the first time, all comments will be marked with a special tag. This ensures that the comment assignment is correct when this class is read later by the Class Builder.
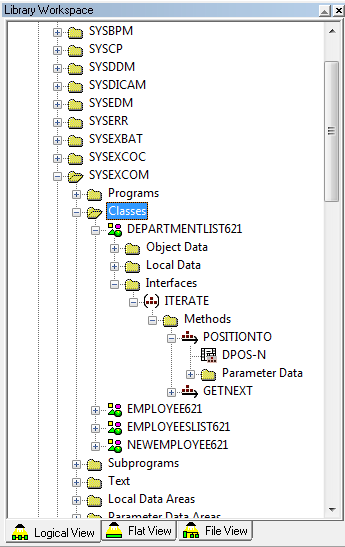
The Class Builder is available in the logical and flat view of Natural. It is fully integrated in the general Natural user interface which shows the Natural objects as nodes of a tree or list view.
In a tree view of the Library Workspace or Application Workspace, a class can be "opened" by expanding the class node. The class nodes are grouped hierarchically. For example, the interface is a child of the class node and the method is a child of the interface node. Every class node provides the same features as all other nodes, for example, a context menu which allows node-specific actions. Most of the class nodes that have child nodes can be opened as a list view which displays all children of this node. The List View shows more information about the nodes (for example, the library in which an object data area is located). The list view nodes offer the same context menu as the corresponding tree view nodes.
The following topics are covered below:
The class nodes of the logical view are inscribed with the class name,
i.e., the name that is used when an object of this class is created with the
CREATE OBJECT statement.
In the logical view the nodes are, as a basic principle, grouped by their type. This is also valid for the class nodes. Class nodes of the same type are collected under a group node which describes the type with its contents. Therefore, all object data nodes are children of the object data group node named "Object Data".
The following topics are covered below:
You can expand and collapse nodes of a class. Expand displays all child nodes and Collapse hides all child nodes of the selected class node.
The logical view provides you with a structured view of the class. You can then expand those class nodes on which you want to work. For more information, refer to the section Library Workspace.
Most of the parent nodes of a class have an assigned list view which can be opened with the command from the context menu. This section describes the information which is shown in the list views of the logical view. For more information, refer to the section List View.
The class list view consists of group nodes. The list view for a group node can be opened with the command.
The following group nodes exist:
"Object Data" group:
is displayed if the class uses a ODA
"Local Data" group:
is displayed if the class uses a LDA for class or interface
GUIDs
"Interface Modules" group:
is displayed if the class uses an Interface Module (see
Using
Interfaces from several Classes).
"Interfaces" group:
is displayed if the class has defined interfaces (internal or
external)
The class list view has the following columns:
Type:
type of the node (e.g. Object Data)
Count:
number of components of the specified type
The "Object Data" group list view consists of object data nodes. Choosing the command for a node will open the data area editor for data areas and a special Class Builder dialog for inline definitions.
The "Object Data" group list view has the following columns:
Name:
name of the object data module or "Inline" in the case of an inline
data definition
Library:
library where the object data module is located (is empty for inline
data definitions or if the data area has not yet been created)
Type:
Natural type of the object data module ("Local Data Area",
"Parameter Data Area" or "Inline Definition")
The "Local Data" group list view consists of local data nodes. Choosing the command for a node will open the data area editor for data areas and a special Class Builder dialog for inline definitions.
The "Local Data" group list view has the following columns:
Name:
name of the local data module or "Inline" for an inline data
definition.
Library:
library where the local data module is located (empty for inline
data definitions or if the data area has not yet been created).
Type:
Natural type of the local data module ("Local Data Area", "Parameter
Data Area" or "Inline Definition").
The "Interface Modules" group list view consists of interface module nodes (see Interface Module List View). Choosing the command for a node will open the list view (see Using Interfaces from several Classes) for this particular interface module.
The "Interface Modules" group list view has the following columns:
Name:
name of the interface module (copycode name)
Library:
library where interface module is located.
The interface module list view consists of interface nodes. Choosing the command for a node will open the list view (see Interface List View) for this particular interface.
The interface module list view has the following columns:
Name:
name of the interface.
The "Interfaces" group list view consists of interface nodes. Choosing the command for a node will open the list view (see Interface List View) for this particular interface.
The "Interfaces" group list view has the following columns:
Name:
name of the interface.
Component Type:
"Internal Interface" for interfaces which are defined in the class
and "External Interface" for interfaces which are defined in an interface
module included in this class.
Defined In:
interface module name for externally defined interfaces (empty for
internal interfaces).
The interface list view consists of group nodes. Choosing the command for a node will open a list view for this particular group.
The following group nodes exist:
"Properties" group:
is displayed if the interface contains property definitions
"Methods" group:
is displayed if the interface contains method definitions.
The interface list view has the following columns:
Type:
type of the node (e.g. Properties).
Count:
number of components of the specified type.
The "Properties" group list view consists of property nodes. The "Property" group list view has the following columns:
Name:
name of the property.
Format:
format of property.
Length:
length of property.
Dimension:
dimension of property.
Read-only:
shows whether property is read-only or not.
ODA Variable:
name of assigned ODA variable
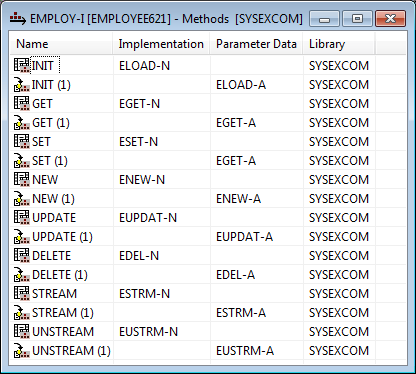
The "Methods" group list view consists of method implementation and parameter data nodes. For every method of the interface, it contains one method implementation (subprogram) node and one node for every parameter data definition of the method.
Choosing the command for a node of this list view will open the editor for the particular node type (for example, program editor for method implementation node).
The "Methods" group list view has the following columns:
Name:
name of the method. The parameter data nodes are numbered from 1 to
n (for example, INIT (2) for the second parameter data node of method
INIT).
Implementation:
only for method implementation node: the name of the subprogram
which implements the method
Parameter Data:
only for method parameter data node: the name of the parameter data
module or "Inline" for an inline data definition
Library:
depending on the node type, library where implementation or
parameter data module is located (empty for inline data definitions or if the
Natural module has not yet been created).
The "Parameter Data" group list view consists of parameter data nodes. Choosing the command for a node will open the data area editor for data areas and a special Class Builder dialog for inline definitions.
The "Parameter Data" group list view has the following columns:
Name:
name of the parameter data module or "Inline" for an inline data
definition.
Library:
library where parameter data module is located (empty for inline
data definitions or if the data area has not yet been created)
Type:
Natural type of parameter data module ( "Parameter Data Area" or
"Inline Definition")
The class nodes of the flat view show the class module name.
Unlike the logical view, the flat view does not contain any group nodes. The flat view has the advantage that the level where a specific class component is displayed is lower compared to the logical view, and thereby provides you with a better class overview.
The following topics are covered below:
You can expand and collapse nodes of a class. Expand displays all child nodes and Collapse hides all child nodes of the selected class node. The flat view provides you with a general overview of the class. It lists all sub-components of a class component on the same level. For example, if an interface node is expanded, all properties and methods of the interface will be displayed as child nodes of the interface node. For more information, see Library Workspace.
The flat view supports only a few list views because of the low node nesting level. The list views can be opened with the command from the context menu. This section describes the information which is shown in the list views of the flat view. For more information, refer to the section List View.
The class list view contains a node for every child component.
The following nodes exist:
Object Data node
for every ODA of the class. Choosing the
command of the node opens the data area editor
for data areas and a special Class Builder dialog for inline definitions
Local Data node
for every GUID LDA of the class. Choosing the
command of the node opens the data area editor
for data areas and a special Class Builder dialog for inline definitions.
Interface Module node
for every interface module which is used by the class. Choosing the
command of the node will open the interface
module list view.
Interface node
for every interface of the class (external and internal). Choosing
the command of the node will open the interface
list view.
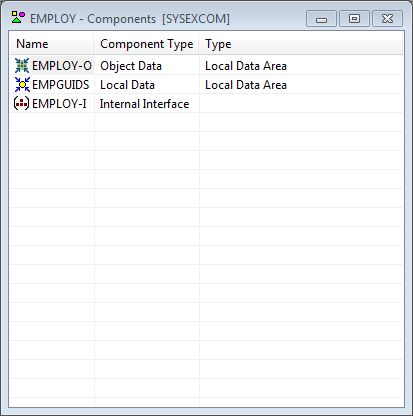
The class list view has the following columns:
Name:
name of the component.
Component Type:
indicates the type of the component ("Object Data", "Local Data",
"Interface Module", "External Interface" or "Internal Interface").
Type:
only for component type "Object Data" and "Local Data": Natural type
of data module ("Local Data Area", "Parameter Data Area" or "Inline
Definition")
The interface module list view consists of interface nodes. Choosing the command of a node will open the list view (see List Views) for this particular interface.
The interface module list view has the following columns:
Name:
name of the interface.
The interface list view contains all nodes for the properties and methods of the interface.
The following nodes exist:
Property node
for every property of the interface.
Method implementation node
for every method of the interface. Choosing the
command for the node will open the program
editor with the specified implementation (subprogram).
Method parameter data node
for every parameter data component of every method of the interface.
Choosing the command for the node will open the
data area editor for data areas and a special Class Builder dialog for inline
definitions.
The interface list view has the following columns:
Name:
name of the property or method; the parameter data nodes for methods
are numbered from 1 to n (for example, INIT (2) for
the second parameter data node of method INIT).
Implementation:
only for properties and method implementation node: the name of the
assigned ODA variable for properties and the name of the subprogram which
implements the method for methods.
Parameter Data:
only for method parameter data node: the name of the parameter data
module or "Inline" for an inline data definition.
Library:
only for methods: depending on the node type, library where
implementation or parameter data module is located (empty for inline data
definitions or if the Natural module has not yet been created).
Format:
only for properties: format of property.
Length:
only for properties: length of property.
Dimension:
only for properties: dimension of property.
Read-only:
only for properties: shows whether property is read-only or not.
Related to the user interface, every component of a class is represented by a node. Nodes are displayed both in tree views and in list views.
Every node has an icon and textual information about the component which can be the name of the component (in the library workspace) or the name of the component and additional information (in the list views).
The following table lists all available Class Builder nodes with their icons and a short description:
| Type | Icon | Description |
|---|---|---|
| new class |
|
new class which has not yet been saved |
| class (src) |
|
class which is only available as source |
| class (gp) |
|
class which is only available as generated program |
| class (src & gp) |
|
class which is available as source and generated program |
| ODA |
|
object data defined in a data area module |
| inline ODA |
|
object data defined with an inline data definition |
| LDA |
|
local data (for GUIDs) defined in a data area module |
| inline LDA |
|
local data (for GUIDs) defined with an inline data definition |
| Interface Module |
|
interface module, i.e., copycode which defines interfaces |
| internal interface |
|
interface which is defined in the class |
| external interface |
|
interface which is defined in an interface module that is used by the class |
| internal property |
|
property which is defined in an internal interface |
| external property |
|
property which is defined in an external interface |
| internal method |
|
method which is defined in an internal interface |
| external method |
|
method which is defined in an external interface |
| method implementation |
|
subprogram which implements a method |
| method PDA |
|
method parameter data defined in a data area module |
| inline method PDA |
|
method parameter data defined with an inline data definition |
In the following section, the Class Builder nodes are described in more detail. The commands of a specific node can be invoked from the context menu of the node or the "Classes" toolbar.
The following topics are covered below:
The class node represents the class itself. The name displayed in the class node is either the class name (logical view) or the class module name (flat view).
If a new class is created, it is displayed with the new class icon until it is saved the first time. Therefore, new class means that the class is only "transient" in the current Natural session and is not available in source format. For this reason, the new class will not be shown in the File View which shows the source and gp files of the Natural objects. In addition, it is not possible to execute all class node commands on a new class.
The source-only class icon is displayed if the class is only available in source format but has not yet been cataloged.
The GP-only class icon is displayed if the class is only available in GP format. Classes of this type cannot be handled with the Class Builder and the context menu of these classes is the same as for all other Natural objects which are only available in GP format.
The Source-and-GP class icon is displayed if the class is available in source and GP format.
| Command | available for | Description |
|---|---|---|
| Open |
new |
Opens the class list view. For more information, see List Views |
| List |
new |
Opens the program editor in read-only state with the internal source format of the current class structure. |
| Cat |
source-only |
Catalogs the current class. |
| Save |
new |
Saves the current class structure in the given class module. |
| Save As |
new |
Saves the current class structure in a new Natural module or with a different encoding. |
| Stow |
new |
Stows the current class structure in the given class module. |
| New ODA |
new |
Creates a new object data area for the class. |
| New Interface |
new |
Creates a new interface for the class. |
| New Interface Module |
new |
Creates a new interface module. This interface module is linked to the class. |
| Link LDA |
new |
Uses an existing data area as GUID LDA for the class. See Link. |
| Link ODA |
new |
Uses an existing data area as ODA for the class. See Link. |
| Link Interface Module |
new |
Uses an existing copycode as interface module for the class. All interfaces defined in the Interface Module will be included in the class. See Link. |
| Register | source-and-GP | Registers the class in the system registry. For more information, see NaturalX in the Programming Guide. |
| Unregister | source-and-GP | Unregisters the class from the system registry. For more information, see NaturalX in the Programming Guide. |
| Rename |
new |
Changes either the class name or the class module name depending on the current view of the library workspace. For more information, see Renaming Class Members. |
| Delete |
new |
Deletes the Natural module of the class (for source-only and source-and-GP) or only the internal structure of the class (new). |
| Restore |
source-only |
Removes all changes of the class which have not yet been saved. This command will close all list views of the class and collapse the class node in the library workspace. |
| Cut |
source-only |
Cuts the class module. |
| Copy |
source-only |
Copies the class module. |
| Paste |
source-only |
Pastes the class module. |
|
new |
Prints the source format of the current class structure. | |
| Properties |
new |
Opens the Properties dialog which shows class-specific information. For more information, see Node Properties. |
An object data node represents an object data area module or an inline object data definition. A class can have several object data nodes. If more than one object data node exists, you must take care to follow the correct object data sequence when you use these nodes in method implementations.
This type indicates that the object data is defined in a separate Natural module of type local data area or parameter data area. The name which is displayed in the node is the name of the Natural data area module.
This type indicates that the object data is defined direct in the
class source with a DEFINE DATA OBJECT statement. In
this case, the object data has to be defined again in every method
implementation which uses the object data. A node of this type is always named
"Inline".
| Command | available for | Description |
|---|---|---|
| Open | data area | Opens the data area module with the data area editor. |
| Edit | inline data definition | Opens a dialog which shows the contents of the inline data definition for editing. |
| List | data area | Lists the data area module. |
| Cat | data area | Catalogs the data area module. |
| Stow | data area | Stows the data area module. |
| Unlink | data area | Unlinks the data area module from the class, i.e. it is no longer used as Object Data Area for the class. |
| Rename | data area | Renames the Object Data Area link, i.e. uses another data area module as Object Data Area for the class. For more information, see Renaming Class Members. |
| Delete | inline data definition | Deletes the inline data definition from the class. |
| data area | Prints the data area module. | |
| Properties |
data area |
Opens the Properties dialog which shows object data-specific information. For more information, see Node Properties. |
An GUID Local Data node represents a local data area module or an inline local data definition which contains GUID definitions. A class can have several local data nodes.
This type indicates that the GUID local data is defined in a separate Natural module of type local data area or parameter data area. The name which is displayed in the node is the name of the Natural data area module.
This type indicates that the GUID local data is defined direct in the
class source with a DEFINE DATA LOCAL statement. A
node of this type is always named "Inline".
| Command | available for | Description |
|---|---|---|
| Open | data area | Opens the data area module with the data area editor. |
| Edit | inline data definition | Opens a dialog which shows the contents of the inline data definition for editing. |
| List | data area | Lists the data area module. |
| Cat | data area | Catalogs the data area module. |
| Stow | data area | Stows the data area module. |
| Unlink | data area | Unlinks the data area module from the class, i.e. the data area module is no longer used as GUID Local Data Area for the class. |
| Rename | data area | Renames the GUID Local Data Area link, i.e. uses another data area module as GUID Local Data Area for the class. For more information, see Renaming Class Members. |
| Delete | inline data definition | Deletes the inline data definition from the class. |
| data area | Prints the data area module. | |
| Properties |
data area |
Opens the Properties dialog which shows local data-specific information. For more information, see Node Properties. |
An Interface Module node represents an interface module. The interface module is a Natural module of type copycode which defines interfaces that can be included in several classes. For more information about interface modules and their usage, see Using Interfaces from several Classes.
| Command | Description |
|---|---|
| Open | Opens the interface module list view. For more information, see List Views. |
| List | Opens the program editor in read-only state with the source format of the current Interface Module structure. |
| Save | Saves the current Interface Module structure in the given Natural copycode module. |
| New Interface | Creates a new interface in the Interface Module. |
| Unlink | Unlinks the Interface Module from the class, i.e. the interfaces defined in the Interface Module are no longer available in the class. |
| Prints the source format of the current Interface Module structure. | |
| Properties | Opens the Properties dialog which shows Interface Module-specific information. For more information, see Node Properties. |
An interface node represents an interface of an interface module or a class. For more information about internal and external interfaces, see Using Interfaces from several Classes.
The parent of an internal interface is either an interface module or a class. If its parent is an interface module, this means that the interface is defined in the interface module which is used by the class. In this case, the interface will be displayed a second time as an external interface of the class (For more information, see Using Interfaces from several Classes). If the internal interface is a child of the class itself, this means that the interface is defined direct in the class.
An external interface can appear only as subnode of a class, which uses an interface module which defines this interface. The commands which can be executed on an external interface node are only a subset of the commands available for an internal interface. Basically you can only change the implementation of such an interface. For more information, see Using Interfaces from several Classes.
| Command | available for | Description |
|---|---|---|
| Open |
internal |
Opens the interface list view. For more information, see List Views. |
| New Method | internal | Creates a new method for the interface. |
| New Property | internal | Creates a new property for the interface. |
| Rename | internal | Renames the interface. For more information, see Renaming Class Members. |
| Delete | internal | Deletes the interface and all its dependent components. |
| Properties |
internal |
Opens the Properties dialog which shows interface-specific information. For more information, see Node Properties. |
A property node represents a property of an internal or external interface.
If a property appears as subnode of an internal interface, it will be displayed as internal property. An internal property node always has a dedicated external property node.
If a property appears as subnode of an external interface, it will be displayed as external property. The commands which can be executed on an external property are only a subset of the commands which are available for internal properties.
| Command | available for | Description |
|---|---|---|
| Rename | internal | Renames the property. For more information, see Renaming Class Members. |
| Delete | internal | Deletes the property. |
| Properties |
internal |
Opens the Properties dialog which shows property-specific information. For more information, see Node Properties. |
A method node represents a method of an internal or external interface.
If a method appears as subnode of an internal interface, it will be displayed as an internal method. An internal method node always has a dedicated external method node.
If a method appears as subnode of an external interface, it will be displayed as external method. The commands which can be executed on an external method are only a subset of the commands which are available for internal methods.
| Command | available for | Description |
|---|---|---|
| New PDA | internal | Creates a new method parameter data area for the method. |
| Link PDA | internal | Uses an existing parameter data area as method PDA. See Link. |
| Link implementation |
internal |
Uses an existing subprogram as method implementation. See Link. |
| Rename | internal | Renames the method. For more information, see Renaming Class Members. |
| Delete | internal | Deletes the method and all its dependent components. |
| Properties |
internal |
Opens the Properties dialog which shows method-specific information. For more information, see Node Properties. |
A method implementation node represents the Natural subprogram which is executed when the method is called.
| Command | Description |
|---|---|
| Open | Opens the subprogram of the method implementation in the program editor. |
| List | Lists the subprogram of the method implementation in read-only mode in the program editor. |
| Cat | Catalogs the subprogram of the method implementation. |
| Stow | Stows the subprogram of the method implementation. |
| Rename | Renames the method implementation, i.e. uses another subprogram for the method implementation. For more information, see Renaming Class Members. |
| Prints the subprogram of the method implementation. | |
| Properties | Opens the Properties dialog which shows method implementation-specific information. For more information, see Node Properties. |
A method parameter data node represents a parameter data area module or an inline parameter data definition. A method can have several method parameter data nodes, which define the parameter used by the method implementation. If more than one method parameter data node exists, you must ensure that the correct parameter data sequence is used in method implementations.
This type indicates that the method parameter data is defined in a separate Natural module of type parameter data area. The name which is displayed in the node is the name of the Natural parameter data area module.
This type indicates that the method parameter data is defined direct
in the class source (or interface module source) with a DEFINE
DATA PARAMETER statement. In this case, the parameter data must
be defined again in every method subprogram. A node of this type is always
named "Inline".
| Command | available for | Description |
|---|---|---|
| Open | data area | Opens the data area module with the data area editor. |
| Edit | inline data definition | Opens a dialog which shows the contents of the inline data definition for editing.. |
| List | data area | Shows the listing of the data area module. |
| Cat | data area | Catalogs the data area module. |
| Stow | data area | Stows the data area module. |
| Unlink | data area | Unlinks the data area module from the method, i.e. the data area module is no longer used as parameter data area for the method. |
| Rename | data area | Renames the method parameter data area link, i.e. uses another data area module as parameter data area for the method. For more information, see Renaming Class Members. |
| Delete | inline data definition | Deletes the inline data definition. |
| data area | Prints the data area module. | |
| Properties |
data area |
Opens the Properties dialog which shows method parameter data-specific information. For more information, see Node Properties. |
The Class Builder provides node-specific information on Natural classes and their elements if context-menu entry is chosen. This context-menu entry is available if an object is selected in the library workspace or in a list view. The property sheet provides no information on group nodes.
The information itself is presented in a property sheet. The actual number of property pages shown depends on the type of the selected object.
: Accept modifications.
: Skip modifications.
For all class elements, property pages General and Comment are available. The other property pages depend on the selected node type.
The following topics are covered below:
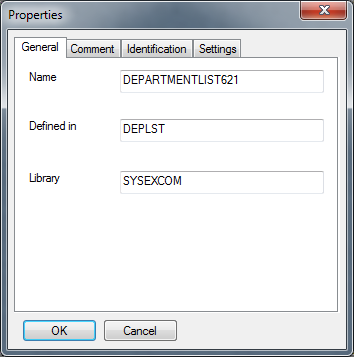
This property page shows general information on the selected object. Its contents vary with the corresponding type of node and are described in the following sections.
| Name | Class Name |
| Defined in | Class Module |
| Library | Library |
| Name | Name of Object or Local Data Area |
| Used in | Class Name |
| Library | Library |
| Name | "Inline Definition" |
| Defined in | Class Name |
| Name | Name of Interface Module |
| Used in | Class Name |
| Library | Library |
| Name | Name of Interface |
| Defined in | Class Name |
| Interface Module | If the interface is defined in an interface module this field shows the corresponding name. |
| Name | Name of Method |
| Defined in | Name of the interface that offers this method. |
| Interface Module | If the method is defined in an interface module this field shows the corresponding name. |
| Name | Name of Subprogram |
| Used in | Name of the method that is implemented by this subprogram. |
| Library | Library |
| Name | Name of Parameter Area |
| Used in | Name of Method |
| Library | Library |
| Name | Name of Property |
| Defined in | Name of the interface that offers this property. |
| Interface Module | If the property is defined in an interface module this field shows the corresponding name. |
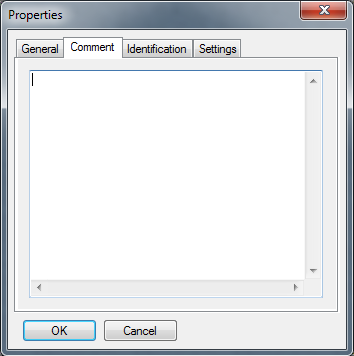
Each component has its own comment.
This property page shows the comment and allows adding new or modifying existing comments. They are entered and listed without any special syntactic notation.
The comment is changed if the property sheet is left by pressing . Pressing leaves the comment unchanged.
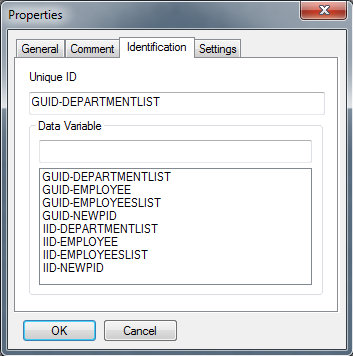
This property page is available for class and interface nodes. For interfaces, the list box below is only enabled if the interface is defined direct as part of the class. The list box is not visible if the interface is defined in an interface module.
The upper control Unique ID shows the current Global Unique ID of a class or an interface as read-only information.
This list box offers all data variables contained in local data areas that are linked to the class. These variables can be used as unique identifiers. Inline definitions of variables are not supported.
To exchange the current Global Unique ID that is displayed in the upper control with another value, select a variable from the list. The name control is then updated with the newly selected variable name. The Global Unique ID is exchanged if a variable has been selected and the property sheet is left by pressing . Pressing leaves the identification unchanged. There is no check whether a selected variable represents a valid Global Unique ID.
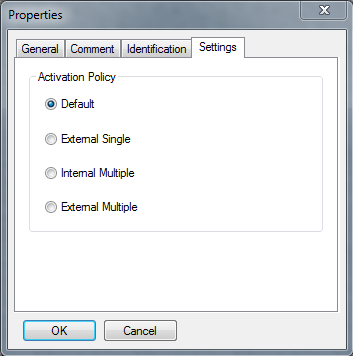
This property page is available for class nodes only. It allows setting the class's activation policy within the Class Builder.
An activation policy for a class can be:
External Single
Internal Multiple
External Multiple
Or it is set to default.
More information on the meaning of these values can be found in NaturalX in the Programming Guide.
To change the current activation policy select the required value.
The value is changed if the property sheet is left by pressing . Pressing leaves the identification unchanged.
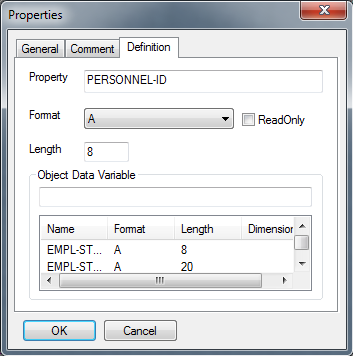
This property page is available for properties of interfaces only. It allows modifying the definition of an existing property.
The property's name cannot be changed. The following changes are possible:
An Object Data Variable can be assigned to the property.
The available Object Data Variables are listed in the page's list box together with their format definition and dimension.
They are taken from the Object Data Areas that are linked to the current class. Inline definitions of variables are not supported.
Existing assignments of Object Data Variables to properties can be changed. The corresponding control is then updated with the newly selected variable's name.
The property's format definition can be added or changed if it is different from the Object Data Variable's definition.
Otherwise format and length definition are taken from the assigned Object Data Variable.
It can be defined whether this property is used read only.
The definition of the property is changed if the property sheet is left by pressing . Pressing leaves the definition unchanged.
To make the development of a class more comfortable the Class Builder offers two ways to add components to a class.
The following topics are covered below:
Existing Natural objects can be linked to a class component.
If context menu item is activated for an object node a dialog is opened. It lists all objects of the required type that can be found in the current library or its steplibs.
If an object has been selected and the dialog is left by pressing , a reference to the selected object is added to the class structure. leaves the class structure unchanged.
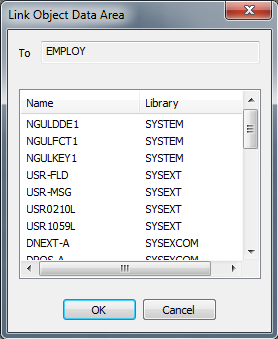
A GUID Local Data Area, an Object Data Area or an Interface Module can be linked to a class. The dialog shows object name and library.
Each method requires a method implementation. The existing implementation can be exchanged by linking another subprogram to a selected method. Moreover, one or more Parameter Data Areas can be linked to a method. The dialog shows object name and library.
New class components are created with context menu item .
In the library workspace, class components are created using in-place editing. List views use dialogs to query the necessary data and create new objects. This applies to all nodes apart from class properties: They are always created using a dialog.
The following sections describe how the different class components are created.
A new class is first created as an internal class structure. At this time the class name is defined. The class module name, i.e. the name of the actual Natural object, is assigned when the class is saved the first time.
A new class name, for example NEWCLS, is generated. The corresponding tree node is selected and made available for in-place editing. The name can be changed to any valid class name.
A dialog is opened that asks for the name of the new class.
Creating a new object data area adds a reference to a new component to the class structure. The corresponding Natural object is not yet created. It is created if you confirm such when you open it.
A new object data area, for example NEWODA, is generated. The corresponding node is selected and is made available for in-place editing. The name can be changed to any valid data area name.
A dialog is opened that asks for the name of the new object data area.
Creating a new interface module adds a reference to a new component to the class structure. The corresponding Natural object is not yet created. It is created if it contains interfaces at the time the class is saved.
A new interface module, for example NEWEIF, is generated. The corresponding node is selected and is made available for in-place editing. The name can be changed to any valid copycode name.
A dialog is opened that asks for the name of the interface module.
A new interface, for example NEWIIF, is generated. The corresponding node is selected and is made available for in-place editing. The name can be changed to any valid interface name.
A dialog is opened that asks for the name of the interface.
A new method, for example NEWMET, is generated. The corresponding node is selected and is made available for in-place editing. The name can be changed to any valid method name. The new method name is also taken as the name of the method implementation. Both are added to the class structure. If the method name is longer than a valid Natural subprogram name, only the first characters are used to guarantee a valid implementation name.
A dialog is opened that asks for the name of the method. The new method name is also taken as the name of the method implementation. Both are added to the class structure. If the method name is longer than a valid Natural subprogram name the first characters are used to guarantee a valid implementation name.
New properties are always created using a dialog.
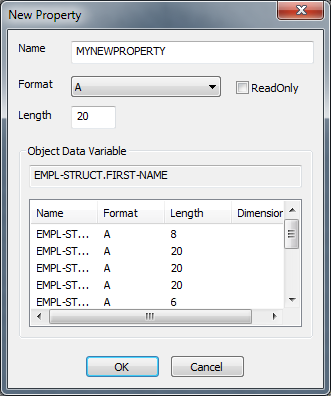
This dialog retrieves the following information:
| Property name: | A valid property name. This is either a new name or the name of the selected ODA variable. For fully qualified ODA variable names the dot is replaced by an underscore. |
| ODA variable: | The list box lists all variables that are defined in the linked
ODAs.
If property name, format and length are not changed, these values are taken from the selected ODA variable. |
| Format: | Format and length can be changed if they must be different from the ODA variable's definitions. |
| Read-Only: | The property can be marked as read-only. |
Like any other Natural object that can be modified in the Natural Studio, the components of a class are renamed by editing their identifier in place. This is done using the mouse or by pressing F2 or by choosing context menu entry which is enabled for every class component.
During the edit process the new name is checked for syntactical correctness. If it is not a valid Natural name the edit mode cannot be left. Pressing ESC cancels the edit mode and resets the old identifier.
If class components refer to Natural objects such as Object Data Areas, Parameter Data Areas or Interface Modules, only the references within the class are changed. The corresponding Natural objects are not renamed. They have to be changed explicitly if required.
Context menu entry is available for class components that refer to Natural objects like Data Areas or Interface Modules. If these modules have been linked to a class previously they can be removed using .
This action only removes the reference to selected components from the class. It does not delete an existing Natural object.
Context menu entry is available for classes and those of their components that do not refer to Natural objects.
If this context menu item is selected, the Class Builder's Delete dialog will be displayed.
You are asked whether you want to delete the selected component(s). A list of references that shows the dependent Natural objects is displayed for each component (if you do not choose ). These Natural objects are identified by name, library and Natural object type if required. The list serves for information purposes only. The dependent Natural sources are not affected.
If the selected component is the class itself, the internal structure is deleted and the corresponding Natural source and cataloged modules are removed from the library.
| Yes | Deletes the selected component. If several components are selected, the list of references is shown for the next component. |
| Yes to All | Closes the dialog and deletes all selected components. |
| No | Does not delete the selected component. If other components are selected, the delete procedure continues by displaying the delete dialog for the next component. |
| Cancel | Closes the dialog without deleting anything. |
At the time a new class is created, the corresponding new class module is not yet created. This occurs only if , or is called for the class.
called for an existing class writes the class source to the class module.
If is called for a new class that does not yet have a corresponding class module, then is treated like . The encoding is initialized with the default code page currently used. If such a class module does not yet exist in the current library, the class module is created and the source is written to this object.
If is called, a dialog is opened that prompts for the class module and the encoding of the class. The input length is restricted to guarantee a valid Natural class module name and the input is checked for validity. If such a class module does already exist or if the name is invalid, an error message is issued.
If the command is called, the class source is cataloged and a corresponding class GP is generated. This does not apply to new classes.
As for other Natural objects internally saves and catalogs a class. If a new class is to be stowed, you are prompted for the class module as described for .
Natural objects that can act as class components can also be modified in the context of the class structure. References to Object Data Areas, Parameter Data Areas and Interface Modules can be created by . Existing objects can be edited, saved and stowed.
Local Data Areas and method implementations cannot be created in the class's context. Here only existing objects can be linked to the class. But they can be edited, saved and stowed.
Other class components such as interfaces, methods and properties cannot be saved, cataloged or stowed independently. They can only be modified in the context of a class.
For some applications, it is useful to implement the same interface in several classes. For this purpose, it is possible to define the interface in a Natural copycode module and include this copycode module in the class which wants to implement the interface. The implementation-specific settings, like method implementations, can be defined in the copycode as a default setting, and they can be overwritten in the class, to use class specific implementations.
Natural copycode modules which define interfaces are called Interface Modules in the Class Builder environment. Interface Modules are fully integrated in the Class Builder, so that interfaces defined in an Interface Module can be handled in the same way as interfaces of a class. However, an Interface Module can only be changed with the Class Builder when it is included from a class.
Interfaces which are defined in an Interface Module are always visible in two places of a class: they are shown as an internal interface under the Interface Module node and they are shown as an external interface under the class node. The commands available for an external interface can be used to change the implementation of the interface.
You can save a changed Interface Module without saving the whole class. If an Interface Module is changed and the class which is the parent of the Interface Module node is saved, the Class Builder asks the user if he wants to save the Interface Module as well.
The locking principles for Interface Modules are described in Locking Concept.
Note:
If you change an Interface Module, you should always be aware that
this Interface Module can also be used by other classes. After saving the
changes other classes can possibly no longer be stowed without errors. The
Class Builder cannot check if your Interface Module is used by other
classes!
The class command (see Class Builder Nodes) creates a new Interface Module.
An Interface Module node is added in the tree and list views and you can then create new interfaces for the Interface Module, methods and properties for the interfaces and so on. If a new component is created for the Interface Module, the corresponding external node will be added for the class. For example, if a new interface INT1 as added to the Interface Module, an external interface node named INT1 will be created as subnode of the class. The new Interface Module is saved just as an existing Interface Module. As soon as the Interface Module exists as Natural module, it can be linked from other classes.
The class command (see Class Builder Nodes) uses an existing Interface Module for the class. A dialog is shown which lists all Natural copycode modules of the current step libraries.
Note:
The dialog will list all copycode modules and not only the Interface
Modules.
If you select a copycode module from this list which defines class interfaces, these interfaces are added to the current class interfaces. An error will be generated if you select a copycode module which does not define interfaces or if the selected copycode module contains an interface which is already defined in the class. In this case, the Interface Module is not linked to the class.
If the Interface Module was linked successfully to the class, a node for it will be added to the class tree. Opening the Interface Module node will show the interfaces of the Interface Module. Furthermore all interfaces of the Interface Module are added as external interfaces nodes to the class itself.
If the command (see Interface Module Nodes) is executed for an Interface Module, the interfaces of this Interface Module are no longer used by the class.
This has the effect that the Interface Module node itself and all external interface nodes from this Interface Module are removed from the class.
Note:
If you unlink an Interface Module from a class, all class-specific
settings contained in the class source module, such as method implementations
for the interfaces of this Interface Module, will be deleted as well.
If an Interface Module is used by a class, every interface defined in the Interface Module is represented by two nodes: an internal interface node which is a subnode of the Interface Module and an external interface node which is a subnode of the class. These two interface node types can be distinguished by their icon (see Interface Nodes). The same is of course valid for the property and method nodes: if they are children of an internal interface, they are represented by an internal node and if they are children of an external interface, they are represented by an external node (see Property Nodes and Method Nodes).
Furthermore the commands which can be executed on external interfaces, properties and methods are only a subset of the commands available on internal interfaces, properties and methods. For example, the name of an interface can only be changed for an internal interface. External interfaces allow only the redefinition of the implementation of the interface, i.e. changing the method implementation and the ODA variable which is assigned to a property.
Natural must ensure that a Natural module cannot be changed at the same time from different places. Therefore, related to the Class Builder, this means that a Natural user must be prevented from changing a Natural module with the program editor which has already been changed with the Class Builder and vice versa.
The Class Builder can be used to change Natural classes and Interface Modules which are special copycode modules (see Using Interfaces from several Classes).
Because of the different requirements, the locking concept for classes differs from the Interface Module locking concept. In the following sections both concepts are described.
The locking of classes is done very flexibly. The Class Builder does not lock a class until it is changed. This means that a class which is opened with the Class Builder can be opened in the program editor as well.
If a class is opened in the program editor, the class nodes can be viewed in the Class Builder, but it is not possible to apply any changes. Before changing the class, the program editor session has to be closed first.
If a class is visible in the Class Builder and the user changed the class in the program editor, the changes will also be shown in the Class Builder when the class is saved. If a class has been changed with the Class Builder it is no longer possible to open this class with the program editor.
The locking of Interface Modules is a bit more restrictive than the locking of classes. A two stage locking exists for the Interface Modules. For the first time the Class Builder must ensure that the Interface Module cannot be changed with the Class Builder and the program editor at the same time: if a class which uses an Interface Module is opened in the Class Builder, the Interface Module is locked. This means on the one hand, that an Interface Module can no longer be opened with the program editor, when a class which uses it is opened in the Class Builder. On the other hand, a class cannot be opened with the Class Builder when it uses an Interface Module which is already open in the program editor.
Moreover, an Interface Module can be opened several times in the Class Builder if it is included from several classes. The Class Builder must ensure that an Interface Module is opened only once, when the user wants to change it, because the other Interface Module instances are then no longer up-to-date: it will try to close all other instances, to make sure that only the current instance of the Interface Module remains visible. The Class Builder will display a confirmation dialog for this purpose which allows the user to stop the process.
If one of the classes was already changed, the user will be asked, if the changes are to be saved . After saving a changed Interface Module, it is again possible to open other classes which use the Interface Module.
This section provides a short introduction on the usage of the Class Builder.
The example shows how class EMPLOYEE in library SYSEXCOM can be built using the Class Builder.
The following topics are covered:
Activate the logical view in the library workspace and create a new library MYEXCOM that contains the local data areas EMPGUIDS and EMPLOY-O. These are just copies of the objects in SYSEXCOM.
EMPGUIDS contains GUID definitions and EMPLOY-O contains object data definitions. To create a new class MYEMPLOYEE select the library node and then select context menu item . A new tree node labeled "NEWCLS" is presented for in-place editing. Just change its name to "MYEMPLOYEE".
The object data for MYEMPLOYEE have to be defined in an object data area. This object data area can either be created by selecting context menu item of node "MYEMPLOYEE" or by linking an existing object data area via context menu item .
A dialog pops up and shows a list of all local and parameter data areas in MYEXCOM and its steplibs. These objects can be used as object data areas. Select EMPLOY-O.
To create the first interface select context menu item of node "MYEMPLOYEE". A new tree node labeled "NEWIIF" is presented for in-place editing. Just change its name to "EMPLOY-I". Further interfaces can be created accordingly or by selecting in the context menu for "Interfaces" ( group node).
To create the first method select context menu item of interface node "EMPLOY-I". A new tree node labeled "NEWMET" is presented for in-place editing. Rename this node to "INIT". A method implementation node with the same name is created automatically.
To use subprogram ELOAD-N (copied from SYSEXCOM) to implement this method, select the method's context-menu item and change the method implementation.
Parameter Data Area ELOAD-A (copied from SYSEXCOM) can be linked using and then selecting the appropriate module. Further methods can be created accordingly or by selecting in the "Methods" (group node) context menu.
To create the first property, select context-menu item of interface node "EMPLOY-I". The dialog lists all object data variables that are defined in linked object data areas and can be assigned to a property. They are shown together with their format and length definition and dimension. If one of these variables is selected without entering any information in the other control, this variable name is taken as property name and format and length definition are generated accordingly.
But the Class Builder allows assigning the property another name and format and length can be adapted as long as the new format is data-transfer compatible ( see NaturalX in the Programming Guide). The new property can be marked as read only.
So far class MYEMPLOYEE only defines interfaces internally. But there might be interfaces defined in modules that were adequate to incorporate.
For this purpose an interface module can be linked using the Class's context-menu item . The interfaces that are defined in this module are then inserted under the corresponding interface module in group "Interface Modules" and at the same time under the group node "Interfaces". To implement their methods, select the corresponding node that can be found under "Interfaces".
The Class Builder generates Global Unique IDs for classes and interfaces automatically. But if variables are to be used instead of the generated identifiers, a local data area with the corresponding definition can be linked to MYEMPLOYEE.
The existing Global Unique ID of MYEMPLOYEE can then be changed. Select context menu item and activate page Identifiers. This page is available for classes and interfaces.
The generated GUID is displayed in the upper control. Local variables that are defined in EMPGUIDS are listed in the lower box. Select EMPGUID and leave the property sheet with .
The Class Builder allows setting a class's activation policy explicitly. The current activation policy of MYEMPLOYEE can be viewed under Settings if context menu item is selected. This option is available for classes only. Select External Multiple and leave the property sheet with .
Up to now the new class MYEMPLOYEE has only existed as an internal class structure. To save all changes the class can be saved and stowed in the class module. This change of state is indicated by the changed icon.
And finally register MYEMPLOYEE by selecting context menu item on the class node.
An external interface is an interface which is defined in an interface module, that is included by the class.
An Interface Module is a Natural copycode module which defines interfaces. The Interface Module can be used in a class to define the contained interfaces. The class can overwrite the method and property implementations, but all other settings of the interface are used as defined in the Interface Module.
An internal interface is an interface which is defined direct in the class, or an interface of an Interface Module, which is defined in the Interface Module.
A method implementation is a Natural subprogram which is assigned to the method and executed when this method is called for a class object.
A property implementation is the object data variable that is assigned to a property.