
This section covers the following topics:
The Web Interface Plug-In is an optional plug-in unit for Natural Studio. Therefore, before any action can be taken, the Web Interface Plug-In must be activated in your Plug-In Manager. For detailed information on the activation procedure, see the section Plug-In Manager.
Once the Web Interface Plug-In is activated, your Natural Studio interface will be changed in the following way:
the Tools menu will display the relevant Web Interface Plug-In commands,
a toolbar will be available for the commands most frequently used.
The commands available depend on your working context.
 To invoke Program Generation commands from the main menu
From the main menu, choose Tools >
Development Tools >
![]() Web Interface Program Generation...
Web Interface Program Generation...
The available commands are described in detail in the section Program Generation.
To invoke Class Generation commands from the main menu
From the main menu, choose Tools >
Development Tools >
![]() Web Interface Class Generation...
Web Interface Class Generation...
The available commands are described in detail in the section Class Generation.
To invoke Test Utility commands from the main menu
From the main menu, choose Tools >
Development Tools >
![]() Web Interface Test Utility...
Web Interface Test Utility...
The available commands are described in detail in the section Online Test Utility.
To invoke Web Interface options from the main menu
From the main menu, choose Tools >
Development Tools >
![]() Web Interface Options...
Web Interface Options...
The available commands are described in detail in the section Options.
To invoke Web Interface Plug-In commands, use the following toolbar
buttons
For the Generation Wizards:
|
|
Selects the HTML page that should be used for the generation process. |
|
|
Starts the external editor for the selected HTML file. |
Or:
For the Test Utility:
|
|
Starts the editor. It is disabled as long as you have not executed the program and if you have not changed the subprogram library or name. You can choose the editor within the Options dialog. |
|
|
Starts the browser.. It is disabled as long as you have not executed the program and if you have not changed the subprogram library or name. You can choose the browser in the Options dialog. |
Note:
The Program Generation Wizard is not applicable to mainframe
systems.
This section describes the use of the Program Generation Wizard, a plug-in that enables you to generate basic web Interface programs and programs that use HTML templates with the Natural Web Interface.
The basic generation can be used to generate necessary parts for a subprogram called from the internet with the web interface. Then your specific coding can be added.
The template generation works with ready designed HTML pages. These HTML pages will be loaded from the resource directory. Then specific parts can be replaced with your individual parts. The program generator reads these HTML pages, searches for the parts to be replaced (marked with special characters) and then generates an external subroutine that can be used equal to output only maps.
This section covers the following topics:
If your basic web pages are designed with editing tools, it takes some effort to include such a page in a Natural subprogram that can be called from the web.
The Web Wizard is a dialog that uses an HTML page as input and generates a Natural subprogram, which can be called by the Natural Web Server Extensions using the Natural Web Interface, or a subroutine which can be called to generate the output.
With the basic generation of the Web Wizard, a standalone Natural subprogram that can be called by the Natural Web Server Extensions using the Natural Web Interface can be produced.
To generate a subprogram/subroutine to be called directly from the
Web:
Select Type of generation: Basic.
Select your Generated Natural object.
Start the generation.
If you generated this subprogram the first time and you want to call the generated subprogram via DCOM, regenerate the DCOM class (see: Class Generation).
After the generation, this page can be called from the internet, but because this page does not set any data, the page will be empty.
Example of a basic generation
Generated Natural subprogram, to be called directly from the internet:
0010 * ----- GENERATED BY NATURAL WEB INTERFACE
* Library .....: SYSPLWEB
* Source Name .: BASIC
* -----
DEFINE DATA
PARAMETER USING W3PARM
LOCAL USING W3CONST
* ----- PRIVATE VARIABLES -----
* LOCAL
* 1 W3VALUE        (A250)
END-DEFINE
* ----- ERROR HANDLER -----
ON ERROR
PERFORM W3ERROR ##W3ERROR
PERFORM W3END ##RPC
ESCAPE ROUTINE
END-ERROR
* ----- INITIALISE HTTP API -----
PERFORM W3INIT ##RPC
* --- READ ENVIRONMENT ---
* PERFORM W3READ-ENVIRONMENT-DYNAMIC 'varname' ' ' W3VALUE
* set default value
* IF *length(W3VALUE) = 0 THEN
*  W3VALUE := ??
* END-IF
* ----- HEADER FOR SERVER -----
* PERFORM W3CONTENT-TYPE 'text/html'
*
*
* Add your individual coding using W3* subroutines or
* call your own subroutines.
*
*
* ----- END HTTP -----
PERFORM W3END ##RPC
* ----- END MAIN PROGRAM -----
*
END
To generate a subprogram to be called directly from the Web:
Select Type of generation: Standalone.
Select your Generated Natural object.
Start the generation.
If you generated this subprogram for the first time and you want to call the generated subprogram via DCOM, regenerate the DCOM class (see: Class Generation).
After the generation, you can call the Natural Web Interface to show the page.
Example of a standalone generation
Generated Natural subprogram, to be called directly from the internet:
* ----- GENERATED BY NATURAL WEB INTERFACE
* Library .....: SYSPLWEB
* Source Name .: ALONE
* -----
DEFINE DATA
PARAMETER USING W3PARM
LOCAL USING W3CONST
* ----- PRIVATE VARIABLES -----
LOCAL
1 W3VALUE        (A250)
END-DEFINE
* ----- ERROR HANDLER -----
ON ERROR
PERFORM W3ERROR ##W3ERROR
PERFORM W3END ##RPC
 ESCAPE ROUTINE
END-ERROR
* ----- INITIALISE HTTP API -----
PERFORM W3INIT ##RPC
* ----- HEADER FOR SERVER -----
PERFORM W3CONTENT-TYPE 'text/html'
*
* --- READ ENVIRONMENT ---
* PERFORM W3READ-ENVIRONMENT-DYNAMIC 'varname' ' ' W3VALUE
*  set default value
* IF *length(W3VALUE) = 0 THEN
*  W3VALUE := ??
* END-IF
* --- WRITE THE HEAD OF THE DOCUMENT ---
PERFORM W3TEXT "<!DOCTYPE 'HTML PUBLIC-//W3C//DTD HTML 3.2//EN'>"-
'<html>'-
'<head>'-
"<meta http-equiv='Content-Type' content='"-
"text/html; charset=iso-8859-1'>"-
'<title>SYSPLWEB/TEST</title>'-
'</head>'
* --- WRITE THE BODY OF THE DOCUMENT ---
PERFORM W3TEXT '<body>'-
'<h2>SYSPLWEB/TEST</h2>'-
'<hr>'
*
PERFORM W3TEXT '<p>This is your output</p>'
*
COMPRESS '<hr>generated:' *DATE *TIME INTO W3VALUE
PERFORM W3TEXT W3VALUE
* --- END THE BODY OF THE DOCUMENT ---
PERFORM W3TEXT '</body>'-
'</html>'
*
* ----- END HTTP -----
PERFORM W3END ##RPC
* ----- END MAIN PROGRAM -----
*
END
To generate a subprogram/subroutine to be called directly from the
Web:
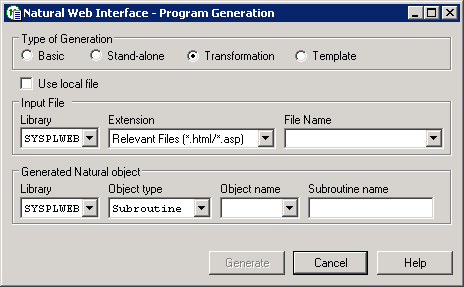
Select Type of generation: Transformation.
Select your input file of type HTML.
You can view your selected HTML page with an editor/browser.
Choose the Natural library you want to generate to.
Select the object type you want to generate.
Select your Generated Natural object.
Start the generation.
If you generated this subprogram for the first time and you want to call the generated subprogram via DCOM, regenerate the DCOM class (see: Class Generation).
After the generation, you can call the Natural Web Interface to show the page.
It is possible to specify Natural coding directly in the HTML page. After generation, the program needs no additional changes.
The HTML2NAT dialog can recognize a <NATURAL> tag.
All lines between <NATURAL> and
</NATURAL> will be copied, as they are, to the generated
Natural source object.
Appearance
<NATURAL> </NATURAL>
|
Below is information on:
Attributes DATA, LDA, GDA, SUB, NOT
Comment Tag
ASP-like Script Commands
Additional Script Directives
Example of a Simple Generation
Example of a Simple Generation with a Natural Tag
Listed below are attributes provided to define coding sections that are to be moved within the program or excluded from the program.
| Attribute | Explanation |
|---|---|
| DATA | <NATURAL
DATA> or <NATURAL LDA> moves the defined section
to the DEFINE DATA LOCAL part of your program.
|
| LDA | |
| GDA | <NATURAL GDA> moves the defined section
to the DEFINE DATA GLOBAL part of your program.
|
| SUB | <NATURAL SUB> moves the defined section
to the end of the program. This enables you to specify inline
subroutines.
|
| NOT | <NATURAL NOT> excludes the defined
section from the program. This enables you to specify the design of part of a
page that will be generated by a program.
|
Use the comment tag <!-- --> to hide the display
of defined sections of your coding. If you use the comment tag and
<NATURAL NOT>, you can display the predefined page with a
normal browser. This helps you to specify your page and replace parts of the
page dynamically.
Not only <NATURAL> and
</NATURAL> can be used, but also ASP-like (Active Server
Pages) script commands which are differentiated from the text by using the
<% and %> delimiters.
The following Natural-specific directives must be used when writing a Natural subprogram:
- Output directive:
<%= ... %>Short form for
<% PERFORM W3HTML ... %>tag- Subprogram directive:
<%SUB ... %>equal to the
<NATURAL SUB> ... </NATURAL>tag- Global Data Area directive:
<%GDA ... %>equal to the
<NATURAL GDA> ... </NATURAL>tag- directive:
<%LDA ... %>equal to the
<NATURAL LDA> ... </NATURAL>tag- Not directive:
<%NOT ... %>equal to the
<NATURAL NOT> ... </NATURAL>tag- Processing directive
<%@ LANGUAGE=NATURAL %>indicates that the used language is Natural.
HTML document:
<HTML><HEAD><TITLE>
Example1 genNat
</TITLE></HEAD><BODY><H2>
Example1 genNat
</H2><HR>
<P>This is for your output
</BODY></HTML>
Generated Natural subprogram:
* ----- GENERATED BY NATURAL WEB INTERFACE
* File ..........:
    E:\SAG\Natural\v.r\Fnat\SYSWEB\RES\example1.html
* Library .......: SYSWEB
* Source Name ...: EXAMPLE1
* Crunch Lines...: 1
* Save Source....: 1
* Line Length....: 128
* Long Constants.: 1
* -----
DEFINE DATA
PARAMETER USING W3PARM
LOCAL USING W3CONST
LOCAL
* ----- PRIVATE VARIABLES -----
1 W3VALUE (A250)
END-DEFINE
*
* ----- ERROR HANDLER -----
ON ERROR
  PERFORM W3ERROR ##W3ERROR
  PERFORM W3END ##RPC
  ESCAPE ROUTINE
END-ERROR
* ----- INITIALIZE HTTP API -----
PERFORM W3INIT ##RPC
* ----- HEADER FOR SERVER -----
PERFORM W3CONTENT-TYPE 'text/html'
*
* ----- MAIN PROGRAM -----
PERFORM
      W3TEXTLINE'<HTML><HEAD><TITLE>'
PERFORM W3TEXTLINE 'Example genNat'
PERFORM
      W3TEXTLINE'</TITLE></HEAD><BODY><H2>'
PERFORM W3TEXTLINE 'Example genNat'
PERFORM W3TEXTLINE '</H2><HR>'
PERFORM W3TEXTLINE '<P>This is for your output'
PERFORM W3TEXTLINE '</BODY></HTML> '
* ----- END HTTP API -----
PERFORM W3END ##RPC
* ----- END MAIN PROGRAM -----
*
*
* ----- SUBROUTINES -----
END
HTML document:
<HTML><HEAD><TITLE>
Example2 genNat
</TITLE></HEAD><BODY><H2>
Example2 genNat
</H2><HR>
<P>This is for your output
<HR>
<P>generated at:
<NATURAL NOT>
Time/Date
</NATURAL>
<NATURAL><!--
 PERFORM DOTIME
--></NATURAL>
<NATURAL SUB><!--
DEFINE SUBROUTINE DOTIME
 COMPRESS *TIME *DATE INTO #VALUE
 PERFORM W3TEXTLINE #VALUE
END-SUBROUTINE
--></NATURAL>
<NATURAL DATA><!--
1 #VALUE (A30)
--></NATURAL>
</BODY></HTML>
Generated Natural subprogram:
* ----- GENERATED BY NATURAL WEB INTERFACE
* File ..........: E:\SAG\Natural\v.r\Fnat\SYSWEB\RES\example2.html
* Library .......: SYSWEB
* Source Name ...: EXAMPLE2
* Crunch Lines...: 1
* Save Source....: 1
* Line Length....: 128
* Long Constants.: 1
* -----
DEFINE DATA
PARAMETER USING W3PARM
LOCAL USING W3CONST
1 #VALUE (A30)
* ----- PRIVATE VARIABLES -----
1 W3VALUE (A250)
END-DEFINE
*
* ----- ERROR HANDLER -----
ON ERROR
  PERFORM W3ERROR ##W3ERROR
  PERFORM W3END ##RPC
  ESCAPE ROUTINE
END-ERROR
* ----- INITIALIZE HTTP API -----
PERFORM W3INIT ##RPC
* ----- HEADER FOR SERVER -----
PERFORM W3CONTENT-TYPE 'text/html'
*
* ----- MAIN PROGRAM -----
PERFORM W3TEXTLINE'<HTML><HEAD><TITLE>'
PERFORM W3TEXTLINE 'Example2 genNat'
PERFORM W3TEXTLINE'</TITLE></HEAD><BODY><H2>'
PERFORM W3TEXTLINE 'Example2 genNat'
PERFORM W3TEXTLINE '</H2><HR>'
PERFORM W3TEXTLINE '<P>This is for your output'
PERFORM W3TEXTLINE '<HR>'
PERFORM W3TEXTLINE '<P>generated at:'
 PERFORM DOTIME
PERFORM W3TEXTLINE '</BODY></HTML>'
* ----- END HTTP API -----
PERFORM W3END ##RPC
* ----- END MAIN PROGRAM -----
*
*
* ----- SUBROUTINES -----
DEFINE SUBROUTINE DOTIME
 COMPRESS *TIME *DATE INTO #VALUE
 PERFORM W3TEXTLINE #VALUE
END-SUBROUTINE
END
Note:
The syntax of the Natural program will not be checked during
conversion.
To generate a subprogram/subroutine using a template that is
called directly from the Web:
Select type of generation: Template.
Select your input file of type HTML.
You can view your selected HTML page with an editor/browser.
Select the object type you want to generate.
Select your Generated Natural object.
Start the generation.
If you generated this subprogram the first time and you want to call the generated subprogram via DCOM, regenerate the DCOM class (see: Class Generation).
After generation, you can call the Natural Web Interface to show the page.
It is necessary to specify the replacement strings directly in the HTML page. The replacement strings have to start and end with an specific character, e.g. $ (see Options). The name (content) of a string has to comply with the Natural rules for variable names. If not, subroutines may not stow.
If the name of the replacement string is prefixed with "HTML", unsaved characters as "<" or ">" will be replaced during replacement at runtime.
The following prefixes for automatic conversion at runtime are implemented:
HTML
URL
XML
For more information, see the documentation of the subroutine W3REPLACE-AT-OUTPUT.
HTML document:
<HTML>
<HEAD>
  <TITLE>Template Processing</TITLE>
</HEAD>
<BODY>
<H2>
  Template Processing
</H2>
<P>
  <HR>
<TABLE BORDER="0">
<TR><TD>Log-Time:</TD><TD>$log$<TD></TR>
<TR><TD>HTTPs Extension:</TD><TD>$html-ext$<TD></TR>
<TR><TD>Web Interface:</TD><TD>$html-ver$<TD></TR>
</TABLE>
<P>
<TABLE BORDER='0' WIDTH='100%' CELLSPACING='0' CELLPADDING=5>
  <TR BGCOLOR='#00cc66'>
    <TD>$prog$ - $log$</TD>
    <TD ALIGN='RIGHT'>Natural</TD>
  </TR>
</TABLE>
</BODY></HTML>
Generated Natural subroutine, that has to be called from a subprogram that is called from the internet:
* ----- GENERATED BY NATURAL WEB INTERFACE
* File ........: E:\SAG\Natural\v.r\Fnat\SYSWEB\RES\templ.html
* Library .....: SYSWEB
* Source Name .: TEMPL
* Delimiter ...: $
* -----
DEFINE DATA PARAMETER
1 log                                (A) DYNAMIC BY VALUE
1 html-ext                           (A) DYNAMIC BY VALUE
1 html-ver                           (A) DYNAMIC BY VALUE
1 prog                               (A) DYNAMIC BY VALUE
END-DEFINE
*
*
DEFINE SUBROUTINE e3templm
*
* ----- HEADER FOR SERVER -----
PERFORM W3CLEAR
PERFORM W3CONTENT-TYPE 'text/html'
* ----- MAIN PROGRAM -----
* --- LOAD THE HTML TEMPLATE ---
PERFORM W3LOAD-RESOURCE ' '   'e3templ.html'
*
* --- REPLACE PLACEHOLDER ---
PERFORM W3REPLACE-AT-OUTPUT ' ' '$log$' log
PERFORM W3REPLACE-AT-OUTPUT 'HTML' '$ext$' ext
PERFORM W3REPLACE-AT-OUTPUT 'HTML' '$ver$' ver
PERFORM W3REPLACE-AT-OUTPUT ' ' '$prog$' prog
* ----- END MAIN PROGRAM -----
*
END-SUBROUTINE
*
END
Generated Natural subprogram, to be called directly from the internet:
* ----- GENERATED BY NATURAL WEB INTERFACE
* File ........: E:\SAG\Natural\v.r\Fnat\SYSWEB\RES\templ.html
* Library .....: SYSWEB
* Source Name .: TEMPL
* Delimiter ...: $
* -----
DEFINE DATA
PARAMETER USING W3PARM
LOCAL USING W3CONST
LOCAL
* ----- PRIVATE VARIABLES -----
1 W3VALUE        (A250)
END-DEFINE
*
* ----- ERROR HANDLER -----
ON ERROR
 PERFORM W3ERROR ##W3ERROR
 PERFORM W3END ##RPC
 ESCAPE ROUTINE
END-ERROR
* ----- INITIALISE HTTP API -----
PERFORM W3INIT ##RPC
* ----- HEADER FOR SERVER -----
PERFORM W3CONTENT-TYPE 'text/html'
*
* ----- MAIN PROGRAM -----
* --- LOAD THE HTML TEMPLATE ---
PERFORM W3LOAD-RESOURCE 'SYSWEB'   'e3templ.html'
*
* --- REPLACE PLACEHOLDER ---
PERFORM W3REPLACE-AT-OUTPUT ' ' '$log$' 'replace-string-1'
PERFORM W3REPLACE-AT-OUTPUT 'HTML' '$ext$' 'replace-string-2'
PERFORM W3REPLACE-AT-OUTPUT 'HTML' '$ver$' 'replace-string-3'
PERFORM W3REPLACE-AT-OUTPUT ' ' '$prog$' 'replace-string-4'
* ----- END HTTP -----
PERFORM W3END ##RPC
* ----- END MAIN PROGRAM -----
*
END

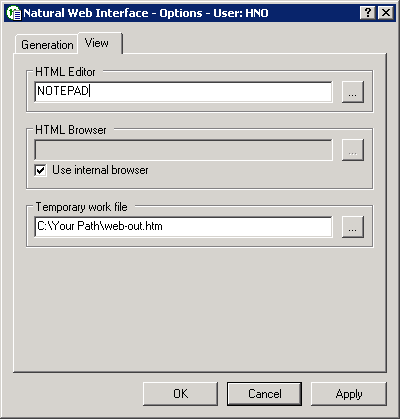
Below is information on:
| OK | Leaves the dialog and saves the changes. |
| Cancel | Leaves the dialog without saving your changes. |
| Apply | Saves the current input. |
If the Natural Web Interface subprograms should be called using DCOM instead of RPC, a DCOM class is needed. This class contains as methods all relevant Natural subprograms for the Natural Web Interface.
The program HTML to Natural automatically generates the specified class. To stow the generated class, a Local Data Area (LDA) is needed to specify the Global Unique IDs (GUIDs) of the DCOM objects. The name of the LDA starts with L followed by the first seven characters of the Library.
Below is information on:
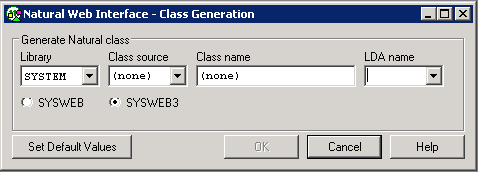
| Field | Explanation |
|---|---|
| Library | The name of the library to be scanned. |
| Class source |
The name of the class source. |
| Class name |
The name of the class that can be called later from the
Internet. |
| LDA name |
The name of the LDA containing the GUIDs for the class ID
and the Natural Web Interface ID. |
| Radio Button | Explanation |
|---|---|
| SYSWEB | Choose this option if you want to generate a class to be used with library SYSWEB. |
| SYSWEB3 | Choose this option if you want to generate a class to be used with library SYSWEB3. |
The LDA name is LSYSWEB3. Name the first GUID CLSID- followed by the library name and the second GUID IID-NATWEB3.
| T | Comment | |||||
| *** Top of Data Area *** | ||||||
| X | U | 1 | CLSID- SYSWEB3 | A | 36 | |
| X | U | 1 | IID-NATWEB3 | A | 36 | |
| *** End of Data Area *** |
| Warning: Do not copy and rename or move an LDA in order to get new GUIDs for your classes. If an LDA is copied and renamed or moved, the preset GUID is not changed. This may cause major problems |
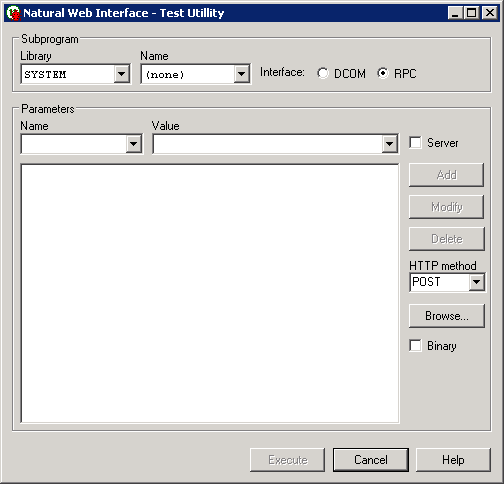
This test utility is a component of the Natural Web Interface. You can check your subprogram locally without involving an HTTP server. The transfer parameters for your web page are transferred into the test utility and are posted directly to the business logic.
As communication platform, you can choose either RPC or DCOM as in real remote communications. The result is either the web page expected or an error message. The web page can be viewed with the browser or a viewer of your choice. If you receive an error message, you can easily debug your business logic locally without writing an extra test routine. No remote debugging is necessary.
Local application checking.
No need for remote debugging.
Simplified error checking.
Comfortable operation by user friendly interface.
No need to write an extra test routine.
Below is information on:
Web browser which supports different content types, for example, Microsoft Internet Explorer Version 5.0 or higher.
Any available text editor.
To define path adjustments
Start the main dialog.
Select a browser and viewer of your choice via Tools > Development Tools > Web Interface Options...
Set the browser, viewer and work file path.
Press the OK button.
To start the application
Start the dialog WEB-ONL for SYSWEB or WEB-ONL3 for SYSWEB3.
Select a library and subprogram name.
Optional: add parameters.
Choose RPC or DCOM.
Press the Execute button.
View the result by pressing either the Result... or the Browse button.
The following Content Types are supported by the Test Utility:
| Content Type | Extension |
|---|---|
| "application/rtf" | "rtf" |
| "application/powerpoint" | "ppt" |
| "application/msword" | "doc" |
| "application/excel" | "xls" |
| "text/html" | "htm" |
| "text/plain" | "txt" |
| "text/xml" | "xml" |
| "text/richtext" | "rtf" |
If you need further Content Types, change the subroutine HTML2CONTENT-TYPE (SYSWEB/W3CO2EXT or SYSWEB3/W3CO2EXT) and extend the translation table to suit your own needs.
| Field | Explanation |
|---|---|
|
Subprogram: |
Enables you to specify the library and the name of the required subprogram. The available libraries and subprograms are automatically taken from the library workspace and listed in selection boxes. |
| Interface | Can be selected with either DCOM or RPC as communication
form. For DCOM, you have to register your classes first.
Default: RPC |
|
Parameters: |
Here you can enter the name-value-pairs needed from the subprogram. To take them over into the parameter list, press the Add button. To modify the entries, use the Modify button. You do not have to substitute &, =, %; this will be done by the WEB-ONL program. If you use server parameters, check the Server toggle button before you add the parameter to the parameter list. In the parameter list, all name-value-pairs are displayed. &, =, % are substituted. To delete a pair, select the item and press the Delete button. Every selected item will be inserted into the Name and Value fields. If you wish to modify a pair, select the item, change it in the Name and Value fields and press the Modify button.
Server: |
| HTTP Method |
In this drop-down list you can select the HTTP request/submit method to be used:
|
|
|
Runs the process of receiving the output from the requested
subprogram. The status of the process can be seen in the status bar at the bottom of the WEB-ONL or WEB-ONL3 dialog window. |
|
|
Starts the editor. It is disabled as long as you have not
executed the program and if you have not changed the subprogram library or name. You can choose the editor with the Options dialog. |
|
|
Starts the browser chosen with the Options dialog. It is disabled as long as you have not executed the program. |