Local Data Areas

Currently, the fields used by your program are defined within the DEFINE DATA statement in the program itself. It is also possible, however, to place the field definitions in a local data area (LDA) outside the program, with the program's DEFINE DATA statement referencing this local data area by name. For reusability and for a clear application structure, it is usually better to define fields in data areas outside the programs.

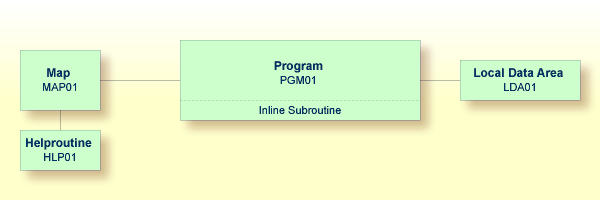
You will now relocate the information from the DEFINE DATA statement to a local data area. When you have completed the exercises below, your sample application will consist of the following modules:

Application structure

This document contains the following exercises:


Creating a Local Data Area

You will now invoke the data area editor in which you will specify the required fields.

Start of instruction setTo invoke the data area editor

  • In the Direct Command window, enter one of the following:

    EDIT LOCAL
    E L

    The data area editor appears. The object type has been set to "Local". This is indicated at the top of the screen.

                           Press <ESC> to enter command mode                      
     Mem: empty    Lib: TUTORIAL Type: LOCAL      Bytes:     0  Line:    0 of:   0
    C T    Comment                                                                
      *    *** Top of Data Area ***                                               
      *    *** End of Data Area ***                                               


      F 1 HELP     F 2 CHOICE   F 3 QUIT     F 4 SAVE     F 5 STOW     F 6 CHECK  
      F 7 READ     F 8 CLEAR    F 9 MEM TYPE F10 GEN      F11 FLD TYPE F12

    By default, the data area editor is in edit mode when you invoke it. To toggle from edit mode to command mode (and vice versa), you press ESC. When you leave the editor, the current mode will be resumed when you open the editor the next time.

Defining Data Fields

You will now define the following fields:

Level Name Format Length
1 #NAME-START A 20
1 #NAME-END A 20
1 #MARK A 1

These are the user-defined variables which you have previously defined in the DEFINE DATA statement.

Start of instruction setTo define the data fields

  1. Make sure that the first entry, which indicates the top of the data area, is selected in the editor.

    Tip:
    If it is not possible to move the cursor and thus to highlight a line, you are in command mode. In this mode, the command line is shown at the top of the screen. Press ESC to switch to edit mode.

  2. Enter the following line command in the first column of the selected line:

    I

    You need not press ENTER.

    The following window appears.

    +-----------------------+
    ¦ D Data Field          ¦
    ¦ B Block               ¦
    ¦ C Constant            ¦
    ¦ H Handle              ¦
    ¦ S Structure           ¦
    ¦ * Comment             ¦
    +-----------------------+
  3. Choose Data Field.

    The Data Field Definition window appears.

    +-------------------- Data Field Definition ---------------------+
    ¦ Level:           1                                             ¦
    ¦ Field Name:                                                    ¦
    ¦ Field Format:                                                  ¦
    ¦ Field Length:                                                  ¦
    ¦ Arraydefinition:                                               ¦
    ¦ Edit Mask:                                                     ¦
    ¦                                                                ¦
    ¦ Header Definition:                                             ¦
    ¦                                                                ¦
    ¦ Initialization:                                                ¦
    ¦ Value Clause:                                                  ¦
    ¦ Optional Param:  N                                             ¦
    ¦ Comment:                                                       ¦
    +----------------------------------------------------------------+
  4. Specify all required information for the first field (#NAME-START) as listed in the above table. Use the arrow keys to move from one field to the next.

  5. When all information for this field has been specified, press ENTER to save this information.

    The Data Field Definition window remains open. The input fields are empty again and you can define a new data field.

  6. Specify all required information for the remaining fields (#NAME-END and #MARK) as described above.

  7. When all fields have been added, press ESC.

    The fields you have defined are now shown in the editor.

                           Press <ESC> to enter command mode                        
     Mem:          Lib: TUTORIAL Type: LOCAL      Bytes:   291  Line:    3 of:   3  
    C T L  Name of Datafield                F     Length Index/Comment             M
      *    *** Top of Data Area ***                                                 
         1 #NAME-START                      A         20                            
         1 #NAME-END                        A         20                            
         1 #MARK                            A          1                            
      *    *** End of Data Area ***                                                 


      F 1 HELP     F 2 CHOICE   F 3 QUIT     F 4 SAVE     F 5 STOW     F 6 CHECK    
      F 7 READ     F 8 CLEAR    F 9 MEM TYPE F10 GEN      F11 FLD TYPE F12

    Tip:
    If you notice that you have made a mistake in a field definition, you can use the line command E to edit the selected field or the line command D to delete the selected field.

Importing the Required Data Fields from a DDM

You will now import the same data fields which you have previously defined in the program's DEFINE DATA statement. The fields are read directly from a Natural data view into the data area editor. A data view references database fields defined in a data definition module (DDM).

In the data area editor, the imported data fields will be inserted below the currently selected data field.

Start of instruction setTo import data fields from a DDM

  1. Enter the following line command in the first column of the #MARK line.

    V

    The View Definition window appears.

                           Press <ESC> to enter command mode                        
     Mem:          Lib: TUTORIAL Type: LOCAL      Bytes:   291  Line:    3 of:   3  
    C T L  Name of Datafield                F     Length Index/Comment             M
      *    *** Top of Data Area ***                                                 
         1 #NAME-START                      A         20                            
         1 #NAME-END                        A         20                            
    V    1 #MARK                            A          1                            
      *    *** End of Data Area ***                                                 
                                                                                    
               +------------------- View Definition -------------------+            
               ¦Name of View:                                          ¦            
               ¦Name of DDM:                                           ¦            
               ¦Comment:                                               ¦            
               +-------------------------------------------------------+            


      F 1 HELP     F 2 CHOICE   F 3 QUIT     F 4 SAVE     F 5 STOW     F 6 CHECK    
      F 7 READ     F 8 CLEAR    F 9 MEM TYPE F10 GEN      F11 FLD TYPE F12
  2. Enter the following information and press ENTER:

    +------------------- View Definition -------------------+
    ¦Name of View:          EMPLOYEES-VIEW                  ¦
    ¦Name of DDM:           EMPLOYEES                       ¦
    ¦Comment:                                               ¦
    +-------------------------------------------------------+

    A window appears showing the fields of the specified DDM.

                           Press <ESC> to enter command mode                        
     Mem:          Lib: TUTORIAL Type: LOCAL      Bytes:   291  Line:    3 of:   3  
    C T L  Name of Datafield                F     Length Index/Comment             M
      *    *** Top of Data Area ***                                                 
         1 #NAME-START                      A         20                            
         1 #NAME-END                        A         20                            
    V    1 #MARK                            A          1                            
      *    *** End of Data Area ***                                                 


    +------------------------------- DDM: EMPLOYEES -------------------------------+
    ¦    1  AA  PERSONNEL-ID                      A          8    D                ¦
    ¦  G 1  AB  FULL-NAME                                                          ¦
    ¦    2  AC  FIRST-NAME                        A         20  N                  ¦
    ¦    2  AD  MIDDLE-I                          A          1  N                  ¦
    ¦    2  AE  NAME                              A         20    D                ¦
    ¦    1  AD  MIDDLE-NAME                       A         20  N                  ¦
    +------------------------------------------------------------------------------+
         HD=PERSONNEL/ID                                                            
                                                                                    
                                                                                    
      F 1 HELP     F 2 CHOICE   F 3 QUIT     F 4 SAVE     F 5 STOW     F 6 CHECK    
      F 7 READ     F 8 CLEAR    F 9 MEM TYPE F10 GEN      F11 FLD TYPE F12
  3. Mark the following fields by entering an "X" in the first column:

    PERSONNEL-ID
    FULL-NAME
    NAME
    DEPT
    LEAVE-DATA
    LEAVE-DUE

    Use the arrow keys to scroll through the DDM.

    Note:
    The field PERSONNEL-ID will be used later when you create the subprogram.

  4. After you have marked all required fields, press ENTER.

    The local data area should now look as follows (use the arrow keys to scroll to the top of the data area):

                           Press <ESC> to enter command mode                      
     Mem:          Lib: TUTORIAL Type: LOCAL      Bytes:   970  Line:    0 of:  10
    C T    Comment                                                                
      *    *** Top of Data Area ***                                               
         1 #NAME-START                      A         20                          
         1 #NAME-END                        A         20                          
         1 #MARK                            A          1                          
      V  1 EMPLOYEES-VIEW                                EMPLOYEES                
         2 PERSONNEL-ID                     A          8                          
      G  2 FULL-NAME                                                              
         3 NAME                             A         20                          
         2 DEPT                             A          6                          
      G  2 LEAVE-DATA                                                             
         3 LEAVE-DUE                        N          2                          
      *    *** End of Data Area ***                                               


      F 1 HELP     F 2 CHOICE   F 3 QUIT     F 4 SAVE     F 5 STOW     F 6 CHECK  
      F 7 READ     F 8 CLEAR    F 9 MEM TYPE F10 GEN      F11 FLD TYPE F12

    The T column indicates the type of the variable. The view is indicated by a "V" and each group is indicated by a "G".

  5. Press ESC to enter command mode.

  6. Stow the local data area and name it "LDA01".

    STOW LDA01

Referencing the Local Data Area from Your Program

Once a local data area has been stowed, it can be referenced by a Natural program.

You will now change the DEFINE DATA statement your program so that it uses the local data area that you have just defined.

Start of instruction setTo use the local data area in your program

  1. Return to the program editor by entering the following in the command line of the data area editor.

    E PGM01
  2. In the DEFINE DATA statement, delete all variables between LOCAL and END-DEFINE (use the line command D).

  3. Add a reference to your local data area by modifying the LOCAL line as follows:

    LOCAL USING LDA01

    Your program should now look as follows:

    DEFINE DATA
      LOCAL USING LDA01
    END-DEFINE
    *
    RP1. REPEAT
    *
      INPUT USING MAP 'MAP01'
    *
      IF #NAME-START = '.' THEN
        ESCAPE BOTTOM (RP1.)
      END-IF
    *
      IF #NAME-END = ' ' THEN
        MOVE #NAME-START TO #NAME-END
      END-IF
    *
      RD1. READ EMPLOYEES-VIEW BY NAME
        STARTING FROM #NAME-START
        ENDING AT #NAME-END
    *    
        IF LEAVE-DUE >= 20 THEN
          PERFORM MARK-SPECIAL-EMPLOYEES
        ELSE
          RESET #MARK
        END-IF
    *
        DISPLAY NAME 3X DEPT 3X LEAVE-DUE 3X '>=20' #MARK
    *
      END-READ
    *
      IF *COUNTER (RD1.) = 0 THEN
        REINPUT 'No employees meet your criteria.'
      END-IF
    *
    END-REPEAT
    *
    DEFINE SUBROUTINE MARK-SPECIAL-EMPLOYEES
      MOVE '*' TO #MARK
    END-SUBROUTINE
    *
    END
  4. Run the program.

  5. To confirm that the results are the same as before (when the DEFINE DATA statement did not reference a local data area), enter "JONES" as the starting name and press ENTER.

  6. To return to the program editor, enter EDIT at the MORE prompt.

  7. Stow the program.

You can now proceed with the next exercises: Global Data Areas.