
A terminal emulation window (which is not Unicode-enabled) is used in a remote development environment to display non-GUI information. This is different from the local environment where the output is shown in an output window.
Exception: In a remote Windows environment, the Natural Web I/O Interface client is always used instead of a terminal emulation window.
This document covers the following topics:
When specific parameters have been set on the Natural Development Server (see below), the terminal emulation window is used instead of the Natural Web I/O Interface client.
The following example shows the terminal emulation window containing the output of a program that has been executed in a remote environment.
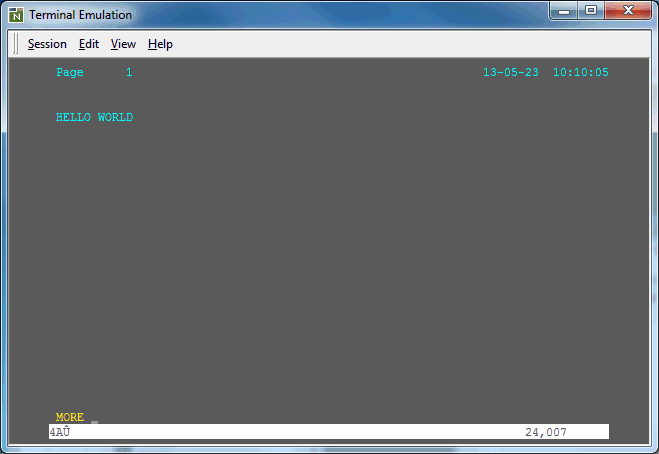
Terminal emulation enables you to test a complete application,
including all of its character output, without having to leave Natural Studio.
A screen output of an executed program automatically causes the terminal
emulation window to be opened and to be closed again when the program
terminates (logically, the development server session reaches the
NEXT level).
The terminal emulation window cannot be closed manually using the standard Windows close button. As long as terminal emulation is active, you cannot work with Natural Studio.
Utilities for which Natural Studio does not offer a graphical user interface in the remote environment are also made available by terminal emulation. Entering the corresponding system command in Natural Studio's command line automatically opens the terminal emulation window.
So that the terminal emulation window can be invoked, the Natural development server (NDV) has to be configured as follows:
UNIX
If you want to use the terminal emulation window in a remote
UNIX environment, the profile parameter WEBIO must be
set to "OFF" on the NDV server. See
Configuration Utility in the Natural for UNIX
documentation.
Mainframe
If you want to use the terminal emulation window in a remote
mainframe environment, the NDV configuration parameter
TERMINAL_EMULATION must not be set to
"WEBIO" on the NDV server. See NDV
Configuration Parameters in the Natural Development Server
documentation.
Windows
In a remote Windows environment, the Natural Web I/O Interface
client is always used instead of the terminal emulation window, regardless of
the setting of the profile parameter WEBIO.
In a the terminal emulation screen, you can use both mouse and keyboard. To change the cursor position, use the standard keys (e.g. TAB or the arrow keys) or the mouse. To use a host function key, press the terminal emulation key assigned to this function key. To simulate the ENTER key, double-click any position in the terminal emulation screen. Otherwise, you can use your keyboard to enter data as normal.
A keypad contains buttons that represent host function keys. You can display several keypads in the terminal emulation window. The following is an example of the keypad containing the 3270 keys.
![]()
 To switch the display of a keypad on and off
From the menu, choose .
When a keypad is displayed, a check mark is shown next to its name.
Using the commands from the menu, you can copy or cut a terminal emulation screen (or part of it) and paste it somewhere else (for example, in another terminal emulation screen or in a PC application, such as, Microsoft Word). You can also copy or cut text from a PC application and paste it in a terminal emulation screen. Cut or copied data is stored on the Windows Clipboard.
You must first select the desired text before you can use the , or command.
The following rules apply for a terminal emulation screen:
You can only cut text from unprotected fields. If protected fields have been selected, they are copied.
When you use the or command, the content of the clipboard is deleted and replaced with the new text. If you want to add data to the clipboard, you must use the command.
When you use the command, the content of the clipboard is not deleted. The selected text is inserted behind already existing text on the clipboard. When you then choose the command, the whole content of the clipboard is inserted at cursor position.
You can only paste text into unprotected fields. If the field is not long enough, it is filled up to its maximum size and the remaining text is inserted in the next unprotected field(s). Example: the text to be pasted is "DISPLAY" and the cursor is located in a two character long input field. In this case, only the first two characters ("DI") are pasted into the input field.
Unless indicated otherwise, the left mouse button is always used. The right mouse button is used to select the menu commands from a context menu.
To select part of a terminal emulation screen (mouse
usage)
Move the mouse pointer to the beginning of the text you want to select.
Press and hold down the left mouse button.
This clears any previous selection.
Drag the mouse until all desired text is selected.
Release the mouse button.
You can now cut, copy or append the selected text.
To select part of a terminal emulation screen (keyboard
usage)
Use the arrow keys to move the cursor to the beginning of the text you want to select.
This clears any previous selection.
Press and hold down SHIFT.
Use the arrow keys to select the desired text.
Release SHIFT.
You can now cut, copy or append the selected text.
Note:
When holding down CTRL+SHIFT and then using the
arrow keys, all text to the end of the line (with RIGHT-ARROW) or to
the bottom of the screen (with DOWN-ARROW) is
selected.
To select the entire content of the terminal emulation
screen
From the menu, choose .
Or:
Press CTRL+A.
A box outline is shown around the terminal emulation screen.
You can now cut, copy or append the selected text.
To cancel the selection
Click another screen position.
Or:
When using the keyboard, just select another part of the
terminal emulation screen as described above.
The previous selection is canceled.
To delete the selection in an unprotected field
From the menu, choose .
Or:
Press DEL.
Or:
Invoke the context menu and choose
.
The selection is deleted. It is not transferred to the clipboard.
To copy the selection and append it behind existing
text in the clipboard
Invoke the context menu and choose .
The selection is copied to the clipboard and appended behind already existing text.
To cut the selection and transfer it to the
clipboard
From the menu, choose .
Or:
Press CTRL+X.
The selection is deleted and transferred to the clipboard. Exception: protected fields are not deleted; they are copied.
To copy the selection to the clipboard
From the menu, choose .
Or:
Press CTRL+C.
To paste the content of the clipboard into a terminal
emulation screen
Move the cursor to the position at which the text is to be inserted.
From the menu, choose .
Or:
Press CTRL+V.
The content of the clipboard is inserted at cursor position.
You can define another font to be used for terminal emulation.
To modify the font
From the menu, choose .
The Fonts dialog box appears.
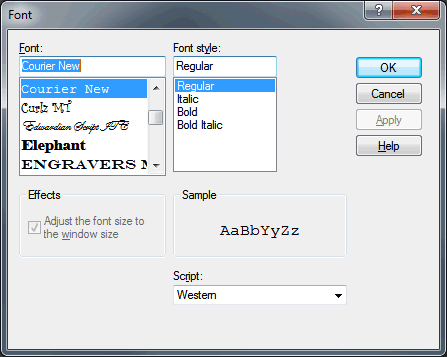
Define the desired font and font style.
The Adjust the font size to the window size check box applies to raster fonts only. For TrueType fonts, automatic resizing is always enabled. Select this check box to adjust the size of the selected font to the window size. Adjusting the font size is done by increasing or reducing the spacing between characters and lines. This may result in truncated characters.
The Script drop-down list box contains a list of all available language scripts for the selected font. Make sure to specify a script that is compatible with the language that has been set up for your computer.
Choose the button.
You can define another color scheme to be used for terminal emulation.
To activate another color scheme
From the menu, choose .
The Color Selection dialog box appears.
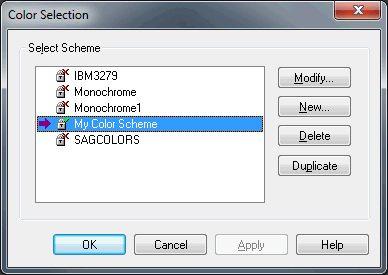
The dialog box lists all color schemes that are available for the currently connected environment (for example, mainframe).
The active color scheme is indicated by an arrow. When the lock symbol next to the color scheme name shows a green check mark, the color scheme can be modified. When it shows a red cross, it cannot be modified; it can only be duplicated in this case.
Select the color scheme you want to activate.
Choose the button.
Besides activating another color scheme, you can also create, modify, delete or duplicate a color scheme. To do so, use one of the following command buttons in the Color Selection dialog box:
| Command Button | Description |
|---|---|
| Modifies the selected color scheme. You can only modify the color scheme which is currently active. If you select another color scheme, you are asked whether you want to make the selected color scheme active in order to continue. | |
| Creates a new color scheme. Specify a name for the new color scheme in the resulting dialog box and choose the OK button. You are then asked whether you want to make the new color scheme active in order to modify it. | |
| Deletes the selected color scheme. You are asked to confirm the deletion. The predefined color schemes cannot be deleted. | |
| Creates a copy of the selected color scheme. Specify a name for the copy in the resulting dialog box and choose the OK button. You are then asked whether you want to make the copy active in order to modify it. |
Detailed information on the dialog box which appears when you create, modify or duplicate a color scheme is provided below. Depending on the currently connected environment, one of the following dialog boxes appears:
The color scheme name can be up to 32 characters long and may contain blanks. It can only be specified when adding a new color scheme. Later, the name cannot be modified.
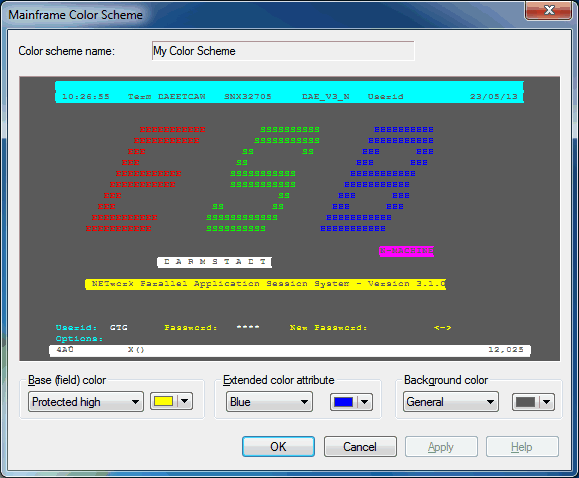
When you move the mouse pointer over the sample screen that is shown in the Mainframe Color Scheme dialog box, tooltips appear. The name of the base (field) color or extended color attribute is shown on the left of the tooltip. The name of the background color is shown on the right of the tooltip.
To define other colors
Select a text entry from the first drop-down list box in one of the following group boxes:
Base (field) color
The colors for the different field types in a terminal
emulation screen.
Extended color attribute
The extended colors sent by the host application. For
example, you can specify that all fields with the extended color attribute
"Green" are to appear blue in the terminal emulation
screen.
Background color
The background colors for specific field types. The
background color underlays text. If the field contains no text, the field area
is colored with the background color.
Select the desired color from the corresponding drop-down list box to the right.
This drop-down list box also provides the following buttons:
Other
Lets you define additional colors.
Default
Resets the modified color palette to the default colors.
Repeat the above steps until all desired colors have been defined. The Mainframe Color Scheme dialog box always reflects the current color settings.
Optional - choose the button to save the current color settings without closing the dialog box.
Choose the button.
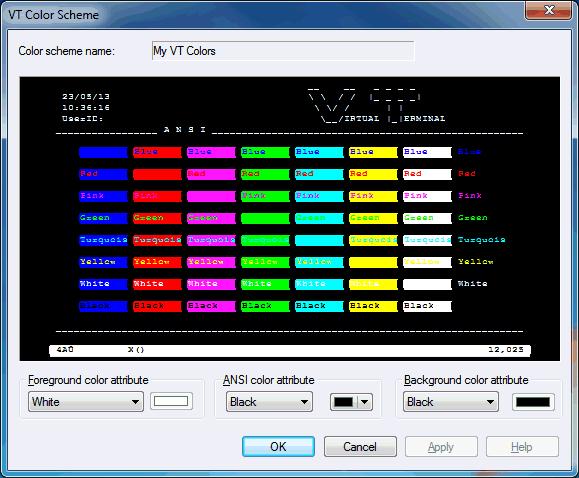
When you move the mouse pointer over the sample screen that is shown in the VT Color Scheme dialog box, tooltips appear. The following applies for the ANSI color attributes: the name of the foreground color is shown on the left of the tooltip, and the name of the background color is shown on the right of the tooltip.
To define other colors
Select a text entry from the first drop-down list box in one of the following group boxes:
Foreground color attribute
The foreground color for the terminal emulation screen.
The VT terminal type 340+ uses this setting when starting the session and as
long as no specific color commands are sent by the host. All other VT terminal
types use this setting during the entire session.
ANSI color attributes
When the VT terminal type 340+ (color terminal) is set
in Natural on the host, the host can send color commands for the foreground and
background. In this mode, eight color attributes are available. For each
possible character position or cursor position, the host can set a foreground
and background color. You can modify the colors belonging to the color
attributes (see below).
Background color attribute
The background color for the terminal emulation screen.
The VT terminal type 340+ uses this setting when starting the session and as
long as no specific color commands are sent by the host. All other VT terminal
types use this setting during the entire session.
Select the desired color for an ANSI color attribute from the corresponding drop-down list box to the right.
This drop-down list box also provides the following buttons:
Other
Lets you define additional colors.
Default
Resets the modified color palette to the default
colors.
Repeat the above steps until all desired colors have been defined.
The VT Color Scheme dialog box always reflects the current color settings.
Optional - choose the button to save the current color settings without closing the dialog box.
Choose the button.
You can print the contents of the terminal emulation screen on a printer that is defined under Windows.
To preview the screen to be printed
From the menu, choose .
The print preview window appears.
Optionally: use the and buttons to view the information in this window. Or choose the button to invoke the Print dialog box.
To return to the terminal emulation screen, choose the button.
To print the screen contents using a dialog box
From the menu, choose .
Or:
Press CTRL+P.
The Print dialog box appears.
Choose the button to print the current screen.
To print the screen contents directly, without displaying a
dialog box
Press the PRINT SCREEN key.
The contents of the current terminal emulation screen are immediately printed. The current printer settings are used.
Keys such as PF1 or PA1 which start a terminal function can be used either by choosing the corresponding button in a keypad or by pressing the corresponding key combination.
The following table lists all available key combinations. When you have to press SHIFT or CTRL, this is indicated by an X. For example, when you want to use PF13, you have to press SHIFT+F1.
| Terminal Keyboard | PC Keyboard | ||
|---|---|---|---|
| 3270 Key | SHIFT | CTRL | F-Key |
| CLR | X | F1 | |
| ENTR | X | F2 | |
| EEOF | X | F3 | |
| ERI | X | F4 | |
| INS | X | F5 | |
| NLIN | X | F6 | |
| HOME | X | F7 | |
| PA1 | X | F8 | |
| PA2 | X | F9 | |
| PA3 | X | F10 | |
| PF1 through PF12 | F1 through F12 | ||
| PF13 through PF24 | X | F1 through F12 | |
| RESET | X | F11 | |
By default, the Latin character set is used for terminal emulation (3270 translation).
You can define a different character set (e.g. Cyrillic) to be used for the terminal emulation. See Workspace Options in the documentation Using Natural Studio for further information.
Note:
When you define another character set, you may have to modify the
font of the terminal emulation. See Modifying the
Font.
Translation tables convert characters when sending or receiving data to or from a host while using terminal emulation. Translation tables contain hexadecimal values which correspond to a national code page.
The following topics are covered below:
Each language setting has its own translation file. This file contains the character translation tables for translations from the PC to the host and vice versa. The file name reflects the communication mode. The extension of a translation file is ".tra".
In the case of a default installation, the translation files can be found in the following folder:
<drive>:\Program Files (x86)\Common Files\Software AG\Natural\V1\etc
The following translation files are available:
N3270_USER1.tra
N3270_USER2.tra
N3270_USER3.tra
N3270_USER4.tra
These files give you the opportunity to create your own character translation tables.
Each file contains two translation tables where each table corresponds to one communication direction (one for sending and one for receiving). Example:
ASC2xxxyy
Translation table for PC-to-host communication.
xxxyy2ASC
Translation table for host-to-PC communication.
The table names contain the following information:
| Part of Name | Description |
|---|---|
| ASC2 or 2ASC | Code page on the PC. Standardized name convention. |
| xxx | Code page on the host. Can be defined by the user. |
| yy | Language. Can be defined by the user. |
The table for PC-to-host communication contains the hexadecimal values for the host code page. The row and column names correspond to the hexadecimal value of the PC code page.
The table for host-to-PC communication contains the hexadecimal values for the PC code page. The row and column names correspond to the hexadecimal value of the host code page.
The first set of characters of the hexadecimal value indicates the row and the second set indicates the column.
The character "b" in the file N3270_USER1.tra has the following hexadecimal values:
| Code Page (communication from) | Hexadecimal Value | Location |
|---|---|---|
| Host | 82 | Row 08, column 02 |
| PC | 62 | Row 06, column 02 |
Translation tables must be adapted in the following situations:
When a character sent from the PC to the host (or vice versa) is translated or displayed differently than it was sent.
When the tables lack special regional characters.
To adapt a translation table, use a code page which corresponds to the host or PC code page settings. You can obtain code pages as graphics from https://msdn.microsoft.com/de-de; look for a link to "References > Code Pages".
Important:
Make backups of all ".tra"
files before beginning.
When the translation tables have been adapted, you have to import them as described below. Entire Connection's Configuration Manager is used for importing the translation tables. With a default installation, the file PCCAdmin.exe, which invokes the Configuration Manager, is provided in the following Natural folder:
<drive>:\Program Files (x86)\Common Files\Software AG\Natural\V1\Terminal\configmgr
Note:
Documentation for Entire Connection's Configuration Manager can
be found at
http://documentation.softwareag.com/
(Empower login required).
To import the adapted translation tables
Execute the file PCCAdmin.exe to start the Configuration Manager.
If user information is required, a logon dialog box appears
In the logon dialog, enter your user name and, if required, password. The default user name is "SYSTEM".
From the menu choose .
In the resulting dialog box, select the file NATSHARE411.sag and choose the button. This file is located in the following folder:
<drive>:\Program Files (x86)\Common Files\Software AG\Natural\V1\etc
In the left pane of the Configuration Manager, expand the node Tables and then select the node Translation.
From the menu, choose .
In the resulting dialog box, select the translation table files that you want to import and choose the button.
Confirm that the translation tables for the user-defined files are to be overwritten.
Natural's user-defined files contain the following translation tables:
ASC2(Ansi)EBCDICUser1
ASC2(Ansi)EBCDICUser2
ASC2(Ansi)EBCDICUser3
ASC2(Ansi)EBCDICUser4
EBCDICUser1(Ansi)2ASC
EBCDICUser2(Ansi)2ASC
EBCDICUser3(Ansi)2ASC
EBCDICUser4(Ansi)2ASC
So that a translation table can be used in Natural, it has to be specified in Natural Studio's workspace options. See Workspace Options in the documentation Using Natural Studio.
For the Natural Development Server under BS2000 the translation tables have to be adapted as follows:
| Position | Value | Character |
|---|---|---|
| C4 | BB | Ä |
| D6 | BC | Ö |
| DC | BD | Ü |
| DF | FF | ß |
| E4 | FB | ä |
| F6 | 4F | ö |
| FC | FD | ü |
| Position | Value | Character |
|---|---|---|
| BB | C4 | Ä |
| BC | D6 | Ö |
| BD | DC | Ü |
| FF | DF | ß |
| FB | E4 | ä |
| 4F | F6 | ö |
| FD | FC | ü |
This example tells you what you can do if the backslash (\), which is a special character, is not converted correctly in the file N3270_USER1.tra.
To correct a wrong conversion
Make a backup of the file N3270_USER1.tra.
Look up the hexadecimal values for the backslash character. The following values are used in this example:
The number of the code page on the PC is 850. In this code page, the backslash is defined as "5C".
The number of the code page on the host is 273. In this code page, the backslash is defined as "EC".
Edit the file N3270_USER1.tra.
Go to row 05 and column 0C in table ASC2(Ansi)EBCDICGR.
Enter the hexadecimal value for the host which is "EC".
Go to row 0E and column 0C in table EBCDICGR(Ansi)2ASC.
Enter the hexadecimal value for the PC which is "5C".
Save the file N3270_USER1.tra.
Import the changed file N3270_USER1.tra.