
Natural Studio's library workspace can also be used to administer the Natural system files of a remote server environment.
This document covers the following topics:
To perform remote development, you have to activate a remote Natural
environment. You do this by connecting to the appropriate development server.
Each development server provides all remote services (such as access or update)
for a specific FUSER (Natural system file for user programs).
If you want to use a development server for the first time, you have to map it as described below. Once you have mapped a development server, a node for this development server session is automatically shown in the library workspace.
It is possible to map the same development server more than once, for example, if you want to have development-server sessions with different session parameters. To switch to another session, you simply select the corresponding node in your library workspace.
If you do not know the name and port number for your development server, ask your administrator.
 To map a development server
From the menu, choose .
Or:
When the Tools toolbar is shown, choose the following toolbar
button.
![]()
The Map Environment dialog box appears. Your user ID is automatically provided.
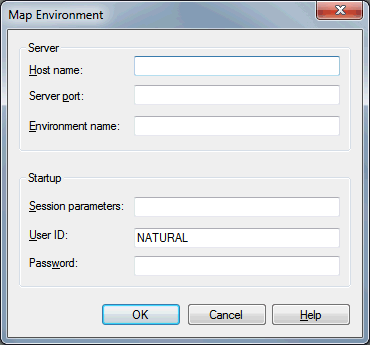
In the Host name text box, enter the name of the development server.
In the Server port text box, enter the TCP/IP port number of the development server.
Optionally. In the Environment name text box, enter the name that is to appear in the tree. If you leave this text box blank, a combination of server name and port number is shown in the tree.
If dynamic parameters are required for your development server, specify them in the Session parameters text box. Otherwise, leave this text box blank.
If you want to map the development server using a different user ID, specify it in the User ID text box. This is useful, for example, when Natural Security is active on the development server and administrator rights are to be used.
If Natural Security is active on the development server, specify the required password in the Password text box. Otherwise, leave this text box blank.
Choose the button.
Once you have mapped a development server, a node for this development server session is shown in the library workspace.
When the connection has been established, all libraries (according to the security profile) for this session are shown in the library workspace. You are automatically logged on to your default library.
The command line now shows the name of the library that is currently selected in the tree and the name of the active environment.
Note:
For mapping to a development server using the command line,
see the system command MAP.
The following description applies if you want to switch to a different CICS transaction on a mainframe.
You specify the CICS transaction name in the same text box in which you also specify the dynamic parameters for the Natural environment. So that the CICS transaction name can be evaluated, it is important that you specify it before any Natural parameters, using the following syntax:
<TA_NAME=name>
where name can be 1 to 4 characters long. This must be the name of an existing CICS transaction which applies to a CICS Adapter. It will override the transaction name which is currently defined in the configuration file for the CICS Adapter on the Natural Development Server (NDV). Ask your administrator for further information.
Make sure to put the entire definition in angle brackets. When this definition is followed by a Natural parameter, insert a blank before the Natural parameter. Example:
<TA_NAME=NA82> STACK=(LOGON SYSCP)
If the specified CICS transaction name cannot be found, an error message occurs and the session cannot be started.
When you connect a disconnected development server, the connection to the corresponding server session is re-established.
Notes:
To connect a disconnected development server
In the library workspace, select the node for a disconnected development server.
From the menu, choose .
Or:
Invoke the context menu and choose
.
Or:
When the Tools toolbar is shown, choose the following toolbar
button.
![]()
The Map Environment dialog box appears. It shows the information that has been provided when the development server has been mapped.
If required, specify the Natural Security password in the Password text box. Otherwise, leave this text box blank.
You need not specify any other information.
Choose the button.
When the connection has been established, all libraries (according to the security profile) for this session are shown in your library workspace. You are automatically logged on to your default library.
Note:
The command is also available
in the application workspace. See Connecting and Disconnecting Base
Applications.
When you disconnect a connected development server, the corresponding server session is shut down. All editor windows that have been opened for this server session are closed. The node for this development server is collapsed and the string "Disconnected" is shown to the right of the node name.
To disconnect a connected development server
In the library workspace, select the node for a connected development server.
From the menu, choose .
Or:
Invoke the context menu and choose
.
Or:
When the Tools toolbar is shown, choose the following toolbar
button.
![]()
Note:
The command is also
available in the application workspace. See
Connecting and
Disconnecting Base Applications.
When you unmap a development server, its node is removed from the tree.
If the development server is still connected when unmapping it, the running session is shut down. All editor windows that have been opened for this server session are closed.
To unmap a development server
In the library workspace, select the node for the development server that you want to unmap.
From the menu, choose .
Or:
Invoke the context menu and choose
.
Or:
When the Tools toolbar is shown, choose the following toolbar
button.
![]()
When the display of delete messages is enabled in the workspace options, a message box appears asking whether you really want to unmap the development server.
Notes:
UNMAP.