You will now learn how to prompt the user for data, that is: a starting name and an ending name for the output.
When you have completed the exercises below, your sample application will consist of the following modules:
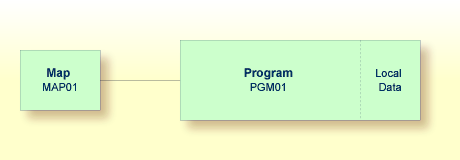
This document contains the following exercises:
You will now modify your program so that input fields for the
starting name and ending name will be shown in the output. This is done using
the INPUT statement.
 To define input fields
Insert the following below END-DEFINE:
INPUT (AD=MT)
  "Start:" #NAME-START /
  "End:  " #NAME-END
The session parameter AD stands for
"attribute definition", its value "M"
stands for "modifiable output field", and the value
"T" stands for "translate lowercase to
uppercase".
The "M" value in
AD=MT means that the default values defined with
INIT (that is: "ADKINSON" and
"BENNETT") will be shown in the input fields.
Different values may be entered by the user. When the
"M" value is omitted, the input fields will be empty
even though default values have been defined.
The "T" value in
AD=MT means that all lowercase input is translated to
uppercase before further processing. This is important since the names in the
demo database file have been defined completely in uppercase letters. When the
"T" value is omitted, you have to enter all names
completely in uppercase letters. Otherwise, the specified name will not be
found.
"Start:" and "End:" are text fields
(labels). They are specified in quotation marks.
#NAME-START and #NAME-END are data
fields (input fields) in which the user can enter the desired starting name and
ending name.
The slash (/) means that the subsequent fields are to be shown in a new line.
Your program should now look as follows:
DEFINE DATA
LOCAL
  1 #NAME-START        (A20) INIT <"ADKINSON">
  1 #NAME-END          (A20) INIT <"BENNETT">
  1 EMPLOYEES-VIEW VIEW OF EMPLOYEES
    2 FULL-NAME
      3 NAME (A20)
    2 DEPT (A6)
    2 LEAVE-DATA
      3 LEAVE-DUE (N2)
END-DEFINE
*
INPUT (AD=MT)
  "Start:" #NAME-START /
  "End:  " #NAME-END
*
READ EMPLOYEES-VIEW BY NAME
  STARTING FROM #NAME-START
  ENDING AT #NAME-END
*
  DISPLAY NAME 3X DEPT 3X LEAVE-DUE
*
END-READ
*
END
Run the program.
The output shows the fields you have just defined.
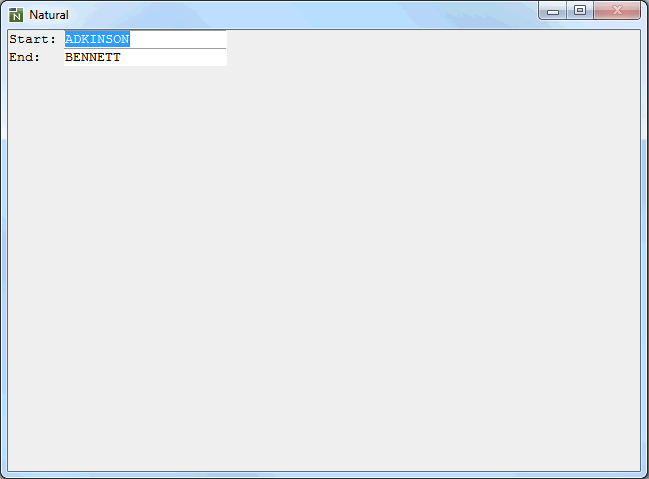
Use the default names and press ENTER.
The list of employees is now shown.
Press ENTER repeatedly until you return to the program editor, or press ESC.
Stow the program.
You are now introduced to a different way of prompting the user for input. You will use the map editor to create a map which contains the same fields that you have previously defined in your program. A map is a separate object and is used to separate the user interface layout from the business logic of an application.
The map you will create now will look as follows:
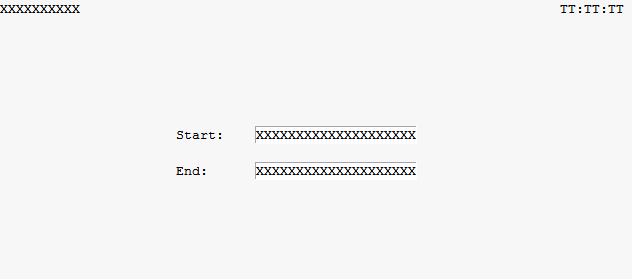
The first line of the map contains system variables for the current date and time. There are two data fields (input fields) in which the user can specify a starting name and an ending name. The data fields are preceeded by text fields (labels).
The following steps are required for the above map:
You will now invoke the map editor in which you will design your map.
Leave the program editor open in the background.
 To create a map
In the library workspace, select the library which also contains your program (that is: select the TUTORIAL node).
From the context menu, choose .
Or:
Choose the following toolbar button:
![]()
An empty map editor window appears.
You will now add two text fields (also called constants or labels) to the map.
 To define the text fields
From the menu, choose .
Note:
When the map editor is active, different menus are shown
in the menu bar. The menus ,
and are now shown (instead of the
menu which was visible when the program editor was
active).
Or:
Choose the following toolbar button:
![]()
Note:
By default, the toolbar containing this button is shown
vertically to the right of the map editor window. A different toolbar was shown
there previously when the program editor was active.
Move the mouse to the position in the map editor window at which you want to insert the text constant.
The mouse pointer changes showing a cross and the symbol for a text constant.
Press and hold down the mouse button.
Drag the mouse to the right until the field has the desired length. For our field a length of about 10 characters is sufficient.
While dragging the mouse, the current length is shown in the
status bar of the application window. The format and the position in the map
are also shown there. A text field always has the format A
(alphanumeric).
Release the mouse button.
A text field with a default label is now shown. Handles indicate that the text field is selected. The mouse pointer still shows a cross and the symbol for a text constant and you can immediately draw another text field.
Note:
If you want to exit this mode, just click any other
position in the map editor.
Draw a second text field below the first text field.
If the field starts in the wrong column, you can move it by positioning the mouse pointer on this field, pressing and holding down the mouse button and then dragging the mouse to the desired position. When you release the mouse button, the normal mouse pointer is shown again.
The text fields you have just inserted do not yet have the correct labels. You will now specify them.
 To specify the labels
Select the first text field and from the context menu, choose .
Or:
Double-click the text field.
The existing text is selected.
Enter "Start:" as the label for the first text field and press ENTER.
The text field (for which you have previously defined a length of 10 characters) is automatically resized to the length of this string.
Repeat the above steps and enter "End:" as the label for the second text field.
You will now add two data fields to the map. These are the input fields in which the user can specify the starting name and ending name.
You can define the data fields in two different ways: with the command where it is your responsibility to define the correct format and length of the data field, or with the command where you simply select the data field from a list and where the correct format and length is automatically used. These two ways are described below.
 To define a data field where you have to specify the
length
From the menu, choose .
Or:
Choose the following toolbar button:
![]()
Draw the data field at the right of the previously inserted text field for the starting name. Draw it in the same way as a text field. A length of 20 characters is required for the data field (if your field is too short or too long, a later exercise also explains how to modify the length). The data field is automatically filled with "X" characters.
 To import a data field
From the menu, choose .
The Import Data Field dialog box appears.
From the Library drop-down list box, select TUTORIAL.
Select the Program option button.
All programs that are currently defined in your library are now shown in the Object list box.
Select the program with the name PGM01.
The importable data fields are now shown at the bottom of the dialog box.
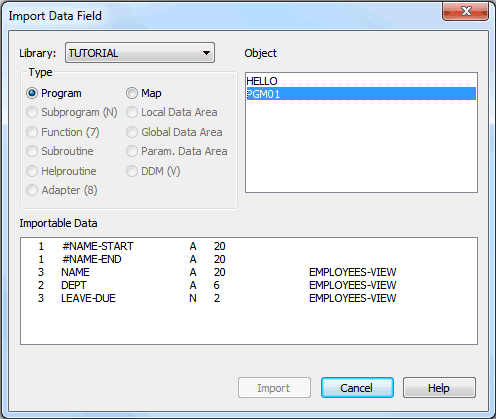
Select the field #NAME-END and choose the
button.
The button in the Import Data Field dialog box is now labeled .
Choose the button to close the Import Data Field dialog box.
The data field is now shown at the top left of the map. It is filled with "X" characters. Handles indicate that the data field is selected.
Move the data field to the right of the previously defined text field for the end name. To do so position the mouse pointer on this field, press and hold down the mouse button, drag the mouse to the desired position and then release the mouse button.
The following applies only for the data field for the starting name which you have defined manually. It does not apply to the data field for the ending name which you have imported: When you create a new data field for a user-defined variable, Natural assigns a field name to it. This field name contains a number. You have to adjust the names of the newly created fields to the variable names defined in your program.
You will now make sure that the same names are used as in your
program: #NAME-START and #NAME-END. The output of
these fields (that is: the user input) will be passed to the corresponding
user-defined variables in your program.
You will also make sure that the same attributes are
defined for both #NAME-START and #NAME-END.
 To define names and attributes for the data fields
Select the data field for the starting name and from the context menu, choose .
Or:
Double-click the data field.
The Field Definition dialog box appears.
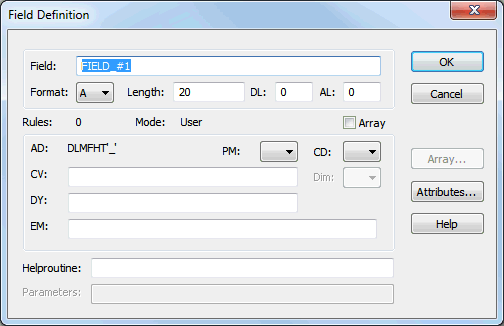
The Field text box shows the field name
that has been assigned by Natural: #FIELD_#1.
In the Field text box, enter "#NAME-START".
The format must be A. This is selected by default.
In the Length text box, enter "20" (if your field has a different length).
Choose the button.
The Attribute Definitions dialog box appears.
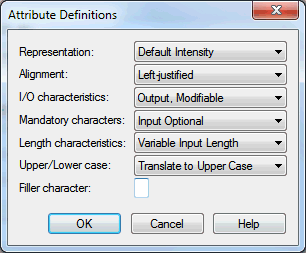
Make sure that Output, Modifiable has been selected in the I/O characteristics drop-down list box.
This defines the field as an output field which can be modified.
Make sure that Translate to Upper Case has been selected in the Upper/Lower case drop-down list box.
This enables the user to enter the name in lowercase letters. Until now, the names in the demo database could only be found when the names were specified completely in uppercase letters.
In the Filler character text box, enter an underscore (_) character.
A blank character is defined as the default filler character. Therefore, before you can enter an underscore in this field, you have to delete the blank.
The filler character is used to fill any empty positions in input fields in the map, allowing the user to see the exact position and length of a field when entering input.
Choose the button to close the Attribute Definitions dialog box.
Choose the button to close the Field Definition dialog box.
Repeat the above steps for the data field for the ending
name. Make sure that the correct field name (#NAME-END), format
(A) and length (20) are defined. Make sure that the same attribute definitions
are used as for #NAME-START.
Natural system variables contain information about the current Natural session, such as the current library, user, or date and time. They may be referenced at any point within a Natural program. All system variables begin with an asterisk (*).
You will now add system variables for the date and time to the map. When the program is run, the current date and time will be displayed in the map.
 To add system variables
From the menu, choose .
Or:
Choose the following toolbar button:
![]()
The Import System Variable dialog box appears.
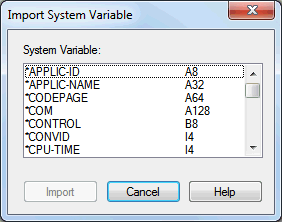
Scroll to *DAT4I and select
it.
Scroll to *TIMX, press
CTRL and select it.
Choose the button to import the selected variables.
The button in the Import System Variable dialog box is now labeled .
Choose the button to close the dialog box.
Both system variables have been placed at the top left of the map.
Select TT:TT:TT (that is: the system variable for the time) and move it to the end of the first line.
Note:
You may have to resize the map editor window to see the
end of the line.
You will now test your map to check whether it works as intended.
 To test the map
From the menu, choose .
Or:
Choose the following toolbar button:
![]()
The following output is shown.
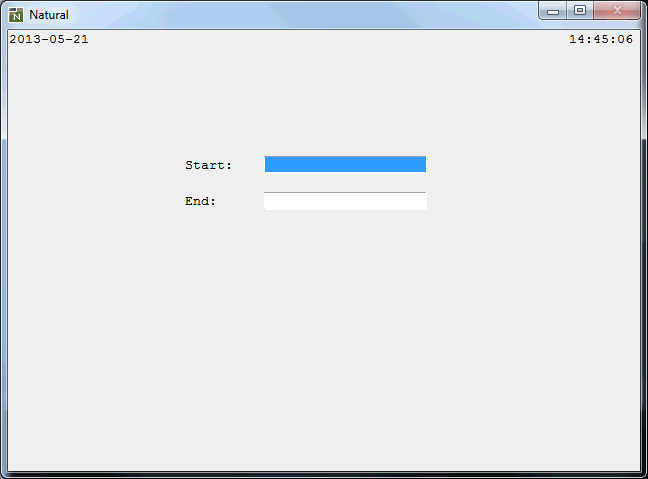
Note:
You may have to resize the output window to see
the time at the top right.
The input field for the starting name is automatically selected since it is the first input field in the map. Both input fields contain the filler character.
Note:
When working in insert mode, the user has to delete the
filler characters before it is possible to enter text. This is not necessary in
overwrite mode.
Press ENTER to return to the map editor.
When the map has successfully been tested, you have to stow it so that it can be found by your program.
 To stow the map
Stow the map in the same way as you stow a program.
When you are asked to specify a name for the map, enter "MAP01".
In the library workspace, a new node named Maps appears below the TUTORIAL node. This node contains the map you have just stowed.
Leave the map editor open for later modifications.
Once a map has been stowed, it can be invoked by a Natural program
using a WRITE or INPUT statement.
 To invoke the map from your program
Return to the program editor.
If you cannot see the program editor (for example,
because you have previously maximized the map editor window), you can return to
an open program editor window by choosing the corresponding command for
PGM01 from the bottom of the
menu.
You can also double-click the program
PGM01 in the library workspace (or when working with the keyboard,
select it and press ENTER). When the program has previously been
closed, it is opened again. When it it still open in the background, its editor
window is brought back to the front.
Replace the previously defined INPUT lines with
the following line:
INPUT USING MAP 'MAP01'
This will invoke the map you have just designed.
The map name must be enclosed in single quotation marks to distinguish the map from a user-defined variable.
Your program should now look as follows:
DEFINE DATA
LOCAL
  1 #NAME-START        (A20) INIT <"ADKINSON">
  1 #NAME-END          (A20) INIT <"BENNETT">
  1 EMPLOYEES-VIEW VIEW OF EMPLOYEES
    2 FULL-NAME
      3 NAME (A20)
    2 DEPT (A6)
    2 LEAVE-DATA
      3 LEAVE-DUE (N2)
END-DEFINE
*
INPUT USING MAP 'MAP01'
*
READ EMPLOYEES-VIEW BY NAME
  STARTING FROM #NAME-START
  ENDING AT #NAME-END
*
  DISPLAY NAME 3X DEPT 3X LEAVE-DUE
*
END-READ
*
END
Run the program.
Your map is now shown.
Press ENTER repeatedly until you return to the program editor, or press ESC.
Stow the program.
As your program is coded now, no data will not be found if an ending name is not specified.
You will now remove the initial values for the starting name and ending name; then the user always has to specify these names. To ensure that an ending name is always used, even if it has not been specified by the user, you will add a corresponding statement.
 To use the ending name
In the DEFINE DATA block, remove the default
values (INIT) for the fields #NAME-START and
#NAME-END so that the corresponding lines look as follows:
1 #NAME-START        (A20)
1 #NAME-END          (A20)
Insert the following below INPUT USING MAP
'MAP01':
IF #NAME-END = ' ' THEN
MOVE #NAME-START TO #NAME-END
END-IF
When the #NAME-END field is blank (that is: when
an ending name has not been entered by the user), the starting name is
automatically used as the ending name.
Note:
Instead of using the statement MOVE #NAME-START TO
#NAME-END it is also possible to use the following variant of the
ASSIGN or COMPUTE statement: #NAME-END :=
#NAME-START.
Your program should now look as follows:
DEFINE DATA
LOCAL
1 #NAME-START (A20)
1 #NAME-END (A20)
1 EMPLOYEES-VIEW VIEW OF EMPLOYEES
2 FULL-NAME
3 NAME (A20)
2 DEPT (A6)
2 LEAVE-DATA
3 LEAVE-DUE (N2)
END-DEFINE
*
INPUT USING MAP
                                           'MAP01'
*
IF #NAME-END = ' ' THEN
    MOVE #NAME-START TO #NAME-END
END-IF
*
READ EMPLOYEES-VIEW BY NAME
STARTING FROM #NAME-START
ENDING AT #NAME-END
*
DISPLAY NAME 3X DEPT 3X LEAVE-DUE
*
END-READ
*
END
Run the program.
In the resulting map, enter "JONES" in the field which prompts for a starting name and press ENTER.
Note:
Since Translate to Upper
Case has been specified for this field, it is now also possible
to enter the name in lowercase letters.
In the resulting list, only the employees with the name "Jones" are now shown.
Press ENTER to return to the program editor.
Stow the program.
You can now proceed with the next exercises: Loops and Labels.