
Currently, the fields used by your program are defined within the
DEFINE DATA statement in the program itself. It is also possible,
however, to place the field definitions in a local data area (LDA) outside the
program, with the program's DEFINE DATA statement referencing this
local data area by name. For reusability and for a clear application structure,
it is usually better to define fields in data areas outside the programs.
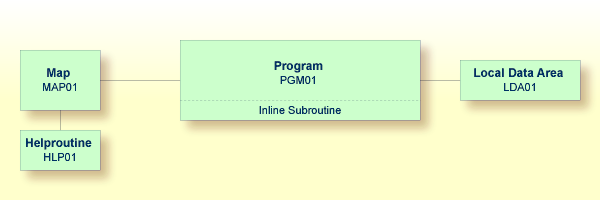
You will now relocate the information from the DEFINE DATA
statement to a local data area. When you have completed the exercises below,
your sample application will consist of the following modules:
This document contains the following exercises:
You will now invoke the data area editor in which you will specify the required fields.
 To invoke the data area editor
At the bottom of the Development Functions menu, enter the following information and press ENTER:
     Code .. C    Type .. L   Name .. LDA01___________________________


Command ===>
Enter-PF1---PF2---PF3---PF4---PF5---PF6---PF7---PF8---PF9---PF10--PF11--PF12---
Help Menu Exit Canc |
"C" stands for the function Create Object, "L" stands for the object type local data area, and "LDA01" is the name of your new local data area.
The data area editor appears. The object type has been set to "Local". This is indicated at the top left of the screen.
Local    LDA01      Library TUTORIAL                       DBID 11177 FNR     8
Command                                                                     > +
I T L  Name                             F Length     Miscellaneous
All -- -------------------------------- - ---------- ------------------------->


----------------------------------------------------------------- S 0 L 1 |
You will now define the following fields:
| Level (L column) | Name | Format (F column) | Length |
|---|---|---|---|
| 1 | #NAME-START |
A | 20 |
| 1 | #NAME-END |
A | 20 |
| 1 | #MARK |
A | 1 |
These are the user-defined variables which you have previously defined
in the DEFINE DATA statement.
To define the data fields
To display your program and the data area editor on the same screen, enter the following to invoke split-screen mode.
SPLIT P PGM01
The screen is divided into two sections. Your program is shown in the
lower half of the screen. It cannot be modified in this mode. You can use the
program as a reference to insert the definitions of the user-defined variables
in the data area editor. To page forward and backward in the program, use the
commands SPLIT + and SPLIT
-.
Specify all required information as listed in the above table.
The local data area should now look as follows:
Local    LDA01      Library TUTORIAL                       DBID 11177 FNR     8
Command                                                                     > +
I T L  Name                             F Length     Miscellaneous
All -- -------------------------------- - ---------- ------------------------->
     1 #NAME-START                      A         20
     1 #NAME-END                        A         20
     1 #MARK                            A          1


----------------------------------------------------------------- S 0    L 1
Program     PGM01     Library TUTORIAL
  0010 DEFINE DATA
  0020 LOCAL
  0030   1 #NAME-START        (A20)
  0040   1 #NAME-END          (A20)
  0050   1 #MARK              (A1)
0060 1 EMPLOYEES-VIEW VIEW OF EMPLOYEES |
Enter the following command to terminate split-screen mode:
SPLIT .
You will now import the same data fields which you have previously
defined in the program's DEFINE DATA statement. The fields are
read directly from a Natural data view into the data area editor. A data view
references database fields defined in a data definition module (DDM).
To import data fields from a DDM
In the line below the variables you have already defined, enter the following, starting in the T column:
.V(EMPLOYEES)
Example:
Local    LDA01       Library TUTORIAL                       DBID 11177 FNR     8
 Command                                                                     > +
 I T L  Name                             F Length     Miscellaneous
 All -- -------------------------------- - ---------- ------------------------->
      1 #NAME-START                      A         20
      1 #NAME-END                        A         20
      1 #MARK                            A          1
. V( EMPLOYEES) |
Press ENTER.
The EMPLOYEES view appears.
SYSGDA 4461: Mark fields to incorporate into data area.
Local     LDA01     Library TUTORIAL                       DBID 11177 FNR     8
View EMPLOYEES
I T L  Name                             F Length     Miscellaneous
- - -- -------------------------------- - ---------- -------------------------
     2 PERSONNEL-ID                     A          8 /* CNNNNNNN
  G  2 FULL-NAME                                     /* NAME INFORMATION
     3 FIRST-NAME                       A         20 /* FIRST/CHRISTIAN NAME
     3 MIDDLE-I                         A          1 /* MIDDLE INITIAL
     3 NAME                             A         20 /* SURNAME/FAMILY NAME
     2 MIDDLE-NAME                      A         20 /* SECOND/MIDDLE NAME
     2 MAR-STAT                         A          1 /* M=MARRIED
     2 SEX                              A          1
     2 BIRTH                            D            /* BIRTH-DATE (YYYY-MM-
     2 N§BIRTH                          I          2 /* INDICATOR OF BIRTH
  G  2 FULL-ADDRESS
  M  3 ADDRESS-LINE                     A         20 (1:8)/* ALL ADDRESS LINES
     3 CITY                             A         20 /* MAIN CITY/TOWN
     3 ZIP                              A         10 /* POSTAL ADDRESS CODE
     3 POST-CODE                        A         10 /* POSTAL ADDRESS CODE
     3 COUNTRY                          A          3 /* COUNTRY CODE
  G  2 TELEPHONE
- - -- -------------------------------- - ---------- ------------------------- |
Mark the following fields by entering any character in the I column :
PERSONNEL-ID
FULL-NAME
NAME
DEPT
LEAVE-DATA
LEAVE-DUE
Not all of these fields are shown on the first page of the view. To scroll forward in the view, press ENTER
Note:
The field PERSONNEL-ID will be used later when you
create the subprogram.
After you have marked all required fields, continue to press ENTER until the data area editor is shown again.
The local data area should now look as follows:
SYSGDA 4462: 6 field(s) of view EMPLOYEES included.
Local     LDA01     Library TUTORIAL                       DBID 11177 FNR     8
Command                                                                     > +
I T L  Name                             F Length     Miscellaneous
All -- -------------------------------- - ---------- ------------------------->
     1 #NAME-START                      A         20
     1 #NAME-END                        A         20
     1 #MARK                            A          1
  V  1 EMPLOYEES-VIEW                                EMPLOYEES
     2 PERSONNEL-ID                     A          8 /* CNNNNNNN
  G  2 FULL-NAME                                     /* NAME INFORMATION
     3 NAME                             A         20 /* SURNAME/FAMILY NAME
     2 DEPT                             A          6 /* DDDDSS
  G  2 LEAVE-DATA                                    /* LEAVE/VACATION INFO
     3 LEAVE-DUE                        N        2.0 /* VACATION DAYS/YEAR


----------------------------------------------------------------- S 10 L 1 |
"-VIEW" has automatically been added to the name of the view. This is the same name that you have already used in your program.
The T column indicates the type of the variable. The view is indicated by a "V" and each group is indicated by a "G".
Stow the local data area.
Once a local data area has been stowed, it can be referenced by a Natural program.
You will now change the DEFINE DATA statement your program
so that it uses the local data area that you have just defined.
To use the local data area in your program
Return to the program editor by entering the following in the command line of the data area editor.
E PGM01
In the DEFINE DATA statement, delete all variables
between LOCAL and END-DEFINE
(use the line command .D).
Add a reference to your local data area by modifying the
LOCAL line as follows:
LOCAL USING LDA01
Your program should now look as follows:
DEFINE DATA
  LOCAL USING LDA01
END-DEFINE
*
RP1. REPEAT
*
  INPUT USING MAP 'MAP01'
*
  IF #NAME-START = '.' THEN
    ESCAPE BOTTOM (RP1.)
  END-IF
*
  IF #NAME-END = ' ' THEN
    MOVE #NAME-START TO #NAME-END
  END-IF
*
  RD1. READ EMPLOYEES-VIEW BY NAME
    STARTING FROM #NAME-START
    ENDING AT #NAME-END
*
    IF LEAVE-DUE >= 20 THEN
      PERFORM MARK-SPECIAL-EMPLOYEES
    ELSE
      RESET #MARK
    END-IF
*
    DISPLAY NAME 3X DEPT 3X LEAVE-DUE 3X '>=20' #MARK
*
  END-READ
*
  IF *COUNTER (RD1.) = 0 THEN
    REINPUT 'No employees meet your criteria.'
  END-IF
*
END-REPEAT
*
DEFINE SUBROUTINE MARK-SPECIAL-EMPLOYEES
  MOVE '*' TO #MARK
END-SUBROUTINE
*
END
Run the program.
To confirm that the results are the same as before (when the
DEFINE DATA statement did not reference a local data area), enter
"JONES" as the starting name and press
ENTER.
To return to the program editor, enter
EDIT at the MORE prompt.
Stow the program.
You can now proceed with the next exercises: Global Data Areas.