
Processing rules and helproutines are defined for fields in a map.
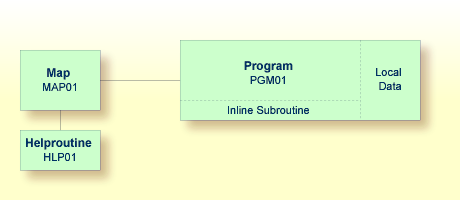
When you have completed the exercises below, your sample application will consist of the following modules (a processing rule cannot be defined as a separate module; it is always part of a map):
This document contains the following exercises:
You will now define the message that is to be displayed when the user presses ENTER without specifying a starting name.
 To define a processing rule
Return to the map editor.
Select the input field for the starting name.
From the context menu, choose .
The Field Rules dialog box for the
field #NAME-START appears.
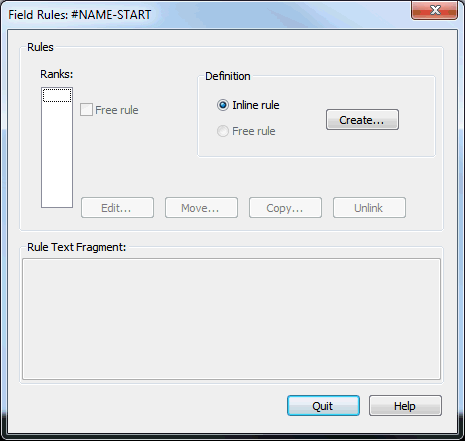
Choose the button.
An empty editor window appears.
Enter the following processing rule:
IF & = ' ' THEN
  REINPUT 'Please enter a starting name.'
  MARK *&
END-IF
The ampersand (&) in the processing rule will dynamically be
replaced with the name of the field. In this case, it will be replaced with
#NAME-START. If #NAME-START is blank, the message
defined with the REINPUT statement is displayed.
MARK is an option of the REINPUT statement.
Its syntax is MARK *fieldname.
MARK specifies the field in which the cursor is to be placed when
the REINPUT statement is executed. In this case, the cursor will
be placed in the #NAME-START field.
Save the content of the editor window.
The Rule Selection dialog box appears.
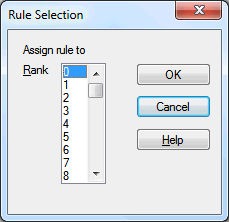
In the Rank list box, select 1 and choose the button.
The rank defines the sequence in which the rules for the different fields are to be processed. All rules with rank 1 are processed first, followed by those with rank 2, etc.
Close the editor window in which you have entered the processing rule.
Test the map.
In the resulting output, enter any starting name and press ENTER.
The output window is closed.
Test the map once more. Do not enter a name and press ENTER.
The message defined with the processing rule should now appear in the map.
To leave the output window, enter a dot (.) in the field which prompts for a starting name and press ENTER.
Stow the map.
A helproutine is displayed when the user presses the help key when the cursor is on the input field for the starting name.
You will first define the helproutine and then associate it with a specific field.
To create a helproutine
In the library workspace, select the library which also contains your program (that is: select the TUTORIAL node).
From the context menu, choose .
An empty editor appears.
Enter the following:
WRITE 'Type the name of an employee'
END
Stow the helproutine.
The Stow As dialog box appears.
Enter "HLP01" as the name of the helproutine.
Choose the button.
In the library workspace, a new node named Helproutines appears below the TUTORIAL node. This node contains the helproutine you have just stowed.
Close the editor window in which you have entered the helproutine.
To associate the helproutine with a field on the map
Return to the map editor.
Select the data field for the starting name.
From the context menu, choose .
Or:
Double-click the data field.
The Field Definition dialog box appears.
In the Helproutine text box, enter "'HLP01'" (including the single quotation marks).
This is the name under which you have saved your helproutine.
Choose the button.
Test the map.
In the resulting output, enter a question mark (?) in the input field for the starting name.
The help text you have defined is shown in a separate window.
Press ENTER to close this window.
To leave the map, enter a dot (.) in the field which prompts for a starting name and press ENTER.
Stow the map.
Close the map editor window.
You can now proceed with the next exercises: Local Data Areas.