
The data browser is used to generate data reports from Natural DDMs (data definition module) created from an Adabas, XML or SQL database available in your current Natural environment. You can select the DDM fields to be included in the report and specify filter criteria.
The data reports generated can be displayed in either the Results window of Natural Studio or in a text file downloaded to the PC. From the Results window, you can select records for printing or for saving as text files. You can generate one or more reports, where each report comprises a separate tabbed page of the Results window.
The Data Browser documentation covers the following topics:
![]() To start the data browser
To start the data browser
From the menu, choose >.
| Help | Activates the Natural Help system and leads to this chapter. |
| Cancel | Closes the dialog box without making any changes. |
| Back | Displays the previous page in the data browser. |
| Next | Displays the next page in the data browser. |
| Finish | Ends the report definition, generates the database request and displays the report layout in the Results window. |
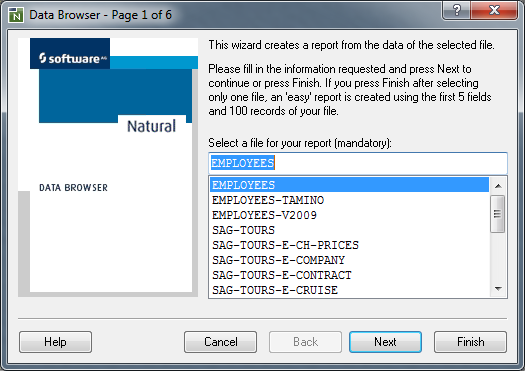
The file selection list displays all cataloged DDMs created from an Adabas file, an SQL table or an XML doctype which are available in the current Natural environment:
In a local Windows environment or in a remote Windows, UNIX or OpenVMS environment, the DDMs are contained in the current Natural library and concatenated steplibs (if defined) in the current FNAT or FUSER system file.
If the FDDM option is set in a local Windows environment or in a remote Windows, UNIX or OpenVMS environment, the DDMs are contained in the FDDM system file.
In a remote mainframe environment, the DDMs are contained in the current FDIC system file.
This section provides information on the following:
A filter that has been defined and activated with the corresponding Natural Studio function (see also Filtering Libraries and Objects in the Natural Studio documentation), by default, also applies to the data browser. Therefore, if a filter is used for the current library, concatenated steplibs or the system file, the selection list contains a reduced number of DDMs.
The data browser ignores a filter that contains any of the following definitions:
In a remote Windows, mainframe, UNIX or OpenVMS environment, a filter that contains a name range ( - ).
In a local Windows environment, a filter that contains a name range ( - ) combined with a wildcard (* or ?).
An active filter is indicated by the message Filtered
list!, which appears above the selection list as shown in the
example screen above. The data browser ignores an active filter if you select
from the context menu. If
selected, the message Unfiltered list! appears above the
selection list and the selection list contains all DDMs available in the
current Natural environment.
The context menu for the file selection list on Page 1 provides the following functions:
| Deactivates or activates the Natural Studio filter as described above. | |
| Indicates the type of database (Adabas, XML or SQL) from which the DDMs were created. | |
| Indicates the database IDs (DBID) and file numbers (FNR) where the DDMs are stored. |
The selection of a DDM is mandatory. After selecting a DDM from the selection list, a check is performed whether the appropriate database is available.
If this is not the case, the DDM check will report the reason for the error, usually a database response code. Based on this information, the user can take measures to correct the error and restart the database.
After DDM selection, you can choose Next to go to the next data browser page where you can specify field selection criteria, or you can choose Finish to immediately generate the data report. If you choose Finish, the data browser creates an "easy" report that outputs the first 100 records of the selected DDM with the first 5 fields of the record. As soon as you specify any field selection or filter criteria on one of the following pages of the data browser, the "easy" report is replaced by an individual report.
All fields of the selected DDM are displayed in a tree view similar to the example shown below:
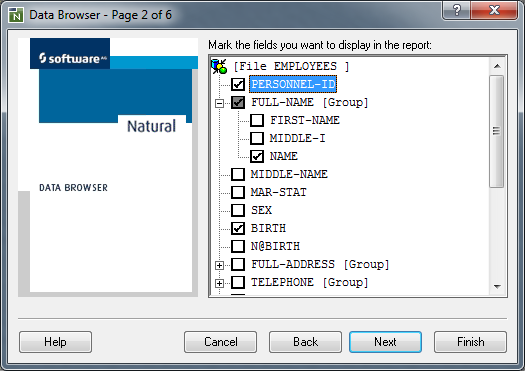
Groups are collapsed and can be expanded by clicking on them. Every item
in the tree view has a check box. The fields that are selected here are taken
over into the list of output fields. If groups are selected, all individual
fields and subgroups that belong to them are automatically selected too. If in
a group, because of manual intervention, not all fields are selected, the check
box with the check mark is grayed out for the corresponding group name (in the
example above, FULL-NAME). A cleared check box causes the field or
fields of a group to be removed from the output list.
This section provides information on the following:
The context menu of the tree view on Page 2 provides the following functions:
| Expand All | Expands all group fields of the DDM. |
| Collapse All | Collapses all group fields of the DDM. |
| Select All | Selects all fields of the DDM. |
| Deselect All | Deselects all fields of the DDM. |
| Properties |
Opens a pop-up window containing properties of the selected
field. |
All individual fields that were selected in the tree view are listed on Page 3 as shown in the following example:
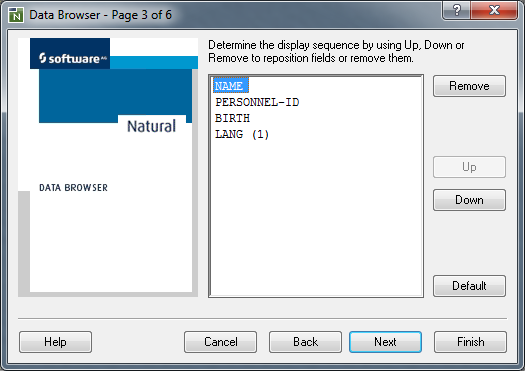
For a field that has been defined as an array, the list indicates the dimension(s) of this array.
The sequence in which the fields appear in the list corresponds to the sequence in the report (from left to right).
The buttons Up und Down are provided for modifying the output sequence. They move the corresponding selected field one position up or down.
Using Remove, the selected field can be deleted from the report list.
With the Default button, the output sequence corresponding to the DDM structure is recreated.
If no fields were selected in the tree view, this page is skipped and per default the first 5 fields of the DDM are used for the report output.
This section provides information on the following:
The context menu of the output sequence on Page 3 provides the following functions:
| Position Top | Positions the selected field at the top of the field list. |
| Position Bottom | Positions the selected field at the bottom of the field list. |
| Properties |
Opens a pop-up window containing properties of the selected
field. |
Page 4 of the data browser provides the option to specify filter criteria similar to the example shown below:
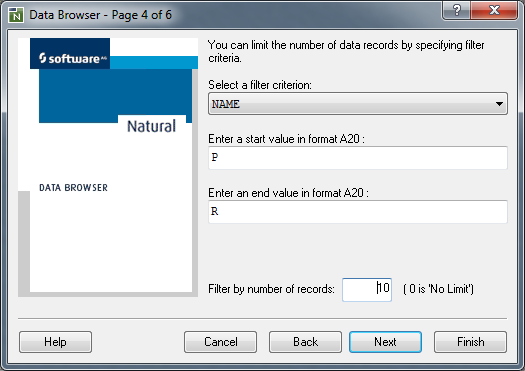
A report can be generated unfiltered in that the records are read as they stand physically in the file (physical read). This is the default.
The range of values of the descriptor field can be defined by a start value and, additionally, by an end value. An end value can be applied only if a start value exists and the start value must be less than the end value. The appropriate value format is shown on the label of the start/end value box.
For a date field, you can enter a start/end date in the
Natural format
D (see the Programming Guide)
according to the example date indicated on the box label where
YYYY represents the year, MM the month and
DD the day. Note that the format in which the date has to be
entered also depends on the setting of the profile parameter
DTFORM
(see the Parameter Reference documentation).
For a time field, you can enter a start/end time in the
Natural format
T or in the
extended format
T according to the example date/time indicated on the
box label where HH:II:SS represents the time (HH =
hour, II = minutes, SS = seconds), YYYY
the year, MM the month and DD the day. Note that the
format in which the date has to be entered also depends on the setting of the
profile parameter DTFORM (see the
Parameter Reference documentation). In addition, consider
the format used when storing the fields in your database system.
All filter criteria can be further limited by entering an absolute
record limit (the default setting is 100 records). Independent of any filter
criteria, only the corresponding number of records is written in the result
list (report). By entering 0 (zero), the record limit is switched
off.
Caution:
A large number of records can result in a long response time for
data retrieval from the database. Therefore, if you switch the record limit off
(value set to 0) or if you specify a value greater than 1000, a
message will warn you of a possible delay in generating the result
list.
This section provides information on the following:
The context menu of the filter criteria on Page 4 provides the following function:
| Properties |
Opens a pop-up window containing properties of the selected
field. |
The report options of the data browser are provided on Page 5:
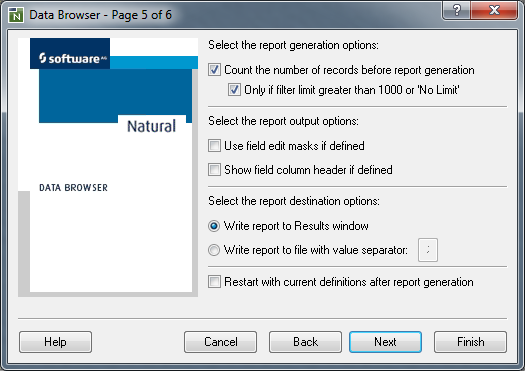
| Count the number of records before report generation | Displays the number of records that meet the
selection and filter criteria specified on the previous pages of the data
browser. The number is displayed before the report is generated.
This option is selected by default. |
| Only if filter limit greater than 1000 or 'No Limit' | Displays the number of records only if a number
greater than 1000 is entered as filter limit or if no filter limit is set on
Page 4 (see
Filter Criteria).
This option is selected by default. |
| Use field edit masks if defined | If defined for the selected fields, uses edit masks for displaying the field values. |
| Show field column headers if defined | If defined for the selected fields, displays the column headers instead of the field names. |
| Write report to Results window | Displays the report generated in the
Results window.
This option is selected by default. |
| Write report to file with value separator | Writes the report generated to a text file, which
can be used for spreadsheet manipulation.
This file contains character-separated values that delimiter rows and columns. You can change the value separator for columns by replacing the default value separator semicolon (;) with another special character. A blank character is not allowed. |
| Restart with current definitions after report generation | Restarts the data browser on Page 2, with the definitions used for the previous report generation. |
When you have finished specifying report generation options, all report definitions are summarized on the last page of the data browser:
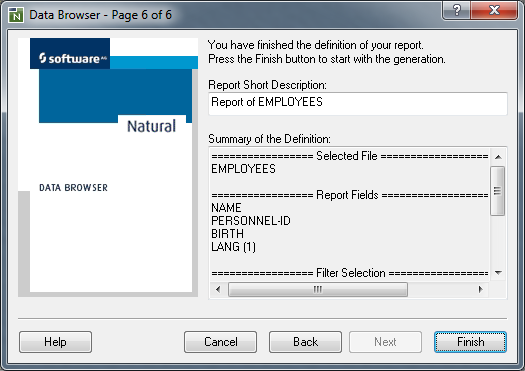
In the Report Short Description text box, you can
replace the default description (Report of
ddm-name) by your own text of up to 253
characters as shown in the example above. The first 30 characters of this
description are then shown as a tab in the
Results
window. The full text is displayed on the tabbed page Description of the report properties (see also
Properties of
Report). The full text is also contained in the header
section of a printout (see also Print).
Note:
When you choose , a warning appears if
more than 200 columns are to be created for the report, which can cause
significant performance problems. A large number of columns can result from a
large number of fields or a wide range of array occurrences specified for the
report.
You can use the context menu to view the properties of each field that is listed on a page (Pages 2 to 4) or in the Results window.
The property sheet of each field always contains the tabbed pages General and Details. An additional page is provided for the following fields:
For fields with header or edit-mask entries, an Extended page with layout information.
For fields with array definitions, an Array Range page with the option to specify a range of occurrences.
The tabbed page General shows the following:

| Name | Name as of the DDM. | ||||||||||||||||||||||||||
| Format | Format as of the DDM. | ||||||||||||||||||||||||||
| Length | Length as of the DDM. | ||||||||||||||||||||||||||
| Type | Field type: group, periodic group, multiple-value field or elementary field. | ||||||||||||||||||||||||||
| Level | Level as of the DDM. | ||||||||||||||||||||||||||
| Descriptor |
|
||||||||||||||||||||||||||
| Remark | Remark as of the DDM. | ||||||||||||||||||||||||||
| File Name | File name as of the DDM. | ||||||||||||||||||||||||||
| File Type | Database type. | ||||||||||||||||||||||||||
The tabbed page Details shows the following:

| Suppression | Null value suppression, fixed storage, not null. |
| Short Name | Adabas short name of the field. |
| Group Hierarchy | All groups and group levels to which a field belongs. |
| Comment | Comment as of the DDM. |
The (optional) tabbed page Extended shows the following:
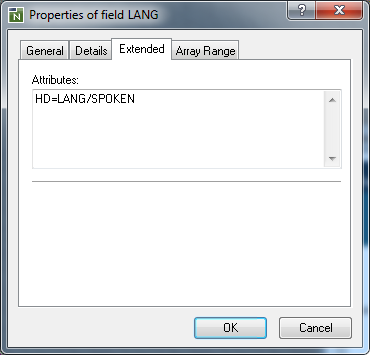
| Attributes | Edit mask (EM=) or header (HD=) as of
the DDM.
|
The (optional) tabbed page Array Range shows the following:
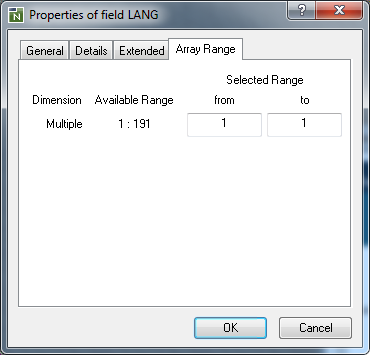
| Dimension |
|
||||||||||||||
| Available Range |
|
||||||||||||||
| Selected Range | For each dimension of an array, you can specify the range of
occurrences to be displayed in the report:
In the from field, you enter the first occurrence to be displayed and in the to you can enter the last occurrence. The value entered in from must be greater than the value entered in to. See also Available Range below. The default setting for both fields is The selected range(s) of occurrences are indicated on Page 3 (see Output Report Fields) and Page 6 (see Summary). In the report, each occurrence is listed in a separate column, in a left-to-right order, from the first occurrence of the first dimension to the last occurrence of the last dimension. Caution: |
||||||||||||||
The result list(s) of the data browser are displayed in the Results window of Natural Studio similar to the example shown below:

You can have as many reports as you want in parallel. With a click on the column header, the lines are sorted by the column value ascending or descending. Modification of the column sequence is possible by shifting the column headers. One or more lines of the result list can be selected for further processing by using the context menu.
Note:
A field header definition that spans multiple lines in a
DISPLAY statement, is displayed in a single line, where each line
break is denoted by a slash (/).
This section provides information on the following:
The context menu of the results list provides the following functions:
| Select All | All lines of the result list are selected. | ||||||
| Expand All Columns | Expands all columns in the result list. | ||||||
| Collapse All Columns | Collapses all columns in the result list. | ||||||
| Output |
|
||||||
| Delete Tab | Deletes the current tab. | ||||||
| Delete Tab and Hide | Deletes the current tab and closes the Results window. | ||||||
| Properties |
Additional information for the current report is displayed.
|
This section provides information on the following:
The Print Selection function invokes a window similar to the example below:
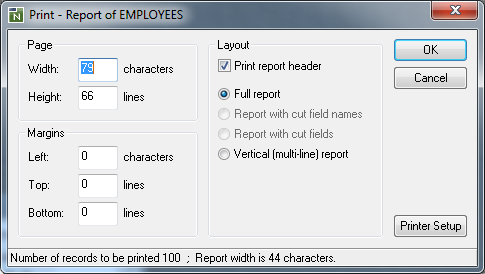
The Print window provides the following options:
| Page | Define the report width and height as matching to printer page size. |
| Margins | You can change the margin settings to adjust the distance between the report data and the left, top or bottom edge of the printed page. |
| Layout | For some criteria you can define the printed report layout.
A report header can be specified which contains the report creation date, the selection criteria, the number of records printed, and the full text of the report description as created by the data browser wizard on Page 6. A record format can be selected, as far as depending on the report size offered, to see a full report list, report list with cut header or fields or a report list with field headers and values in vertical sequence. |
The status line informs about the selected number of records and the original width of the report in characters. With the Printer Setup button, you can open the PC printer setup dialog to select one of the printers available in your system.
The Export Selection to Textile function invokes a Save Report Data window similar to the example below:
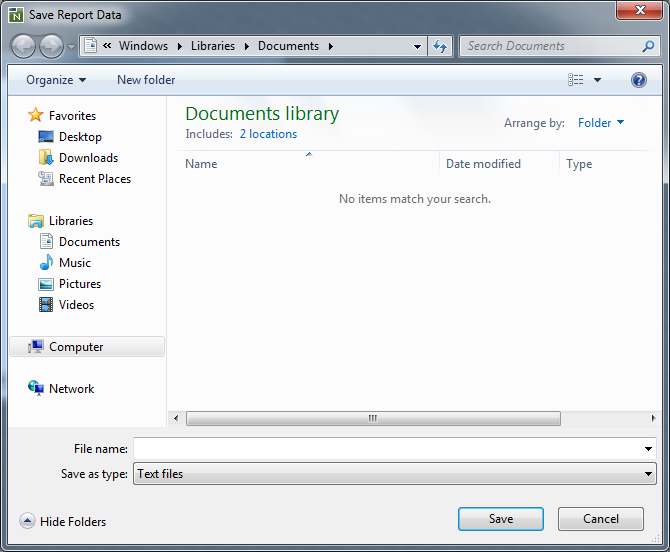
The standard save dialog enables you to enter a file name completed
with the file type .txt.
The text file contains the selected lines of the result list with the
delimiters: the input delimiter character as specified with the
ID session parameter (default is a comma) separates
field values and carriage return/line feed separates records.
The Properties function invokes a property sheet similar to the example below:

The tabbed page General shows the following:
| File | DDM name. |
| DID/FAR/Type | Database ID, file number and database type. |
| Selection criteria | Selection criteria as entered in the data browser. |
| Start value | Start value as entered in the data browser. |
| End value | End value as entered in the data browser. |
| Record limit | Record limit as entered in the data browser. |
| Result records | Number of records shown in the report. |
| Creation date | Date and time when the report was created. |
| Environment | Name or alias name of the environment where the data were retrieved. |
| Library | The library from which the data browser was started to create the current report. |
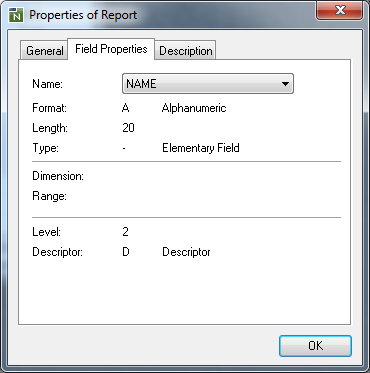
The tabbed page Field Properties shows the following:
| Name | Enables a field name selection to see its properties. |
| Format | Format as of the DDM. |
| Length | Length as of the DDM. |
| Type | Group, periodic group, multiple-value field or elementary field. |
| Dimension | Shows Periodic for a periodic group or
Multiple for a multiple-value field (Adabas), or one or more
numbers of array dimensions (1 for SQL or 1 to
3 for XML).
|
| Range | Shows the range of array occurrences specified for a field. |
| Level | Level as of the DDM. |
| Descriptor | Descriptor, subdescriptor/superdescriptor, hyperdescriptor or non-descriptor. |
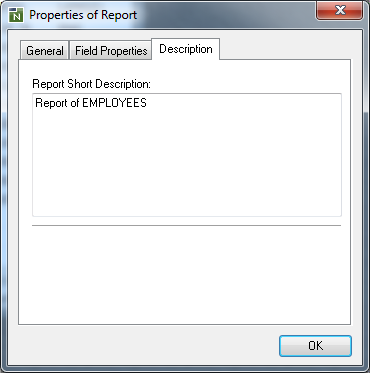
The tabbed page Description shows the full text of the report description as created by the data browser wizard on Page 6.