This document describes how to develop an application by defining and using classes.
The following topics are covered:
Development Environments
-
Developing Classes on Windows Platforms
On Windows platforms, Natural provides the Class Builder as the tool to develop Natural classes. The Class Builder shows a Natural class in a structured hierarchical order and allows the user to manage the class and its components efficiently. If you use the Class Builder, no knowledge or only a basic knowledge of the syntax elements described below is required. -
Developing Classes Using SPoD
In a Natural Single Point of Development (SPoD) environment that includes a Mainframe, UNIX and/or OpenVMS remote development server, you can use the Class Builder available with the Natural Studio front-end to develop classes on Mainframe, UNIX and/or OpenVMS platforms. In this case, no knowledge or only a basic knowledge of the syntax elements described below is required. -
Developing Classes on Mainframe, UNIX or OpenVMS Platforms
If you do not use SPoD, you develop classes on these platforms using the Natural program editor. In this case, you should know the syntax of class definition described below.
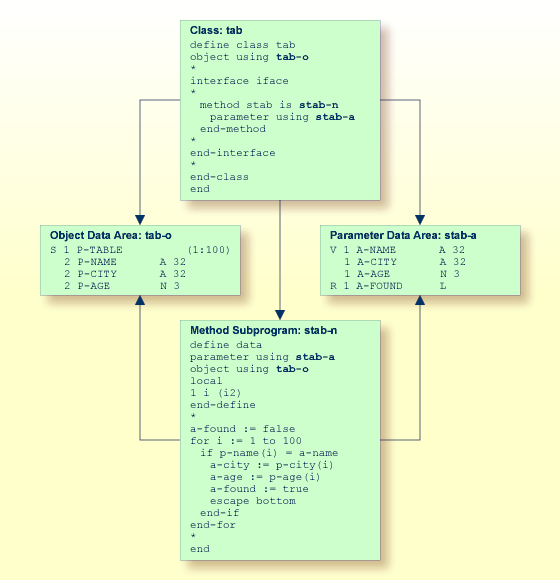
Defining Classes
When you define a class, you must create a Natural class module, within
which you create a DEFINE
CLASS statement. Using the DEFINE CLASS
statement, you assign the class an externally usable name and define its
interfaces, methods and properties. You can also assign an object data area to
the class, which describes the layout of an instance of the class.
This section covers the following topics:
Creating a Natural Class Module
![]() To create a Natural class module
To create a Natural class module
-
Use the
CREATE OBJECTstatement to create a Natural object of type Class.
Specifying a Class
The DEFINE
CLASS statement defines the name of the class, the interfaces
the class supports and the structure of its objects.
![]() To specify a class
To specify a class
-
Use the
DEFINE CLASSstatement as described in the Statements documentation.
Defining an Interface
Each interface of a class is specified with an
INTERFACE statement
inside the class definition. An INTERFACE statement specifies the
name of the interface and a number of properties and methods. For classes that
are to be registered as COM classes, it specifies also the globally inique ID
of the interface.
A class can have one or several interfaces. For each interface, one
INTERFACE statement is coded in the class definition. Each
INTERFACE statement contains one or several
PROPERTY
and METHOD
clauses. Usually the properties and methods contained in one interface are
related from either a technical or a business point of view.
The PROPERTY
clause defines the name of a property and assigns a variable from the object
data area to the property. This variable is used to store the value of the
property.
The METHOD
clause defines the name of a method and assigns a subprogram to the method.
This subprogram is used to implement the method.
![]() To define an interface
To define an interface
-
Use the
INTERFACEstatement as described in the Statements documentation.
Assigning an Object Data Variable to a Property
The PROPERTY
statement is used only when several classes are to implement the same interface
in different ways. In this case, the classes share the same interface
definition and include it from a Natural copycode. The PROPERTY statement
is then used to assign a variable from the object data area to a property,
outside the interface definition. Like the
PROPERTY
clause of the INTERFACE statement, the
PROPERTY statement defines the name of a property and assigns a
variable from the object data area to the property. This variable is used to
store the value of the property.
![]() To assign an object data variable to a property
To assign an object data variable to a property
-
Use the
PROPERTYstatement as described in the Statements documentation.
Assigning a Subprogram to a Method
The METHOD
statement is used only when several classes are to implement the
same interface in different ways. In this case, the classes share the same
interface definition and include it from a Natural
copycode. The METHOD
statement is then used to assign a subprogram to the method, outside
the interface definition. Like the
METHOD
clause of the INTERFACE statement, the
METHOD statement defines the name of a method and assigns a
subprogram to the method. This subprogram is used to implement the method.
![]() To assign a subprogram to a method
To assign a subprogram to a method
-
Use the
METHODstatement as described in the Statements documentation.
Implementing Methods
A method is implemented as a Natural subprogram in the following general form:
DEFINE DATA statement * * Implementation code of the method * END
For information on the DEFINE
DATA statement see the Statements
documentation.
All clauses of the DEFINE DATA statement are optional.
It is recommended that you use data areas instead of inline data definitions to ensure data consistency.
If a PARAMETER
clause is specified, the method can have parameters and/or a return
value.
Parameters that are marked
BY
VALUE in the parameter data area are input parameters of the
method.
Parameters that are not marked BY VALUE are passed
"by reference" and are input/output parameters. This is the
default.
The first parameter that is marked
BY VALUE
RESULT is returned as the return value for the method. If
more than one parameter is marked in this way, the others will be treated as
input/output parameters.
Parameters that are marked
OPTIONAL need not
be specified when the method is called. They can be left unspecified by using
the nX
notation in the SEND
METHOD statement.
To make sure that the method subprogram accepts exactly the same
parameters as specified in the corresponding METHOD statement in the class
definition, use a parameter data area instead of inline data definitions. Use
the same parameter data area as in the corresponding METHOD
statement.
To give the method subprogram access to the object data structure, the
OBJECT clause
can be specified. To make sure that the method subprogram can access the object
data correctly, use a local data area instead of inline data definitions. Use
the same local data area as specified in the
OBJECT
clause of the DEFINE
CLASS statement.
The GLOBAL,
LOCAL and
INDEPENDENT
clauses can be used as in any other Natural program.
While technically possible, it is usually not meaningful to use a
CONTEXT clause in
a method subprogram.
The following example retrieves data about a given person from a table.
The search key is passed as a BY VALUE
parameter. The resulting data is returned through "by reference"
parameters ("by reference" is the default definition). The return
value of the method is defined by the specification
BY VALUE
RESULT.
Using Classes and Objects
Objects created in a local Natural session can be accessed by other modules in the same Natural session.
The statement CREATE
OBJECT is used to create an object (also known as an
instance) of a given class.
To reference objects in Natural programs, object handles have to be
defined in the DEFINE
DATA statement. Methods of an object are invoked with the
statement SEND
METHOD. Objects can have properties, which can be accessed
using the normal assignment syntax.
These steps are described below:
Defining Object Handles
To reference objects in Natural programs, object handles have to be
defined as follows in the DEFINE DATA statement:
DEFINE
DATA
|
level-handle-name
[(array-definition)] HANDLE OF
OBJECT
|
| ... |
END-DEFINE
|
Example:
DEFINE DATA LOCAL 1 #MYOBJ1 HANDLE OF OBJECT 1 #MYOBJ2 (1:5) HANDLE OF OBJECT END-DEFINE
Creating an Instance of a Class
![]() To create an instance of a class
To create an instance of a class
-
Use the
CREATE
                                       OBJECT
statement as described in the Statements documentation.
Invoking a Particular Method of an Object
![]() To invoke a particular method of an object
To invoke a particular method of an object
-
Use the
SEND METHODstatement as described in the Statements documentation.
Accessing Properties
Properties can be accessed using the ASSIGN (or
COMPUTE ) statement
as follows:
ASSIGN
operand1.property-name =
operand2
|
ASSIGN
operand2 =
operand1.property-name
|
Object Handle - operand1
operand1 must be defined as an object handle and identifies the object whose property is to be accessed. The object must already exist.
operand2
As operand2, you specify an operand whose format must be data transfer-compatible to the format of the property. Please refer to the data transfer compatibility rules for further information.
property-name
The name of a property of the object.
If the property name conforms to Natural identifier syntax, it can be specified as follows
create object #o1 of class "Employee"
  #age := #o1.Age
If the property name does not conform to Natural identifier syntax, it must be enclosed in angle brackets:
create object #o1 of class "Employee"
  #salary := #o1.<<%Salary>>
The property name can also be qualified with an interface name. This is necessary if the object has more than one interface containing a property with the same name. In this case, the qualified property name must be enclosed in angle brackets:
create object #o1 of class "Employee"
  #age := #o1.<<PersonalData.Age>>
Example:
define data
  local
  1 #i         (i2)
  1 #o         handle of object
  1 #p         (5) handle of object
  1 #q         (5) handle of object
  1 #salary    (p7.2)
  1 #history   (p7.2/1:10)
  end-define
  * ...
  * Code omitted for brevity.
  * ...
  * Set/Read the Salary property of the object #o.
  #o.Salary := #salary
  #salary := #o.Salary
  * Set/Read the Salary property of
  * the second object of the array #p.
  #p.Salary(2) := #salary
  #salary := #p.Salary(2)
  *
  * Set/Read the SalaryHistory property of the object #o.
  #o.SalaryHistory := #history(1:10)
  #history(1:10) := #o.SalaryHistory
  * Set/Read the SalaryHistory property of
  * the second object of the array #p.
  #p.SalaryHistory(2) := #history(1:10)
  #history(1:10) := #p.SalaryHistory(2)
  *
  * Set the Salary property of each object in #p to the same value.
  #p.Salary(*) := #salary
  * Set the SalaryHistory property of each object in #p
  * to the same value.
  #p.SalaryHistory(*) := #history(1:10)
  *
  * Set the Salary property of each object in #p to the value
  * of the Salary property of the corresponding object in #q.
  #p.Salary(*) := #q.Salary(*)
  * Set the SalaryHistory property of each object in #p to the value
  * of the SalaryHistory property of the corresponding object in #q.
  #p.SalaryHistory(*) := #q.SalaryHistory(*)
  *
  end
In order to use arrays of object handles and properties that have arrays as values correctly, it is important to know the following:
A property of an occurrence of an array of object handles is addressed with the following index notation:
#p.Salary(2) := #salary
A property that has an array as value is always accessed as a whole. Therefore no index notation is necessary with the property name:
#o.SalaryHistory := #history(1:10)
A property of an occurrence of an array of object handles which has an array as value is therefore addressed as follows:
#p.SalaryHistory(2) := #history(1:10)