This section describes how to create and maintain user security profiles. It covers the following topics:
Before You Begin
Before you begin to define users to Natural Security, it is recommended that you take a few preparatory steps:
-
Make a list of all people in your organization who are using Natural.
-
Divide them into groups according to the work they do and in view of the Natural libraries they are to use. The division of your company into departments may be a guideline. People using the same libraries should be in the same groups. (People may be in more than one group.)
It is recommended that groups be used as much as possible, as this will not only reduce Natural Security maintenance considerably, but also provides for a more consistent protection setup.
The definition of users to Natural Security and the assignment of users to groups is best done in the following order:
-
Create a group security profile; that is, define a user of type "Group".
-
Create individual user security profiles; that is, define users (typically of type "Member").
-
Assign Members to the Group; that is, modify the group security profile.
Components of a User Profile
This section covers the following topics:
Overview of Components

Components on Main User-Profile Screen
The following type of screen is the "basic" user profile screen, which is displayed when you invoke one of the functions Add, Copy, Modify, Display for a user security profile:
 15:27:08                    *** NATURAL SECURITY ***               2016-07-31
                                 - Modify User -

                                              Modified ..          by
 User ID ...... AD
 User Name .... ARTHUR DENT_____________________
 User Type .... A (A=Administrator, P=Person, M=Member)

 Privil. Groups           Libraries                 Password
 --------------      -------------------      ----------------------
    DOC_____         Default .. SYSSEC__      New Password ________
    ________         Last .....               Change after 666 days
    ________         Private Library ... Y    Password History .. N
    ________                                  Individual Lock ... F
    ________
                            ETID                  Characteristics
    No. groups   3   -------------------      ---------------------------------
                     Default ..  AR1R  G      Logon recorded .... N
                     Last .....               Batch User ID ..... ________
                                              Language .......... _0
                     Batch ....               Time Differential   + __ h __ min
                                              Time Zone
                                              _________________________________


 Additional Options ... N

 Enter-PF1---PF2---PF3---PF4---PF5---PF6---PF7---PF8---PF9---PF10--PF11--PF12---
       Help  PrevM Exit  AddOp PrLib Flip                                Canc
|
The individual items you may define as part of a user security profile are explained below.
The items of a user security profile may vary depending on the user type. For each item explained below, the user types concerned are indicated in brackets. If no user types are indicated, the item applies to users of every type.
| Field | Explanation |
|---|---|
| User ID (display only) |
The ID of the user as specified when the user security profile was created. |
| User Name |
The name of the user, which may be up to 32 characters long. This name should be identical to the corresponding entry in Predict (if installed). |
| User Type |
G = Group |
| Privileged Groups (all except G) |
You may enter the IDs of up to five groups to which the user belongs. By this, you may influence the order in which Natural Security scans for a link to a library:
The privileged groups may also be used to influence the order in which Natural Security searches for utility profiles to apply; see Which Utility Profile Applies? in the section Protecting Utilities for details. You may enter a group in the Privileged Groups list only after the user has been added to the group. If you remove a group from the user's Privileged Groups list, the user will not be deleted as a member of that group. |
| Members (G) |
You may enter the IDs of the first five users to belong to this group. If the number of users belonging to the group exceeds five, use the Edit Group Members function. You can assign users to a group only after they have been defined to Natural Security. After a user ID entered, its user type will be displayed. |
| No. Groups (all except G; display only) |
The total number of groups to which the user belongs (including the Privileged Groups). Via Additional Options (see below), you can obtain a list of all these groups. |
| No. Members (G; display only) |
The number of users who belong to the group. Via Additional Options (see below), you can obtain a list of all these users. |
| Sum Members (G; display only) |
The sum of all users contained in the group. This includes users who are members of the group itself, and users which are contained in another group that is a member of the group. |
|
Libraries
|
|
| Default |
In this field, you may enter the ID of a default library.
|
| Last (all except G and E; display only) |
The last RESTARTable library to which the user was logged on. |
| Private
Library (A, P, E) |
This option determines whether the user may have a private library (see below). |
|
ETID
|
|
| Default (all except G) |
This field displays the ID to identify End of Transaction data (ETID).
Note: |
| Last (all except G and E; display only) |
The ETID which was last generated/set for the user. Note: |
| Batch (A, P, M, E) |
If the user's Natural session is running in batch mode, this field determines the ETID to be used for the session. Possible values for this field are:
|
|
Password
|
|
| New Password (A, P, M) |
You may enter a password for the user to be used when he or she logs on. This password may be modified by the user (during the logon procedure) or by an owner of the user's security profile (in the security profile). If no password is entered here, Natural Security will assume the password to be identical to the user ID. The minimum length of the password is set in the Library and User Preset Values section of Administrator Services. |
| Change after nnn days (A, P, M) |
In this field, you may specify a time interval after which the user will be forced to change his or her password during the logon procedure. For example, if you set the time interval to If you wish to prevent the user from changing the password, set
this field to If you leave this field blank, the user can change his/her password as often as he/she likes. You can have a message displayed to users warning them of their impending password expiration; see the option Message before password expiratation in the Library and User Preset Values section of Administrator Services. |
| Password History |
This field is only available if User Password History is set to "*" in the Library and User Preset Values. In this case, you can use this field to activate the User Password History feature for an individual user. Possible values:
For details, see the corresponding values of the field User Password History (which is described in the Library and User Preset Values section of Administrator Services |
| Individual Lock |
This field is only available if User Password History is set to "*" in the Library and User Preset Values. In this case, you can use this field to activate the Lock User Option for an individual user. Possible values:
For details, see the corresponding values of the Lock User Option (which is described in the General Options section of Administrator Services). |
|
Characteristics
|
|
| Logon recorded |
All logons by the user to any library will be recorded. See Logon Records in the section Administrator Services for information on logon records. |
| Batch User ID (all except T and B) |
If the Natural system variable You may enter the ID of a batch user profile. Before you can enter a batch user ID, a security profile for this batch user ID must have been defined. In batch mode, a user logs on with his/her "normal" user ID and password. Natural Security will then use the batch user ID specified in the user's security profile, and the conditions of use defined for that batch user ID will apply. If no batch user ID is specified in the user's security profile, the "Privileged Groups" specified in the user's security profile will be checked (in order of entry) for a batch user ID. If none of the Privileged Groups has a batch user ID either, the user's own user ID will be used. Note: |
| Language (all except T) |
This corresponds to the Natural system variable
You may enter a numeric value from For further information, see the system variable
|
| Time Differential (all except B and E) |
This only applies to an environment in which remote nodes are used
in a computer network. It corresponds to the Natural profile parameter
You can enter a value from If, for example, your location time is 5 hours ahead of computer
centre time, you may set the value to You can also specify an asterisk (*); this has the same effect as
the profile parameter setting You can use either Time Differential or Time Zone (described below), but not both. |
| Time Zone (all except B and E) |
This only applies to an environment in which remote nodes are used in a computer network. You can enter the name of a time zone. A time zone of this name
must be defined in the You can use either Time Zone or Time Differential (described above), but not both. |
Additional Options
If you mark the field Additional Options on the basic security profile screen with "Y", a window will be displayed from which you can select the following options:
The options for which something has already been specified or defined are marked with a plus sign (+).
Some options are only available for certain user types.
You can select one or more items from the window by marking them with any character. For each item selected, an additional window/screen will be displayed (in the order of the items in the selection window).
The Private Library screen can also be invoked directly by pressing PF5 on the basic security profile screen.
The individual options are explained below.
| Additional Option | Explanation |
|---|---|
| Maintenance Information
(display only) |
In this window, the following information is displayed:
|
| Security Notes | In this window, you may enter your notes on the security profile. |
| Owners | In this window, you may enter up to eight IDs of
administrators. Only the administrators specified here will be allowed to
maintain this user security profile.
If no owner is specified, any user of type "Administrator" may maintain the security profile. For each owner, the number of co-owners whose countersignatures will be required for maintenance permission may optionally be specified in the field after the ID. For information on owners and co-owners, see the section Countersignatures. |
| Mailboxes | In this window, you may enter up to five mailbox IDs.
For information on mailboxes, see the section Mailboxes. |
| Activation Dates (all except T and B) |
In this window, you may define dates as of which or until when
the security profile shall be valid.
The message "This security profile is currently not active." is displayed if the security profile is not yet or no longer or temporarily not valid, which means that the corresponding user ID cannot be used before or after a certain date or within a certain period of time. |
| Functional Security (all except T and E) |
In this window, you may define functional security for the user
with respect to the command processors defined in the libraries the user has
access to.
This is only relevant if command processors have been created with the Natural utility SYSNCP. See the section Functional Security for details. |
| Groups/Members (display only) |
If you mark this field, a list of all groups to which the user
belongs will be displayed.
If the user is a Group, a list of all users who belong to the Group will be displayed. |
| Group Editor (G) |
If you mark this field, the Edit Group Members function will be invoked. This function is explained under Editing Group Members below. |
| Private
Library (A, P, E) |
A user may have a "personal" library whose ID is the same as his/her user ID. Such a library is called a private library. Private libraries can be made available in two modes:
The mode is set with the general option Private libraries in public mode (described in the section Administrator Services) and applies to all private libraries. For information on creating and maintaining a private library, see the section Library Maintenance. As far as access to DDMs/files is concerned, there is no difference between private libraries and "normal" libraries. Note: |
| Session Options (A, P, G, E) |
|
| Development Mode (A, P, G, E) |
See Protecting the Navigator View in the section Protecting the Natural Development Environment in Eclipse. |
Session Options
| Option | Explanation | ||||||||||||
|---|---|---|---|---|---|---|---|---|---|---|---|---|---|
| Unlock Objects |
|
||||||||||||
| Environment Protection (display only) |
|
||||||||||||
| Suspend Line Protection |
|
||||||||||||
| Profile Maintenance |
|
||||||||||||
| Natural Client Access |
|
||||||||||||
Creating and Maintaining User Profiles
This section describes the functions used to create and maintain user profiles. It covers the following topics:
Invoking User Maintenance
![]() To invoke user maintenance:
To invoke user maintenance:
-
On the Main Menu, select Maintenance.
A window will be displayed.
-
In the window, mark the object type User with a character or with the cursor.
The User Maintenance selection list will be displayed.
-
From this selection list, you invoke all user maintenance functions as described below.
Adding a New User
The Add User function is used to define new users to Natural Security, that is, create user security profiles.
When you add a new user, you have to specify:
-
a user ID,
-
a user type,
-
the ID of a default profile (optional).
User ID
The user ID is used by Natural Security to identify the user. It may be 1 to 8 characters long. The ID must be unique among all user IDs and library IDs defined to Natural Security. For user IDs, the same naming conventions apply as for library IDs (see the section Library Maintenance).
-
If the user is an individual, usually an ID is chosen which is related to the user's name.
-
If the user is a terminal, the ID must be identical to the terminal ID by which the terminal is defined to the computer (ask your system programmer).
-
If the user is a group, choose whatever ID you like.
User Type
When you add a user, you specify the code for one of the following user types:
| Code | User Type |
|---|---|
| G | Group |
| M | Member |
| P | Person |
| A | Administrator |
| T | Terminal |
| Special-purpose user types: | |
| B | Batch User (see Batch User Security Profiles in the section Natural Security In Batch Mode). |
| E | External User (this user type cannot be explicitly specified; see the field NSC user ID under Components of the LDAP Security Profile in the section Authentication Options). |
If the user to be defined is a group, the user type must be "G". If the user to be defined is a terminal, the user type must be "T". If the user to be defined is an individual, the user type should be "M" (except individuals who are Natural Security administrators and have to be user type "A").
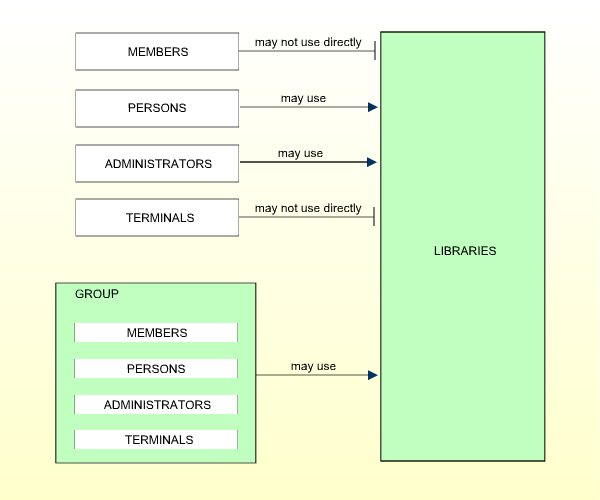
The access rights of different types of users to libraries are summarized in the following diagram:
If you have doubts about the correct user type specification, please refer to Users in the section The Structure And Terminology Of Natural Security.
Once an individual has been defined, you can later change his/her user type classification (as explained under Upgrading and Downgrading Users below.
Default Profile
When you add a new user, you can either type in every item within the user security profile by hand; or you can use a pre-defined user default profile as a template for the security profile you are creating.
Before you use default profiles, you should be familiar with the "normal" way of defining users (that is, without default profile).
Default profiles are created and maintained in the Administrator Services subsystem.
The user type of the default profile you specify must be the same as that of the user security profile you are creating.
If you specify the ID of a default profile in the Add User window, the items from the default profile will be copied into the user profile - except the user ID, user name and the owners.
On the Add User screen, you can then overwrite the items copied into the user profile and specify further items.
For further information, see User Default Profiles in the section Administrator Services.
Note:
To define numerous users with identical security profiles, you can
also use the Multiple Add User function (see
Adding Multiple New
Users below).
How to Add a New User
In the command line of the User Maintenance
selection list, you enter the command ADD.
A window will be displayed. In this window, you enter the following:
-
a user ID,
-
a user type,
-
the ID of a default profile (optional).
The Add User screen for the specified user type will be displayed. On this screen, you define a security profile for the user.
The Add User screen and the subsequent screens/windows that are part of a user security profile as well as the individual items you may define are described under Components of a User Profile above.
When you add a new user, the owners specified in your own user security profile will automatically be copied into the user security profile you are creating.
Adding Multiple New Users
Before you use the Multiple Add User function you should be familiar with the "normal" way of defining users (as described under Adding a New User above).
The Multiple Add User function allows you to define large numbers of users to Natural Security in a fast and easy way. You can use this function to define numerous users who are to have identical security profiles.
In the command line of the User Maintenance
selection list, you enter the command ADDM.
A window will be displayed. In this window, enter a user ID and a user type specification (and, optionally, the ID of a default profile).
The Multiple Add User screen for the specified user type will be displayed. On this screen you may define a security profile for the user.
The Multiple Add User screen and the subsequent screens/windows that are part of a user security profile as well as the individual items you may define are described under Components of a User Profile above.
When you add a new user, the owners specified in your own user security profile will automatically be copied into the user security profile you are creating.
![]() To create multiple user security profiles
To create multiple user security profiles
-
On the first screen (and any additional screens/windows), you define a security profile for one user.
-
Once you have finished typing in the items to be defined and are back on the Multiple Add User screen without any additional screens/windows being active, press ENTER. The first user is now defined.
-
Then press PF5 - the same security profile will be displayed again omitting the user ID and user name entries. Type in a user ID and the name of the next user and press ENTER. The second user is now defined.
-
Then press PF5 - the same security profile will be displayed again omitting the user ID and user name entries. In this manner, you may continue to define more users all with identical security profiles.
-
To leave the Multiple Add User function, press PF3.
Selecting Existing Users for Processing
When you invoke User Maintenance, a list of all users that have been defined to Natural Security will be displayed.
If you do not wish to get a list of all existing users but would like only certain users to be listed, you may use the Start Value and Type/Status options as described in the section Finding Your Way In Natural Security.
On the Main Menu, select Maintenance. A window will be displayed.
In the window, mark the object type User with a character or with the cursor (and, if desired, enter a start value and/or user type).
The User Maintenance selection list will be displayed:
 11:11:11                   *** NATURAL SECURITY ***                 2015-12-31
                                - User Maintenance -

  Co User ID  User Name                        Type Message
  __ ________ ________________________________ ____ _____________________
  __ AAZ      ABDUL ALHAZRED                   A
  __ AD       ARTHUR DENT                      A
  __ CDW      CHARLES DEXTER WARD              A
  __ CZ       CODY ZAMORA                      P
  __ DI       DAVID INNES                      A
  __ EW       ESMERALDA WEATHERWAX             M
  __ HC       HAGBARD CELINE                   A
  __ HW       HENRY WILT                       A
  __ IW       IRENE WILDE                      M
  __ LL       LOCKE LAMORA                     M
  __ PE       PALMER ELDRITCH                  M
  __ PR       PRECIOUS RAMOTSWE                M
  __ SV       SAM VIMES                        M
  __ TN       THURSDAY NEXT                    P
  __ VV       VINCENT VEGA                     M

  Command ===>
  Enter-PF1---PF2---PF3---PF4---PF5---PF6---PF7---PF8---PF9---PF10--PF11--PF12---
        Help        Exit              Flip  -     +                       Canc
|
For each user, the user ID, user name and user type are displayed.
The list can be scrolled as described in the section Finding Your Way In Natural Security.
The following user maintenance functions are available (possible code abbreviations are underlined):
| Code | Function |
|---|---|
CO |
Copy user |
MO |
Modify user |
RE
|
Rename user |
DE
|
Delete user |
DI |
Display user |
EG
|
Edit group members |
LA
|
Link user to applications |
LL
|
Link user to libraries |
LO
|
Link user to external objects |
LR |
Link user to RPC servers |
CP |
Copy user's links |
EP |
Protect environments for user |
MD
|
Modify DDM restrictions in user's private library (this function is not available on mainframes) |
To invoke a specific function for a user, mark the user with the appropriate function code in column Co.
You can select various users for various functions at the same time; that is, you can mark several users on the screen with a function code. For each user marked, the appropriate processing screen will be displayed. You can then perform for one user after another the selected functions.
Copying a User
The Copy User function is used to define a new user to Natural Security by creating a security profile which is identical to an already existing user security profile.
What is Copied?
All components of the existing security profile will be copied into the new security profile - except:
-
the user name (see How to Copy below),
-
the password,
-
the ETID (which identifies End of Transaction data),
-
the owners (these will be copied from your own user security profile into the new user security profile you are creating).
Whether the groups entered in the "Privileged Groups" column and any links to libraries are copied depends on whether you copy with or without links (see below).
How to Copy
On the User Maintenance selection list, mark the
user whose security profile you wish to duplicate with function code
CO.
A window will be displayed. In this window, specify the following:
| Field | Explanation |
|---|---|
| To user | Enter the ID of the "new" user. |
| User name | This field shows the name of the existing user. Overwrite it with the name of the "new" user. |
| With links | If you wish links not to be copied, leave the "N" in this field untouched; if you wish any links existing for the existing user also to apply to the new user, type in a "Y". See below for details. |
The Copy User screen will be displayed showing the new security profile.
The Copy User screen and the subsequent screens/windows that are part of a user security profile as well as the individual items you may define are described under Components of a User Profile above.
Copying Without Links
If you leave the "N" in the with links field of the Copy User window:
-
the groups entered in the Privileged Groups column of the existing user will not be copied into the new user security profile;
-
any links defined for the existing user will not apply to the new user;
-
any user-specific and user-library-specific utility profiles for the existing user will not apply to the new user.
Copying With Links
If you enter a "Y" in the with links field of the Copy User window:
-
any links that existed for the existing user are copied for the new user, and you have the option to cancel the links you wish not to apply for the new user;
-
the new user will be added to all groups in which the existing user is contained (and all access right of the groups to libraries then also apply for the new user), and you have the option to delete the new user from any of these groups;
-
any user-specific and user-library specific utility profiles that existed for the existing user are copied for the new user.
The procedure is as follows:
-
Once you have made any changes to the copied security profile and then leave the Copy User screen by pressing PF3, a list of libraries is displayed: the list contains all libraries to which the existing user is linked directly.
-
On the list, you may mark individual libraries with
CLto cancel any links you wish not to apply for the new user; to all libraries you do not mark, the new user will automatically be linked in the same manner - normal or special link - as the existing user. -
Once you have established all direct links and then leave the list of libraries by pressing PF3, a list of groups is displayed: the list contains all groups in which the existing user is contained.
-
On the list you may mark with
CLthe groups to which you wish the new user not to be added; the new user will automatically be added to all groups you do not mark. If any of the groups to which the new user is added is entered as Privileged Groups in the security profile of the existing user, they will automatically also be entered as Privileged Groups in the new user security profile.
Modifying a User
The Modify User function is used to change an existing user security profile.
On the User Maintenance selection list, mark the
user whose security profile you wish to change with function code
MO. The Modify User screen will be
displayed.
The Modify User screen and the subsequent screens/windows that are part of a user security profile as well as the individual items you may define or modify are described under Components of a User Profile above.
Upgrading and Downgrading Users
If need be, you may change the user type classification of an individual.
If you wish to change the user type, first type in the new user type and press ENTER to obtain the appropriate Modify User screen before you further modify the security profile, because the Modify User screens for the different user types are not identical to one another.
Upgrading a User
You may "promote" a MEMBER to become a PERSON or an ADMINISTRATOR; and you may "promote" a PERSON to become an ADMINISTRATOR.
Downgrading a User
You may downgrade an ADMINISTRATOR to become a PERSON or a MEMBER; and you may downgrade a PERSON to become a MEMBER.
-
Before you can downgrade a user from ADMINISTRATOR to PERSON, you have to remove him/her as owner from every security profile in which he/she is specified as owner. As long as an ADMINISTRATOR is still owner of any security profile, he/she cannot be downgraded.
-
Before you can downgrade a user from ADMINISTRATOR to MEMBER, you have to perform the following:
-
Remove him/her as owner from every security profile in which he/she is specified as owner. As long as an ADMINISTRATOR is still owner of any security profile, he/she cannot be downgraded.
-
Cancel all direct links from the user to libraries/external objects. As long as the user is linked to any library or external object, he/she cannot become a MEMBER.
-
Delete the ADMINISTRATOR's private library (if defined). As long as the user has a private library, he/she cannot become a MEMBER.
-
-
Before you can downgrade a user from PERSON to MEMBER, you have to cancel all direct links from the user to libraries/external objects. As long as the user is linked to any library or external object, he/she cannot become a MEMBER. In addition, you have to delete the PERSON's private library (if defined). As long as the user has a private library, he/she cannot become a MEMBER.
User Locked?
When the Lock User Option (see Administrator Services) is active, it may occur that the user security profile has been locked.
If the security profile is locked, this will be indicated on the Modify User screen by the message:
This user is currently locked due to logon/countersign error!
If you enter a "Y" in the Unlock? (Y/N) field, a window will be displayed which provides detailed information on how and when the locking occurred. In that window you may also unlock the security profile.
Note:
You can also view and unlock locked users with the
List/Unlock Locked
Users function (see Administrator
Services).
Renaming a User
The Rename User function allows you to change the user ID of an existing user security profile.
On the User Maintenance selection list, you mark
the user whose ID you wish to change with function code RE. A
window will be displayed in which you can enter a new ID for the user (and,
optionally, change the user's name).
An administrator who is an owner of one or more security profiles cannot be renamed. A user who is specified as DDM modifier in one or more DDM/file security profiles, cannot be renamed either.
Deleting a User
The Delete User function is used to delete an existing user security profile.
On the User Maintenance selection list, you mark
the user you wish to delete with function code DE. A window will
be displayed.
-
If you have invoked the Delete User function and should then decide against deleting the given user security profile, leave the Delete User window by pressing ENTER without having typed in anything.
-
If you wish to delete the given user security profile, enter the user's ID in the window to confirm the deletion.
Depending on the setting of the general option Allow Deletion of Users Who Are Owners/DDM Modifiers (see Administrator Services), it may not be possible to delete a user security profile if the user is specified as owner in any security profile or as DDM modifier in any DDM/file security profile.
If you mark more than one user with DE, a window will be
displayed in which you are asked whether you wish to confirm the deletion of
each user security profile by entering the user's ID, or whether all users
selected for deletion are to be deleted without this individual confirmation.
Be careful not to delete a user accidentally.
Note:
If you delete a Group security profile, this will not
delete the individual security profiles of the users assigned to this
Group.
Displaying a User
The Display User function is used to display an existing user security profile.
On the User Maintenance selection list, mark the
user whose security profile you wish to view with function code
DI. The Display User screen will be
displayed.
The items displayed on the Display User screen and any additional windows that are part of a user security profile are explained under Components of a User Profile above.
User Locked?
When the Lock User Option (described in the section Administrator Services) is active, it may occur that the user security profile has been locked.
If the security profile is locked, this will be indicated on the Display User screen by the message:
This user is currently locked due to logon/countersign error!
If you enter a "Y" in the Lock Info (Y/N) field, a window will be displayed which provides detailed information on how and when the locking occurred.
Editing Group Members
The Edit Group Members function is used to assign users to or delete users from a group.
As long as the number of users assigned to a group does not exceed 5, the group members may be maintained in the Members column of the group's security profile by using the Modify User function. For larger groups, membership maintenance has to be done with the Edit Group Members function.
Note:
The number of group members you can maintain with the Edit Group
Members function is restricted by internal storage limitations set by the
Natural profile parameter ESIZE. To maintain a larger number of
group members, you use the application interface program
NSCUS. With NSCUS, you can
maintain groups of up to 99,999 members.
You can invoke the Edit Group Members function either from the User Maintenance selection list or from within a group's security profile:
-
On the User Maintenance selection list, mark the group you wish to edit with function code
EG. -
In a group's security profile, mark the option Group Editor in the Additional Options window with any character.
The Edit Group Members screen will be displayed:
>                      > +   Gr ELGRUPO                  Size 5    Line 1
  ALL  User ID             User Name              Type        Status
       -------- --------------------------------- ---- --------------------
       AD       ARTHUR DENT                       A
       AT       TIFFANY ACHING                    A
       MT       MERCY THOMPSON                    M
       RM       RACHEL MORGAN                     M
       T2112    WEINRIB'S TERMINAL                T
|
The Edit Group Members screen is a modified Natural program editor. When you invoke it, the users already contained in the given group are read into the source area. The list of group members will be in alphabetical order of user IDs. For each user, the user ID, user name and user type are displayed.
To add a user to the group, add the user ID to the list. To delete a user from the group, delete the user ID from the list.
Remember that users have to be defined to Natural Security before they can be added to a group.
It does not matter in which order you add new user IDs: when you
catalog the list of group members (see command CAT
below), they will automatically be sorted alphabetically.
To edit the list, you can use the Natural program editor scrolling commands, line commands and editor commands (as described in the Natural Editors documentation).
To add all users contained in one group to the group you are
editing, enter the command INCLUDE
group-ID in the command line of the
Edit Group Members screen. All users contained in the
group whose ID you specify with the INCLUDE command will then be added to the
list. They will be included before the user who is displayed in the top line of
the screen.
Modifications are only processed in the source area until you enter the
command CAT[ALOG] in the command line (or press
PF3). This command first invokes a procedure which checks for
duplicate IDs. If the IDs are unique, the edited list of members will be
entered in the group's security profile.
With the command CHECK you invoke the
checking procedure only.
When you perform the CATALOG function, the
user exit NSCUSEX2 is invoked. It
displays a list of the group's members, indicating which members have been
added to the group and which have been removed from it.
To leave the Edit Group Members screen, enter a period (.) in the command line.
Copying a User's Links
The Copy User's Links function is used to copy links from one existing user profile to another one of the same user type.
You can individually select the links to be copied. In addition to links, you can copy group memberships (including Privileged Groups specifications) and functional security definitions.
On the User Maintenance selection list, you mark
the user whose links you wish to copy with function code CP. A
window will be displayed in which you enter the ID of the user to which you
wish to copy links. In addition, you can restrict the selection of link types
in the window:
-
Library links
-
Groups/Members
-
Utility links
-
Functional security
-
File links (if the user has a private library)
-
Environment links
-
External object links
By default, all the above are selected. To deselect one type, you remove the "X".
A list of all the first user's existing links (of the selected types) will then be displayed.
The listed links are not automatically preselected for copying. In the
"Co" column of the list, you have to mark with function code
CO each link you wish to be copied from the one user to the
other.
You can mark one or more links per screen. For each link marked, a message indicating if it has been copied will be displayed. If a link cannot be copied, this will also be indicated. For example, if the user already has a link to a specific object, this cannot be replaced by a link copied from the other user.