
A library is defined to Natural Security by creating a library security profile. The library security profile determines the conditions under which the library may be used.
This section covers the following topics:
This section covers the following topics:
Restrictions
The following type of screen is the "basic" library security profile screen, which is displayed when you invoke one of the functions Add, Copy, Modify, Display for a library security profile:
15:52:08                    *** NATURAL SECURITY ***                 2020-12-31
                               - Modify Library -

                                             Modified .. 2020-12-12 by SAG
Library ID ..... TESTLIB
Library Name ... ________________________________

    General Options            Library File                Transactions
-----------------------   -----------------------   ---------------------------
People-protected .... N   DBID ........ _____       Startup .......... ________
Terminal-protected .. N   FNR ......... _____       Batch execution .. Y
Restrictions ........ Y   Password .... ________    Restart .......... ________
Logon recorded ...... N   Ciphercode .. ________    Error ............ ________
Utilities ........... O   Read Only ... _
Programming mode .... R                             User exit ........ ________
Cross-reference ..... N
Restart ............. N


Additional Options ... N


Enter-PF1---PF2---PF3---PF4---PF5---PF6---PF7---PF8---PF9---PF10--PF11--PF12---
      Help  PrevM Exit  AddOp Restr Flip                                Canc
|
The individual items you may define as parts of a library security profile are explained below.
| Field | Explanation |
|---|---|
| Library ID (display only) | The ID of the library as specified when the library security profile was created. |
| Library Name | You may enter a name for the library, which may be up to 32 characters long. |
| Field | Explanation | |
|---|---|---|
| People-protected/ Terminal-protected | You may specify whether the library is to be people-protected and/or terminal-protected in order to restrict the use of the library. The possible combinations of protection are described under Protected Libraries in the section Protecting Libraries. | |
| Restrictions | Special restrictions may
be defined for the library, as described under
Additional
Options below.
|
|
| Logon recorded | This option determines whether logons to the library are to be recorded or not. | |
| Y | Every time a user logs on to the library, a logon record will be written by Natural Security. You may review the activities of users by viewing these logon records (see Logon Records in the section Administrator Services for further information). | |
| N | Logons to the library will not be recorded. | |
| Utilities |
For consistent control of Natural utility usage, utility profiles should be used; they are described in the section Protecting Utilities. This option applies to the following Natural utilities:
Under this condition, this option determines who may use the utility to process the contents of the library. Possible values are: |
|
| N | No protection - The library's contents may be processed by any user. | |
| O | Permission for Owners - The library's
contents may be processed only by the owners of the library security
profile. If no owner is specified, any user of type "Administrator" may do so.
In the case of a private library, in addition to the owners, the user with the
same ID as the library ID may also process the library's contents.
In batch mode, an owner who requires a countersignature from a co-owner cannot process the contents of the library (as countersignatures are not possible in batch mode). In online mode, if the Session Option Utilities Option is set to "O" in the default security profile of SYSMAIN or SYSOBJH, and an owner requires a countersignature, the countersignature prompt will be suppressed and the library excluded from SYSMAIN/SYSOBJH processing. |
|
| P | Permission under Protection rules - The library's contents may be processed under protection rules, that is, only by users who are allowed to log on to the library. For private libraries in private mode, the following applies: The user with the same ID as the library ID may process the library's contents; anyone else may process it only after entering that user's password (on a countersignature screen provided for that purpose). In batch mode, please note that a user cannot process the contents of another user's private library in private mode (as no password can be entered in batch mode). | |
|
If the Natural system command SCAN is allowed for the library (see Command Restrictions below), this option also applies to the SCAN command. |
||
| Programming mode | Natural programming mode: | |
| S | (= Structured mode) - The programming
mode to be used cannot be changed with the Natural parameter SM,
and structured mode will invariably be in effect.
|
|
| R | (= Reporting mode) - The setting of the
Natural profile/session parameter SM (see Natural
Parameter Reference documentation) determines the mode to
be used.
|
|
| See also Natural programming mode in Library Preset Values. | ||
| Cross-reference | This option determines whether an active cross-reference in Predict (if installed) will be generated for the library. | |
| Y | Yes - An active cross-reference will be generated. | |
| N | No - An active cross-reference will not be generated. | |
| F | Force - An active cross-reference will be forced. | |
| D | Doc - Objects to be cataloged must be documented in Predict. However, no active cross-reference will be generated. | |
| See the Predict documentation for details on active cross-references. | ||
| Restart | Y | The library may be re-invoked by
entering RESTART as the library ID on the logon screen; an Adabas
OPEN command with End of Transaction ID (ETID) will be executed during the
logon procedure.
|
| N | The library cannot be "RESTARTed". The ETID specified in Natural Security will not be used for the Adabas OPEN command. | |
| Version control (display only) |
This field only applies
on mainframe computers and if the library is under control of Predict
Application Control.
This field indicates the version control status of the library. If the library is controlled by Predict Application Control, the database ID (DBID) and file number (FNR) of the FDIC system file in which the library's Predict data are stored are also displayed. |
|
These items concern:
the database file where the source programs and object modules contained in the library are to be stored (FUSER).
the database file where the Predict active cross-references related to the library are to be stored (FDIC).
The FDIC settings can only be specified if the option Library FDIC Assignment Enabled is set to "Y" in Administrator Services > Library Preset Values.
The FUSER and FDIC values specified here in the library profile
take precedence over the corresponding values of the Natural profile parameters
FUSER and
FDIC which apply at
the start of the Natural session. For values not specified here in the library
profile, the corresponding values of the FUSER and
FDIC profile parameters apply.
For Natural system libraries - that is, all libraries whose IDs
begin with SYS (except the library SYSTEM) - you
cannot make any specifications here. For these libraries, the specifications of
the Natural profile parameter FNAT apply.
For libraries which are under the control of Predict Application
Control, you cannot make any FDIC specifications here. For these libraries, the
specifications of the Natural profile parameter
FDIC apply.
(*) The Password and Cipher code fields only apply on mainframe computers, they have no effect under UNIX, OpenVMS and Windows.
For the Natural Development Server environment and Natural servers used in Eclipse, see also the following sections:
Map Environment and Library Selection under Protecting the Natural Development Server Environment and Applications;
Map Environment and Library Selection under Protecting the Natural Development Environment in Eclipse.
Note:
For the use of the Natural utility SYSMAIN, the following
applies: If FDIC values are specified in the security profile of a library, and
the library is selected as source or target library in a SYSMAIN function, no
other FDIC values can be used for this library in SYSMAIN.
| Field | Explanation |
|---|---|
| ETID (display only) |
This field contains the library-specific component of the ID for End of Transaction data. For details on ETIDs, see Components of a User Profile. |
| Field | Explanation | |
|---|---|---|
| Startup |
You can enter the name of a startup transaction; this
transaction will always be invoked immediately after a successful logon to the
library. See also the Natural system variable
The name of the startup transaction will be placed in
the Natural system variable |
|
| Batch execution |
This field only applies if the Natural system variable
You can specify one of the following values: |
|
| Y | The startup transaction will also be executed (once) in batch mode. | |
| S | The startup transaction will also be
executed in batch mode; in addition, its name will be placed in the Natural
system variable *STARTUP.
|
|
| N | If the NEXT/MORE line is allowed for
the library (see Security Options below), the startup
transaction will not be executed in batch mode. If the NEXT/MORE line is not allowed, the startup transaction will also be executed (once) in batch mode. |
|
|
See also Natural Security In Batch Mode. |
||
| Restart | You can enter the name of
a restart transaction; this transaction will always be invoked when the library
is reinvoked by entering RESTART as the library ID on the logon
screen.
|
|
| Error |
You can enter the name of an error transaction. This
transaction will be invoked after the occurrence of an execution time error (if
the program does not contain an For further information on error transactions, see Using an Error Transaction Program in the Natural Programming Guide. Note: |
|
With each library profile and special-link profile, you can store 250 bytes of additional data of your choice.
These additional data can be stored/read by means of a user exit
subprogram which must contain a CALLNAT statement (with five
parameters as described below) which in turn invokes one of the following
subprograms:
| Subprogram | Function | |
|---|---|---|
SNAASEXT |
Store additional library data. | |
SNAAREXT |
Read additional library data. | |
SNAUSEXT |
Store additional special-link data. | |
SNAUREXT |
Read additional special-link data. | |
These four subprograms are contained in the Natural Security
library SYSSEC.
In the User Exit field of the library profile or special-link profile, you enter the name of the user exit that invokes one of the above subprograms.
To invoke the user exit, you mark User Exit with "Y" in the Additional Options window (see below).
If you wish to handle the additional data from within a library, you can also invoke the above subprograms by means of a user exit from a library itself. In this case you must copy the subprograms into that library (by using the SYSMAIN utility). When invoked from a library, each subprogram will check and ensure that only data concerning that library or the specified link are read/stored.
In the security profiles of the Natural system libraries, that
is, all libraries whose IDs begin with "SYS" (except the library
SYSTEM), you cannot specify a user exit.
SNAASEXT is used to store additional library data.
It must be invoked with the following five parameters:
| Parameter | Format/Length | Contents passed to SNAASEXT | Contents returned from SNAASEXT |
|---|---|---|---|
| 1st | A8 | none | Library ID |
| 2nd | A32 | none | Library name |
| 3rd | D | none | Date of latest modification |
| 4th | A250 | Data to be stored | same as passed |
| 5th | B2 | none | Return code |
SNAAREXT is used to read addtional library data.
It must be invoked with the following five parameters:
| Parameter | Format/Length | Contents passed to SNAAREXT | Contents returned from SNAAREXT |
|---|---|---|---|
| 1st | A8 | none | Library ID |
| 2nd | A32 | none | Library name |
| 3rd | D | none | Date of latest modification |
| 4th | A250 | none | Data read |
| 5th | B2 | none | Return code |
When you invoke SNAAREXT or SNAASEXT
from a library profile in SYSSEC, the data will refer to the
library you are currently maintaining. When you invoke them from outside
SYSSEC, the data will refer to the library from which you invoke
the subprogram.
SNAUSEXT is used to store additional special-link
data. It must be invoked with the following five parameters:
| Parameter | Format/Length | Contents passed to SNAUSEXT | Contents returned from SNAUSEXT |
|---|---|---|---|
| 1st | A8 | none | Library ID |
| 2nd | A8 | User ID (must only be filled if
SNAUSEXT is invoked from outside SYSSEC)
|
User ID |
| 3rd | D | none | Date of latest modification |
| 4th | A250 | Data to be stored | same as passed |
| 5th | B2 | none | Return code |
SNAUREXT is used to read additional special-link
data. It must be invoked with the following five parameters:
| Parameter | Format/Length | Contents passed to SNAUREXT | Contents returned from SNAUREXT |
|---|---|---|---|
| 1st | A8 | none | Library ID |
| 2nd | A8 | User ID (must only be filled if
SNAUREXT is invoked from outside SYSSEC)
|
User ID |
| 3rd | D | none | Date of latest modification |
| 4th | A250 | none | Data read |
| 5th | A2/B2 | * | Return code * |
* When you invoke SNAUREXT from outside
SYSSEC, you may read several special links to the library by using
the 2nd parameter as start value and specifying one of the following operators
in the 5th parameter (A2): "EQ", "=",
"GT", ">", "LT", "<",
"GE", ">=", "LE",
"<=". These operators determine the read condition as compared
against the 2nd parameter. Return code (B2) "0" indicates that the
specified special link has been found; any other value indicates that no such
link has been found.
When you invoke SNAUREXT or SNAUSEXT
from a special-link profile in SYSSEC, the data will refer to the
link you are currently maintaining. When you invoke them from outside
SYSSEC, the data will refer to the link between the specified user
ID and the library from which you invoke the subprogram.
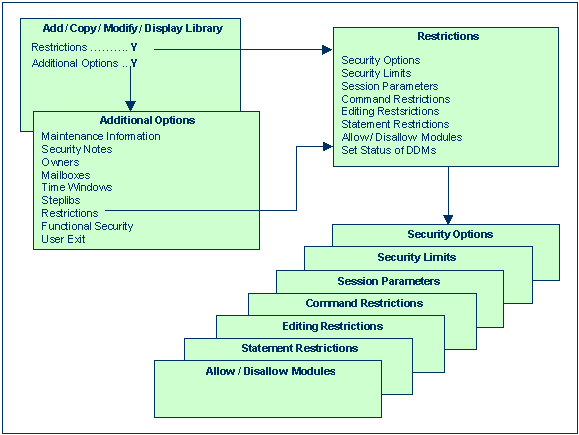
If you mark the field Additional Options on the basic security profile screen with "Y", a window will be displayed from which you can select the following options:
The options for which something has already been specified or defined are marked with a plus sign (+).
You can select one or more items from the window by marking them with any character. For each item selected, an additional window/screen will be displayed (in the order of the items in the selection window).
The Restrictions window can also be invoked directly by pressing PF5 on the basic security profile screen.
The individual options are explained below.
| Additional Option | Explanation |
|---|---|
| Maintenance
Information (display only) |
In this window, the following information is
displayed:
|
| Security Notes | In this window, you can enter your notes on the security profile. |
| Owners | In this window, you can enter up to eight IDs of
administrators. Only the administrators specified here will be allowed to
maintain this security profile. If no owner is specified, any user of type
"Administrator" may maintain the library.
For each owner, the number of co-owners whose countersignatures will be required for maintenance permission may optionally be specified in the field after the ID. For an explanation of owners and co-owners, see the section Countersignatures. |
| Mailboxes | In this window, you can enter up to five mailbox IDs. For information on mailboxes, see the section Mailboxes. |
| Time Windows | In this window, you can specify up to five time
windows, outside of which the library cannot be used.
When the end of a time window is reached, the
application contained in the library will automatically be terminated and
Natural Security will perform a logoff. Depending on the general option
Enable Error Transaction Before
NAT1700/1701 Logoff, the application's For example, if a time window is set to |
| Steplibs | In this window, you can enter the IDs of the libraries
which are to be the steplib libraries (concatenated libraries) for the library.
The libraries whose IDs you specify must be defined in Natural Security.
Multiple steplibs allow you to make different modules available to different libraries and also restrict the general availability of modules without having to have multiple copies of the same module in multiple libraries; that is, each module has to exist only once, but you can nonetheless make it available to several libraries, but not to others. For example, the modules that are to be available to all libraries can be contained in a general steplib which is specified in all library profiles, while modules that are to be available only to some libraries can be contained in another steplib which is specified only in some library profiles. Moreover, by specifying different special links to a library (see Linking Users to Libraries in the section Protecting Libraries), you can allow different users of the same library the use of different steplibs. You can specify up to 8 steplibs, plus a value for the
Natural system variable If no value is assigned to Notes:
Dynamic Change of Steplib Table at Runtime
The table of steplibs as outlined above is fixed and cannot be changed by the application itself; this means that the same steplib table applies to all users who use the library. Via the Natural application programming interface (API)
You can specify Dynamic steplib assignment is only possible for the
steplibs which are last in the sequence of steplibs. This means that in the
steplib table, after any field(s) containing Thus it is possible, for example, to have a setup where the 1st to 4th steplibs are fixed as specified in the library profile, and the 5th and 6th steplibs are supplied dynamically by the API. DBID, FNR, Password and Cipher Code
Next to each steplib name, you can enter a database ID
(DBID), file number (FNR), password and cipher code in the steplib window of a
library window. If you assign By marking a steplib name with the cursor and pressing
PF5 in the steplib window of a library profile, you can copy the
actual values of DBID, FNR, password and cipher code from the steplib profile
into the steplib window. For the |
| Restrictions | As part of the restrictions, you can define:
These items are described below. |
| Functional Security | In this window, you can define functional security for the command processors of the library.This is only relevant if command processors have been created with the Natural utility SYSNCP. See the section Functional Security for details. |
| User Exit | If a user exit is specified in the Transactions column of the main library security profile screen, you can activate that user exit by marking this field. |
If you mark Security Options in the Restrictions selection window with any character, the Security Options window will be displayed. In this window, you can set the following options:
| Option | Explanation | |
|---|---|---|
| Allow NEXT/MORE line | Y | Allows the use of the Natural main menu. |
| N | Suppresses the Natural main menu;
when a user logs on to the library, the startup transaction specified for the
library will be invoked instead (if no startup transaction is specified, the
logon procedure will be invoked; see also the Natural system variable
*STARTUP).
|
|
| Allow system commands | Y | Allows the use of Natural system commands in the library. To disallow individual commands, you use the Command Restrictions section of the library profile (see below). |
| N | Disallows the use of all system
commands in the library. (This does not affect the system commands
FIN, LAST,
LASTMSG, LOGOFF,
LOGON, MAINMENU,
RENUMBER, RETURN,
SETUP and TECH; they can
always be used.)
|
|
| Execution of update programs | Y | Programs that update the database can be executed in the library. |
| N | Programs that update the database cannot be executed in the library. | |
| Device | If this field is left
blank, use of the library will not be restricted to any operation mode or
device.
If you enter a value, use of the library will be
restricted to one specific device or operation mode. Possible values are:
|
|
| Clear source area by logon | N | The editor source work area will not be cleared when a user logs on from the library to another. |
| Y | The work area of the editor will be cleared automatically when a user logs on from the library to another. | |
| PC download/ PC upload | Y | Modules contained in the library can be downloaded from the mainframe to a personal computer and uploaded from a personal computer to the mainframe respectively. |
| N | Download and upload of modules will not be possible. | |
|
This option only applies to mainframe computers; it has no effect under UNIX, OpenVMS and Windows. |
||
| Close databases by logon | Y | All databases that have been accessed during the current Natural session will be closed automatically when a user logs on from the library to another. |
| N | No databases will be closed when a user logs on from the library to another. | |
|
When you set this option, you should also review the
setting of the Natural profile parameter |
||
If you mark Security Limits in the Restrictions selection window with any character, the Security Limits window will be displayed. In this window, you can set the following limits:
| Limit | Explanation |
|---|---|
| Non-activity logoff limit |
The maximum time (in seconds) which may elapse after the last terminal communication. If this time is exceeded, a new logon procedure will
be invoked as soon as the next input is received from the terminal. Depending
on the general option Enable Error
Transaction Before NAT1700/1701 Logoff, the application's
Possible values are If you wish no limit to be in effect, set this field to "0". |
| Maximum transaction duration | The maximum time (in seconds) permitted for a single
Adabas transaction. This feature can be used to prevent the blockage of
resources for an excessive time. If the time is exceeded, the current
transaction will be backed out.
Possible values are If you wish no limit to be in effect, set this field to "0". The Natural system variable |
| Maximum number of source lines | The maximum number of source-code lines permitted
for a user-written Natural program. If the line limit is exceeded, the Natural
syntax checker will issue an appropriate error message.
Possible values are |
| Maximum amount of CPU time (MT) | The maximum amount of CPU time (in seconds) to be
used (as in the Natural profile parameter
MT, described
in the Natural Parameter Reference documentation).
If you set this field to
"0", the limit is determined by the value of the
Natural profile parameter If you wish the highest possible limit to be in
effect, set this field to the maximum value ( If you wish no limit to be in effect, set this field
to This field only applies to mainframe computers; it has no effect under UNIX, OpenVMS and Windows. |
| Maximum number of Adabas calls (MADIO) | The maximum number of Adabas calls permitted between
two screen I/O operations (as in the Natural profile parameter
MADIO, described in
the Natural Parameter Reference documentation). If the
number specified is exceeded, the Natural program will be interrupted and an
appropriate error message displayed.
If you set this field to
"0", the limit is determined by the value of the
Natural profile parameter If you wish the highest possible limit to be in
effect, set this field to the maximum value ( If you wish no limit to be in effect, set this field
to |
| Maximum number of program calls (MAXCL) | The maximum number of program calls permitted
between two screen I/O operations (as in the Natural profile parameter
MAXCL, described in
the Natural Parameter Reference documentation). If the
number specified is exceeded, the Natural program will be interrupted and an
appropriate error message displayed.
If you set this field to
"0", the limit is determined by the value of the
Natural profile parameter If you wish the highest possible limit to be in
effect, set this field to the maximum value ( If you wish no limit to be in effect, set this field
to |
| Processing loop limit (LT) | The maximum number of records which may be read in
any given processing loop of the library (as in the Natural profile parameter
LT, described in the
Natural Parameter Reference documentation).
If you set this field to
"0", the limit is determined by the value of the
Natural profile parameter If you wish the highest possible limit to be in
effect, set this field to the maximum value ( If you wish no limit to be in effect, set this field
to Note: |
If you mark Session Parameters in the Restrictions selection window with any character, the Session Parameters screen will be displayed.
On this screen, you can specify values for the following Natural session parameters, which will override the default parameter values set during Natural installation:
| Parameter | Short Description |
|---|---|
| DC | Character for decimal point notation |
| CF | Character for terminal commands |
| CLEAR | Processing of CLEAR key in NEXT mode |
| IA | Input asign character |
| IM | Input mode |
| ID | Input delimiter character |
| SA | Sound terminal alarm |
| DU | Dump generation |
| EJ | Page eject |
| FS | Default format/length setting for user-defined variables |
| WH | Wait for record in hold status |
| ZD | Zero-division check |
| LS | Line size |
| PS | Page size for Natural reports |
| SL | Source line length (on mainframes only) |
| SF | Spacing factor |
If a parameter value is blank (or "0" for a parameter which takes numeric values), the corresponding default value applies.
For information on the individual session/profile parameters, see the Natural Parameter Reference documentation.
Moreover the screen provides the following fields:
| Field | Explanation |
|---|---|
| Adabas open (OPRB) | You can specify the contents of the record buffer
used with the Adabas OPEN command. If so, a
restricted OPEN will be executed, which means that
only files included in the record buffer may be referenced. If no record buffer
contents are specified, all accessible files may be referenced (see also the
Adabas Command Reference documentation).
If this field is set to If this field is left blank, an |
| Spool profile | You can specify the name of the spool profile. This is only applicable if Natural Advanced Facilities is installed; see the Natural Advanced Facilities documentation for details. |
| Adabas password | You can specify the Adabas password used for access
to the Adabas data files (not system files) referenced by the library. This is
only relevant if the corresponding files are password-protected under Adabas
Security.
The password specified in the security profile applies
to all database access statements for which neither an individual password is
specified nor a |
| SLOCK | This field applies on mainframes only; on other
platforms, its setting will be ignored.
This field controls source locking and determines how
concurrent updates of Natural source members in the library are to be handled.
Its possible values If this field is left blank, the profile parameter
See the Natural Parameter
Reference documentation for details on the
|
When you press PF8 on the Session Parameters screen, another screen will be displayed in which you can set various restrictions that apply when subprograms contained in the library are executed by means of Natural RPC in a client/server environment.
| Field | Explanation | |
|---|---|---|
| Expiration Criteria | The following criteria
determine how often / how long subprograms in the library can be executed by
means of Natural RPC.
When one of the criteria is reached, the criteria can
be reset either by means of the Natural application programming interface
|
|
| Use Count |
Determines how many times remote subprograms can be executed. A value of "0" means that no such limit is in effect. |
|
| Number of Days | Determines for how many
days remote subprograms can be executed.
The days are counted beginning with the logon to the library. A value of "0" means that no such limit is in effect. |
|
| Number of Hours/Minutes | Determines for how many
hours/minutes remote subprograms can be executed.
The time is counted beginning with the logon to the library. A value of "0" means that no such limit is in effect. |
|
| Allow Overwriting by User Exit USR1071N | Y | The above expiration criteria in the
library security profile, as well as the user ID and password from the client
logon procedure, can be overwritten by criteria specified with the Natural
application programming interface USR1071N.
|
| N | No data can be set/overwritten by the
Natural application programming interface USR1071N.
|
|
| Server Session Options: | ||
| Close All Databases | This option allows you to control the logon-/logoff-dependent closing of databases. It affects all databases which have been opened by remote subprograms contained in the library: | |
| N | The databases are not closed when a logon/logoff to/from the library is performed. | |
| Y |
The databases are closed when a logon to the library is performed. If Impersonation is activated in the RPC server profile, "Y" has the same effect as "F" (see below). |
|
| F | The databases are closed when a logon to the library is performed, and when a logoff from the library is performed. | |
This option is only
relevant if the option LOGONRQ=ON is set in the Natural profile
parameter RPC or NTRPC macro. If you wish to have one
user-queue element per client session for each database accessed by the RPC
server, it is recommended that you set LOGONRQ=ON and
Close All Databases to "Y" or
"F".
|
||
| Logon Option | This option determines which logon data are evaluated by Natural Security when the library is accessed via a Natural RPC service request: | |
| N | Natural RPC user ID and password are evaluated. (*) | |
| E | Natural RPC user ID and password are
evaluated. (*) In addition, it is checked if the Natural RPC user ID is identical to the EntireX user ID. |
|
| A | Only the Natural RPC user ID is
evaluated (similar to the Natural profile parameter AUTO=ON, but
for this library only).
|
|
| S | Only the Natural RPC user ID is
evaluated (similar to the Natural profile parameter AUTO=ON, but
for this library only). In addition, it is checked if the Natural RPC user ID is identical to the EntireX user ID. |
|
| (*) If impersonation is
active for the Natural RPC server, the password is not evaluated (as this will
be performed by an external security system).
For details, see Validation of an RPC Service Request in the section Protecting Natural RPC Servers and Services. |
||
| Logon Recorded | This option determines whether logons to the library are recorded when the library is accessed via Natural RPC service requests: | |
| N | Logons to the library via Natural RPC service requests are not recorded. | |
| Y | Logons to the library via Natural RPC service requests are recorded. Every time a user accesses the library via a Natural RPC service request, a logon record will be written by Natural Security. You may review the activities of users by viewing these logon records (see Logon Records in the section Administrator Services for further information). | |
| L | The value of the option Logon recorded in the General Options section of the library profile determines whether logons to the library via Natural RPC service requests are to be recorded or not. | |
| * | The value of the option Logon recorded option in the Library Preset Values of Administrator Services determines whether logons to libraries via Natural RPC service requests are to be recorded or not. | |
| Lock User Option | This option determines whether the Lock User feature is to be active when the library is accessed via Natural RPC service requests: | |
| N | The Lock User feature is not active for access attempts to the library via Natural RPC service requests. | |
| X | The Lock User feature is active for access attempts to the library via Natural RPC service requests. Once a user has reached the maximum number of logon attempts without supplying the correct password, he/she will be locked, that is, the user ID will be made "invalid". Natural Security "remembers" unsuccessful attempts across sessions: The error counters for the client user IDs which were tried out unsuccessfully are kept for access attempts in subsequent sessions, thus reducing the number of subsequent attempts with these IDs. The error counter for a user ID is only reset after a successful logon. | |
| * | The value of the Lock User option in the security profile of the Natural RPC server determines whether or not the Lock User feature is active for access attempts to libraries on that server via Natural RPC service requests. See Components of a Server Profile in the section Protecting Natural RPC Servers And Services. | |
| For details on the Lock User feature, see also the Lock User Option in the General Options section of Administrator Services. | ||
The Natural application programming interfaces
USR1071N mentioned above is contained in the library
SYSEXT.
For further information on Natural RPC with Natural Security, see the section Protecting Natural RPC Servers and Services in the Natural Security documentation, and the sections Using Natural RPC With Natural Security and Logon To A Server Library in the Natural RPC documentation.
If you mark Command Restrictions in the Restrictions selection window with any character, the Command Restrictions screen will be displayed. On this screen, you may allow or disallow the use of individual Natural system commands.
By default, all commands shown on the Command Restrictions screen are marked with "Y", which means that all commands are allowed.
Mark with "Y" each command you wish to be available for use in the library.
Mark with "N" each command you wish not to be used in the library.
For the SCAN command, you can specify the following settings:
"Y" - The command is allowed.
"N" - The command is not allowed.
"R"- The command is allowed; however, its Replace option is not allowed.
"B" - The command is allowed; however, its
Replace option is only allowed in batch mode (that is, if the Natural system
variable *DEVICE is set to BATCH).
"O" - The command is allowed; however, its
Replace option is only allowed online (that is, if *DEVICE is set
to any value other than BATCH).
Note:
Settings R, B and O are only available on mainframe
computers.
For information on the individual commands, see the Natural System Commands documentation.
Those commands which are displayed intensified on the Command Restrictions screen use the Natural syntax checker and consequently Natural statements (which may also be allowed/disallowed individually; see Statement Restrictions below).
You can either disallow the system command
SCAN altogether for a library via the
Command Restrictions (as described above), or you can
control its use via the Utilities option:
If SCAN is marked with "N" on the
Command Restrictions screen, the
SCAN command cannot be used in the library
(regardless of the Utilities option).
If SCAN is marked with "Y" on the
Command Restrictions screen, the
Utilities
option (in the General Options part of the library profile) determines who may
use the SCAN command in the library. The Utilities
option may take one of the following values:
| N | No protection - The SCAN
command may be used in the library by any user.
|
| O | Permission for Owners - Only the owners of the
library may use the SCAN command; if no owner is
specified, any user of type "Administrator" may use it. In a private library in
private mode, in addition to the owners, the user with the same ID as the
library ID may use the SCAN command. In batch mode,
please note that an owner who requires a countersignature from a co-owner
cannot use the SCAN command (as countersignatures
are not possible in batch mode).
|
| P | Permission under Protection rules - The
People/Terminal protection of the library applies: Only users who may use the
library - and only under the conditions under which they may use it - may use
the SCAN command. For a private library in private
mode, the following applies: The user with the same ID as the library ID may
use the SCAN command; anyone else may use it only
after entering that user's password (on a countersignature screen provided for
that purpose). In batch mode, please note that a user cannot use the
SCAN command in another user's private library in
private mode (as no password can be entered in batch mode).
|
You can also allow or disallow the execution of UNIX shell
commands from within a Natural program. These commands are executed from within
a Natural program by invoking the Natural user exit SHCMD via the
statement CALL SHCMD being issued by the program.
To allow/disallow the execution of shell commands from within a
program in the library, you mark CALL SHCMD on the
Command Restrictions screen as follows:
Y = Shell commands can be executed.
N = Shell commands cannot be executed.
If you mark Editing Restrictions in the Restrictions selection window with any character, the Editing Restrictions window will be displayed. In this window, you may allow or disallow the editing of Natural objects of certain object types.
By default, all object types shown in the Editing Restrictions window are marked with "Y", which means that objects of all types may be edited.
Mark with "Y" each type of object whose editing you wish to be allowed in the library.
Mark with "N" each type of object whose editing you wish not to be allowed in the library.
For information on Natural object types, see the Natural Programming Guide; for information on the Natural editors, see the Natural Editors documentation.
To disallow editing altogether, you may disallow the use of the EDIT command (see Command Restrictions). When you disallow the EDIT command, all object types in the Editing Restrictions window are automatically marked with "N". When you allow the EDIT command again, all object types in the Editing Restrictions window are automatically marked with "Y" again.
If you mark Statement Restrictions in the Restrictions selection window with any character, the Statement Restrictions screen will be displayed. On this and the next screen, you may allow or disallow the use of individual Natural statements. To get from this screen to the next and back again, you press PF7 and PF8 respectively.
By default, all statements shown on the Statement Restrictions screen are marked with "Y", which means that all statements are allowed.
Mark with "Y" the Natural statements you wish to be allowed for use in the library.
Mark with "N" the Natural statements you do not wish to be used in the library.
For the FIND statement and other database access
statements, you may also allow/disallow individual clauses.
Any Natural statement which is not listed on the
Statements Restrictions screen is always allowed (for
example, the statement END).
The Statement Restrictions take effect when a programming object is syntax-checked at compilation.
With this option, you can restrict the use of modules (programming objects) in a library, that is, you can disallow/allow that they can be executed or invoked for execution.
This option may be evaluated differently on different platforms, depending on the option Module Protection Mode, as described in the section Administrator Services.
In the Restrictions selection window, besides the field you mark to select Disallow/Allow Modules, there is a second field in which you can enter one of the following:
| X | This causes all modules to be allowed; individual modules cannot be disallowed (the Disallow/Allow Modules screen will not be invoked). If you enter an "X", do not at the same time mark the selection field. |
| D | All modules are initially allowed, and you may disallow individual modules. |
| A | All modules are initially disallowed, and you may allow individual modules. |
Note:
For the Display function, you can only mark the selection
field; regardless of the setting of the second field, the
Disallow/Allow Modules screen will be displayed showing
the list of allowed/disallowed modules.
If you mark Disallow/Allow Modules in the Restrictions selection window with any character and enter a "D" or "A" in the second field, the Disallow Modules screen or Allow Modules screen respectively will be displayed:
11:13:46                    *** Natural Security ***                 2020-12-31
                               - Disallow Modules -
   Library  SKYLIB                         0 Module names not held in user buffer
   Module   T Status                 Mark  Module   T Status                 Mark
   --------------------------------------  --------------------------------------
   #CADMIUM P ALLOWED                   _  HELLO    P ALLOWED                   _
   #DANZA   P ALLOWED                   _  HOTTA    P ALLOWED                   _
   #FIFO    P ALLOWED                   _  MEHEECO  P ALLOWED                   _
   #GRACE   P ALLOWED                   _  MOONROOF P ALLOWED                   _
   #PRESTO  P ALLOWED                   _  SAHARA   P ALLOWED                   _
   #TEMPEST P ALLOWED                   _  SCIPIO   P ALLOWED                   _
   CALDANDO P ALLOWED                   _  SKYLARK  P ALLOWED                   _
   CANNBALL P ALLOWED                   _  WESTWAY  P ALLOWED                   _
   CARILLON P ALLOWED                   _  WESTWIND N ALLOWED                   _
   ELCIELO  P ALLOWED                   _  XANGO    M ALLOWED                   _
  *********************  Module Names held in User Buffer  **********************
    ________         ________         ________         ________         ________
    ________         ________         ________         ________         ________
  -------------------------------------------------------------------------------
  Reposition to .. ________    Display module names not held in UB .. _


  Enter-PF1---PF2---PF3---PF4---PF5---PF6---PF7---PF8---PF9---PF10--PF11--PF12---
        Help  PrevM Exit  AddOp Restr Flip  -     +     Free  Stepl       Canc
|
Column T on the Disallow/Allow Modules screen indicates the object types of the modules:
| P | Program |
| N | Subprogram |
| S | Subroutine |
| H | Helproutine |
| G | Global data area |
| L | Local data area |
| A | Parameter data area |
| M | Map |
| C | Copycode |
| 3 | Dialog |
| 4 | Class |
| 7 | Function |
| 8 | Adapter |
On the Disallow/Allow Modules screen, mark with "D" the modules contained in the library you wish to be disallowed; mark with "A" the modules contained in the library you wish to be allowed. The first ten module names marked will be held in the user buffer.
In addition, the following subfunctions are available:
|
Module Names Held in User
Buffer
|
If you wish modules to be disallowed/allowed and
their names to be held in the user buffer, type in their names into the ten
fields provided on the Disallow/Allow Modules screen.
If you type in a value followed by an asterisk (*), all module names beginning with that value will be disallowed/allowed and held in the user buffer. Those disallowed/allowed module names not held in the user buffer may be displayed by marking the Display module names not held in User Buffer field with any character. Unmark it to return to the Disallow/Allow Modules screen. If possible, the number of allowed/disallowed modules should not exceed 10; that is, all allowed/disallowed module names should be held in the user buffer; module names not held in the user buffer will cause a reduction in performance, as the Natural Security data file will have to be additionally accessed to check whether a module whose name is not held in the user buffer is allowed or not. |
|
Allowing/Disallowing "Non-Existent"
Modules (PF9)
|
The Disallow/Allow Modules
screen of a library profile displays a list of all modules contained in the
corresponding library. However, there may be modules which currently are not
physically available (for example, because the corresponding database is not
active, or the modules have not yet been written), and which would therefore
not appear in the list of modules. Or in a heterogeneous production environment
using a central mainframe FUSER system file, the library may exist not on the
mainframe FUSER system file but in the file system on another platform. If you
were to define a library profile for such a library, Natural Security on the
mainframe computer would not know of that library, and the list of modules
would therefore be empty.
To enable you to disallow/allow such "non-existent" modules, the Allow/Disallow Modules function provides the subfunction Free List of Modules. With this subfunction, you can predefine modules which are not physically present on the current FUSER system file. To invoke the subfunction, you press PF9 on the Disallow/Allow Modules screen. The Free List of Modules window will be displayed. In this window, you manually enter the names of modules and allow/disallow them. |
|
Steplibs
(PF10)
|
This subfunction does not apply on mainframe
computers.
With this subfunction, you can disallow/allow modules in the library's steplibs. To invoke the subfunction, you press PF10 on the Disallow/Allow Modules screen. A list of all the library's steplibs will be displayed. On the list, you select the library whose modules you wish to disallow/allow. Then, the list of modules contained in the selected steplib will be displayed, which you can then disallow/allow individually. When you disallow/allow modules in a steplib in this way, this does not mean you actually disallow/allow these modules in the library profile of the steplib. The steplib modules are only disallowed/allowed with respect to usage by the library whose profile you are currently maintaining (that is, the library from within whose library profile you have invoked the subfunction). |
This option only affects DDMs for which no security profiles have been defined. It allows you to set the status of all new DDMs to PUBLIC. On mainframes, this applies to the file status; on UNIX, OpenVMS and Windows, this applies to both the internal and the external status of DDMs.
In the Restrictions window, you can specify one of the following values for this option:
| UNDF | The status of all DDMs without security profiles is undefined. |
| PUBL | The status of all DDMs without security profiles is PUBLIC. |
By default, this option is set to UNDF, which means
that DDMs for which no security profiles have been defined cannot be used.
If you set this option to PUBL, the status of all
DDMs for which no security profiles have been defined is assumed to be PUBLIC,
which means that these DDMs can be used. This allows you to use these DDMs
without having to define security profiles for them.
For further information, see the sections Protecting DDMs On Mainframes and Protecting DDMs On UNIX, OpenVMS and Windows .
See Library Development Mode Options in the section Protecting the Natural Development Environment in Eclipse.
This section describes the functions used to create and maintain library profiles. It covers the following topics:
 To invoke library maintenance:
On the Main Menu, select Maintenance.
A window will be displayed in which you mark the object type Library with a character or with the cursor.
The Library Maintenance selection list will be displayed.
From this selection list, you invoke all library maintenance functions as described below.
The Add Library function is used to define new libraries to Natural Security, that is, create library security profiles.
Note:
To create library security profiles for system libraries of
Natural and its subproducts more easily, you can use the Administrator Services
function Definition of System
Libraries, which provides predefined security profiles
for most system libraries.
To add a new library security profile:
In the command line of the Library
Maintenance selection list, enter the command
ADD.
A window will be displayed in which you enter a library ID and, optionally, the ID of a default profile:
|
Library
ID
|
Library IDs are used by Natural Security to identify libraries and their security profiles. A library ID may be 1 to 8 characters long, it must start with an upper-case alphabetical character, and it must be unique. It may consist of the following characters: upper-case alphabetical characters, numeric characters, hyphen (-) and underscore ( _ ). It must not contain blanks. Before you start defining libraries, it may be advisable to conceive a logical system of library IDs that are related to the library names; this will help you to identify libraries more easily when maintaining them in Natural Security. |
|---|---|
|
Default
Profile
|
When you add a new library, you can either type in every item within the library security profile by hand; or you can use a pre-defined default library profile as the basis for the security profile you are creating. Before you use default library profiles, you should be familiar with the "normal" way of defining libraries (that is, without default profile). Default profiles are created and maintained in the Administrator Services subsystem. If you specify the ID of a default profile in the Add Library window, the items from the default profile will be copied into the library profile On the Add Library screen, you can overwrite the items copied from the default profile, and specify further items. For further information on default library profiles, see Library Default Profiles in the section Administrator Services. |
The Add Library screen will be displayed. On this screen, you may define a security profile for the library.
The Add Library screen and the subsequent screens/windows that may be part of a library security profile as well as the individual items you may define are described under Components of a Library Profile.
When you add a new library, the owners specified in your own user security profile are automatically copied into the library security profile.
Note:
In a non-mainframe environment, the use of the
SHOW command requires that work file 3 has been
defined in your Natural parameter module, because internally the command uses
the corresponding function of the Natural Object Handler utility.
An undefined library is a library which exists on the system file, but for which no library security profile has been created in Natural Security.
To ascertain which libraries are undefined, you can use the
SHOW command. This will expand the Library
Maintenance selection list so that it also includes undefined
libraries.
The syntax for the SHOW command is as
follows:
SHOW ALL
                     				[FILE=(database-id,file-number,password,ciphercode)]
or
SHOW +
                     				[FILE=(database-id,file-number,password,ciphercode)]
With FILE you specify the system file
whose undefined libraries are to be listed. If you omit the
FILE specification, the undefined libraries on the
current FUSER file will be listed.
The system file to which the expanded list of libraries refers is shown at the top of the Library Maintenance selection list. The Message column of the selection list indicates which of the listed libraries are undefined.
Instead of entering the SHOW ALL
command (without FILE specification) in the command
line of the Library Maintenance selection list, you can
also press PF16.
If you want to list only the undefined libraries, you either enter
the command SHOW UNDF (with or without
FILE specification) in the command line, or enter
UNDF in the protection status field
(Prot.).
To revert the Library Maintenance selection list to the standard display of only defined libraries, you press PF16 again or enter the following command in the command line:
SHOW -
Note:
To list undefined libraries, you can also use the application
programming interface NSCXR
(with object-type code SF (system file)).
To create a security profile for one undefined library:
On the Library Maintenance selection
list, you mark the library with function code AD or
AP.
With AP, a window will be displayed in which
you can specify the ID of a default profile (see above). With
AD, this window will be skipped and no default profile used.
The Add Library screen will be displayed - as with Step 3 above.
To create security profiles for multiple undefined
libraries:
On the Library Maintenance selection
list, you either mark each of the libraries with function code AD
or AP; or you press PF10 to simultaneously select all
undefined libraries on the currently displayed page of the Library
Maintenance selection list (corresponds to marking them all with
AP).
Steps 2 and 3 will then be repeated for one of the marked/selected libraries after another.
Note:
To define undefined libraries, you can also use the
Administrator Services function Definition of Undefined
Libraries.
When you invoke Library Maintenance, a list of all libraries that have been defined to Natural Security will be displayed.
If you do not want a list of all existing libraries but would like only certain libraries to be listed, use the Start Value and Type/Status options as described in the section Finding Your Way In Natural Security.
On the Main Menu, select Maintenance. A window will be displayed.
In the window, mark the object type Library with a character or with the cursor (and, if desired, type in a start value and/or protection status).
The Library Maintenance selection list will be displayed:
 12:47:45                   *** NATURAL SECURITY ***                 2020-12-31
                              - Library Maintenance -

  Co Library ID Library Name                     Prot. Message
  __ __________ ________________________________ _____ _____________________
  __ KETEST                                      YN
  __ KEX        TEST APPL-KE                     YN
  __ KE1        KETEST                           NN
  __ KJH                                         NN
  __ KK-APPL                                     NN
  __ KKAPP                                       NN
  __ KKAPPC                                      NN
  __ KKAPP1                                      NN
  __ KKAPP2                                      NN
  __ KKAPP3                                      NN
  __ KKAPP4                                      YN
  __ KKAPP7                                      NN
  __ KKITEST                                     NN
  __ KKPAC                                       NN
  __ KKPROD                                      NN

  Command ===>
  Enter-PF1---PF2---PF3---PF4---PF5---PF6---PF7---PF8---PF9---PF10--PF11--PF12---
        Help        Exit              Flip  -     +                       Canc
|
For each library, the ID, name and protection status are displayed.
The list can be scrolled as described in the section Finding Your Way In Natural Security. The list can be expanded to also include undefined libraries, as described under Listing Undefined Libraries above.
The following library maintenance functions are available (possible code abbreviations are underlined):
| Code | Function |
|---|---|
AD |
Add library without default profile (only possible if the selection list has been expanded; see Listing Undefined Libraries) |
AP |
Add library, optionally with default profile (only possible if the selection list has been expanded; see Listing Undefined Libraries) |
CO |
Copy library |
MO |
Modify library |
RE |
Rename library |
DE |
Delete library |
DI |
Display library |
LU |
Link users to library |
LF |
Link library to files (this function is only available on mainframe computers) |
MD |
Modify DDM restrictions in library (this function is only available on UNIX, OpenVMS and Windows) |
EP
|
Protect environments |
RA |
Restrict access to Natural RPC services |
To invoke a function for a library, mark the library with the appropriate function code in column Co.
You may select various libraries for various functions at the same time; that is, you can mark several libraries on the screen with a function code. For each library marked, the appropriate processing screen will be displayed. You may then perform for one library after another the selected functions.
The Copy Library function is used to define a new library to Natural Security by creating a security profile which is identical to an existing library security profile.
All components of the existing security profile will be copied into the new security profile - except the owners (these will be copied from your own user security profile into the new library security profile).
In addition to duplicating a library profile, you can choose to also copy its links and utility profiles, as well as the actual library itself; this depends on the options described below.
On the Library Maintenance selection
list, mark the library whose security profile you wish to duplicate with
function code CO.
A window will be displayed in which you specify the following:
| Field | Explanation |
|---|---|
| To library | Enter the ID of the "new" library. |
| Library name | This field shows the name of the existing library. Overwrite it with the name of the "new" library. |
| With links |
Enter "Y" or "N". With this option, you can, in addition to the library profile, also copy its links, utility profiles and files/DDMs; see Copying With Links below. |
| With Natural objects |
Enter "Y" or "N". With this option, you can duplicate the actual library itself. This means that a new library will be created on the FUSER system file, and all Natural programming objects contained in the existing library will be copied into this new library. (Internally this option uses the
|
The Copy Library screen will be displayed, showing the new library security profile.
Its components you may define are described under Components of a Library Profile.
If you select With links = N:
Any links defined for the existing library will not apply to the new library.
Any library-specific and user-library-specific utility profiles for the existing library will not apply to the new library.
If you select With links = Y:
Any links that exist for the existing library are copied for the new library, and you have the option to cancel the links you wish not to apply to the new library.
Any library-specific and user-library specific utility profiles that exist for the existing library are copied for the new library.
The procedure with With links = Y is as follows:
Once you have made any changes to the copied security profile and then leave the Copy Library screen by pressing PF3, a list of users is displayed: it contains all users which are linked to the existing library.
On the list, you may mark individual users with
CL to cancel any links you wish not to apply to the new
library. All users you do not mark will automatically be linked to the new
library in the same manner - normal or special link - as the existing
library.
Once you have established all user links and leave the list of users by pressing PF3, a list of files is displayed: it contains all files/DDMs to which the existing library is linked.
On the list, you may mark individual files/DDMs with
CL to cancel any links you wish not to apply to the new
library. To all files/DDMs you do not mark the new library will automatically
be linked in the same manner - read or update link - as the existing
library.
The Modify Library function is used to change an existing library security profile.
To do so:
On the Library Maintenance selection
list, you mark the library whose security profile you wish to change with
function code MO.
The security profile of the selected library will be displayed.
Its components which you may define or modify are described under Components of a Library Profile.
The Rename Library function allows you to change the library ID of an existing library security profile.
To do so:
On the Library Maintenance selection
list, you mark the library whose ID you wish to change with function code
RE.
A window will be displayed in which you enter a new ID for the library (and, optionally, change its name).
Depending on the setting of the general option Deletion of non-empty libraries allowed (see Administrator Services), it may not be possible to rename a library security profile if the library contains any sources or object modules.
When you rename a library profile, this option allows you to also
change the name of the actual library. This means that the library will be
renamed on the FUSER system file, and all Natural programming objects contained
in the library will be stored under the new library name. (Internally this
option uses the MAINUSER application programming interface of the
Natural utility SYSMAIN.)
The Delete Library function is used to delete an existing library security profile.
To do so:
On the Library Maintenance selection
list, mark the library you wish to delete with function code DE.
The Delete Library window will be displayed.
If you decide against deleting the library security profile, leave the window by pressing ENTER without having typed in anything.
To delete the library security profile, enter the library's ID in the window to confirm the deletion.
When you delete a library, all existing links to the library will also be deleted.
Depending on the setting of the general option Deletion of Non-empty Libraries Allowed (see Administrator Services), it may not be possible to delete a library security profile if the library still contains any sources or object modules.
If you mark more than one library with DE, a window
will be displayed in which you are asked whether you wish to confirm the
deletion of each library security profile by entering the library's ID, or
whether all libraries selected for deletion are to be deleted without this
individual confirmation. Be careful not to delete a library accidentally.
When you delete a library profile, this option allows you to
also delete the actual library itself. This means that the library - and all
Natural programming objects it contains - will be deleted from the FUSER system
file. (Internally this option uses the MAINUSER application
programming interface of the Natural utility SYSMAIN.)
The Display Library function is used to display an existing library security profile.
To do so:
On the Library Maintenance selection
list, mark the library whose security profile you wish to view with function
code DI.
The security profile of the selected library will be displayed. Its components are described under Components of a Library Profile.
The library ID by which a private library is defined to Natural Security is identical to the respective user ID. Therefore private libraries can only be created for users whose user IDs conform to the naming conventions for library IDs.
To define a private library to Natural Security:
In the user's security profile, mark the field Private Library with "Y" (on the Add User, Copy User or Modify User screen) (marking this field does not cause any default private library profile to be created).
In the Additional Options window, select Private Library; or press PF5 on the main user profile screen.
A Private Library screen will be displayed. It is identical to a "normal" library security profile screen (except when private libraries are used in private mode, in which case the screen does not contain the fields People-protected and Terminal-protected). On this screen and the subsequent screens/windows you define the security profile for the private library.
In private mode, maintenance of existing private library profiles is performed via User Maintenance.
In public mode, private libraries also appear on the Library Maintenance selection list along with the other libraries, that is, they can be maintained like "normal" libraries with the library maintenance functions described above.
If private libraries are used in public mode, you delete a private library like any other library (see Deleting a Library).
If private libraries are used in private mode, you delete a private library by marking the Private Library field in the user's security profile with "N". A window will be invoked in which you confirm the deletion by typing in the library ID.
Depending on the setting of the general option Deletion of Non-empty Libraries Allowed (see Administrator Services), it may not be possible to delete a private library if it still contains any source or object modules.