Currently, the fields used by your program are defined within the
DEFINE DATA statement in the program itself. It is also possible,
however, to place the field definitions in a local data area (LDA) outside the
program, with the program's DEFINE DATA statement referencing this
local data area by name. For reusability and for a clear application structure,
it is usually better to define fields in data areas outside the programs.
You will now relocate the information from the DEFINE DATA
statement to a local data area. When you have completed the exercises below,
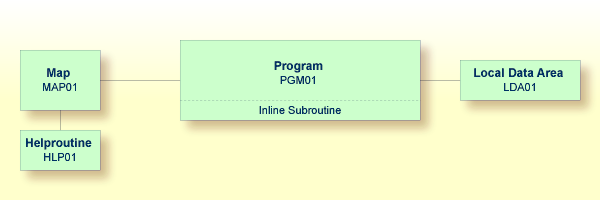
your sample application will consist of the following modules:

This document contains the following exercises:
You will now invoke the data area editor in which you will specify the required fields.
![]() To create a local data area
To create a local data area
In the library workspace, select the library which also contains your program (that is: select the TUTORIAL node).
From the context menu, choose .
Or:
Choose the following toolbar button:
![]()
An editor window appears.

Level, name, format and length are automatically preset in the first row.
You will now define the following fields:
| Level | Name | Format | Length |
|---|---|---|---|
| 1 | #NAME-START |
A | 20 |
| 1 | #NAME-END |
A | 20 |
| 1 | #MARK |
A | 1 |
These are the user-defined variables which you have previously defined
in the DEFINE DATA statement.
You can define the data fields in two different ways: manually in the editor window where it is your responsibility to define the correct format and length of the data field, or with the command where you simply select the data fields from a list and where the correct format and length is automatically used. These two ways are described below.
The setting of the following toolbar button in the Data Area Editor Insert toolbar indicates the insert position. When the toolbar button appears pressed, the new field is inserted after the selected field (this state is assumed in this tutorial); otherwise, the new field is inserted before the selected field.
![]()
![]() To define a data field manually in the editor window
To define a data field manually in the editor window
Make sure that the Level column in the first row contains the preset value "1".
Change the preset value in the Name column of the first row to "#NAME-START".
Make sure that the Format column in the first row contains the preset value "A".
Change the preset value in the Length column of the first row to "20".
![]() To import data fields from a program
To import data fields from a program
In the editor, select the row which has been created for
#NAME-START.
Note:
If required, press ENTER or ESC to switch
from single-cell selection to full-row selection mode.
From the context menu, choose .
Or:
Choose the following toolbar button:
![]()
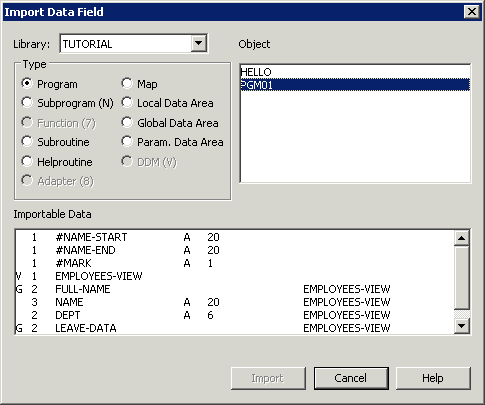
The Import Data Field dialog box appears.
Make sure that TUTORIAL is selected in the Library drop-down list box.
Select the Program check box.
All programs that are currently defined in your library are now shown in the Object list box.
Select the program with the name PGM01.
The importable data fields are now shown at the bottom of the dialog box.

Press CTRL and select the following fields in the Importable Data list box:
#NAME-END
#MARK
Choose the button.
The button in the Import Data Field dialog box is now labeled .
Choose the button to close the Import Data Field dialog box.
The fields #NAME-END and #MARK are now
shown below the #NAME-START field in the editor
window.
You will now import the same data fields which you have previously
defined in the program's DEFINE DATA statement. The fields are
read directly from a Natural data view into the data area editor. A data view
references database fields defined in a data definition module (DDM).
In the data area editor, the imported data fields will be inserted below the currently selected data field.
![]() To import data fields from a DDM
To import data fields from a DDM
In the editor, select the row containing
#MARK.
From the context menu, choose .
The Import Data Field dialog box appears.
From the Library drop-down list box, select SYSEXDDM.
The DDM option button is selected.
In the Object list box, select the sample DDM with the name EMPLOYEES.
Press CTRL and select the following fields in the Importable Data list box:
PERSONNEL-ID
FULL-NAME
NAME
DEPT
LEAVE-DATA
LEAVE-DUE
Note:
The field PERSONNEL-ID will be used later when you
create the subprogram.
Choose the button.
The View Definition dialog box appears.
Specify the same name that you have previously defined for your view
(that is: EMPLOYEES-VIEW).
Choose the button.
Choose the button to close the Import Data Field dialog box.
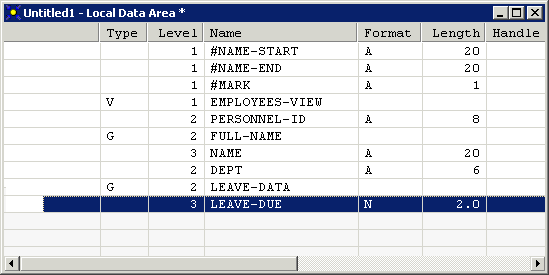
The local data area should now look as follows:

The Type column indicates the type of the variable. The view is indicated by a "V" and each group is indicated by a "G".
Note:
When the Expand/Collapse check box
has been selected in the data area editor options, expand/collapse toggles are
shown in the first column (for the view and each group).
Stow the local data area.
When you are asked to specify a name for the local data area, enter "LDA01".
In the library workspace, a new node named Local Data Areas appears below the TUTORIAL node. This node contains the local data area you have just stowed.
Once a local data area has been stowed, it can be referenced by a Natural program.
You will now change the DEFINE DATA statement your program
so that it uses the local data area that you have just defined.
Leave the data area editor open in the background.
![]() To use the local data area in your program
To use the local data area in your program
Return to the program editor.
In the DEFINE DATA statement, delete all variables
between LOCAL and END-DEFINE.
Add a reference to your local data area by modifying the
LOCAL line as follows:
LOCAL USING LDA01
Your program should now look as follows:
DEFINE DATA
  LOCAL USING LDA01
END-DEFINE
*
RP1. REPEAT
*
  INPUT USING MAP 'MAP01'
*
  IF #NAME-START = '.' THEN
    ESCAPE BOTTOM (RP1.)
  END-IF
*
  IF #NAME-END = ' ' THEN
    MOVE #NAME-START TO #NAME-END
  END-IF
*
  RD1. READ EMPLOYEES-VIEW BY NAME
    STARTING FROM #NAME-START
    ENDING AT #NAME-END
*
    IF LEAVE-DUE >= 20 THEN
      PERFORM MARK-SPECIAL-EMPLOYEES
    ELSE
      RESET #MARK
    END-IF
*
    DISPLAY NAME 3X DEPT 3X LEAVE-DUE 3X '>=20' #MARK
*
  END-READ
*
  IF *COUNTER (RD1.) = 0 THEN
    REINPUT 'No employees meet your criteria.'
  END-IF
*
END-REPEAT
*
DEFINE SUBROUTINE MARK-SPECIAL-EMPLOYEES
  MOVE '*' TO #MARK
END-SUBROUTINE
*
END
Run the program.
To confirm that the results are the same as before (when the
DEFINE DATA statement did not reference a local data area), enter
"JONES" as the starting name and press
ENTER.
Press ESC to close the output window.
Stow the program.
You can now proceed with the next exercises: Global Data Areas.