This document contains general information which applies when installing and setting up any Software AG product on a UNIX platform. The following topics are covered:
The installation package containing Software AG products is provided on an installation medium conforming to the ISO 9660 standard.
The installation medium contains a complete directory structure which clearly specifies product and platform.
The following figure shows the general directory structure generated during installation and the environment variables which reference the specified directories:
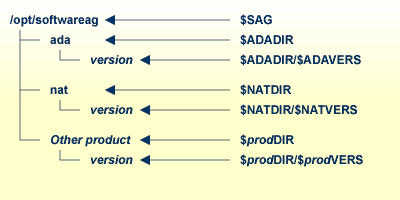
The environment variable $SAG defines the
root directory for all Software AG products. It is recommended to define
SAG=/opt/softwareag.
For each product, the variable
$prodDIR is set to the
path of the main directory of the product specified, where
prod is a three-letter product code in upper-case
letters. For example, all files for Natural, whose
product code is "NAT", are contained in the
directory $NATDIR.
However, there are exceptions to this convention. For example, the product code for Predict is "PRD" but the environment variables use the prefix "DIC" instead.
The name of the main directory is usually the same as the product code in lower-case letters. For example, the main directory for Natural is named "nat".
Version-independent parts of the product, such as examples or data, are stored in a subdirectory of the product main directory. For example, all Adabas demonstration data is contained in the directory $ADADIR/adademo.
Version-dependent components of the product are kept in the version directory $<prod>DIR/$<prod>VERS. For example, the current version of Natural is stored in the directory $NATDIR/$NATVERS.
The environment variables
prodDIR and
prodVERS for all
products specified during installation are defined via the file
sagenv.new. The same applies for any other environment
variables needed for the various products.
It is recommended that you use /opt/softwareag as one common root directory for all of your Software AG products. For Linux systems, this location is the registered name with LANANA.
The default search path for dependent libraries of some Software AG
products is /opt/softwareag. They are loaded from this
location or using the environment variable
$LD_LIBRARY_PATH
($SHLIB_PATH on HP-UX systems). If you install the
product to a different location (for example, /usr/SAG
instead of /opt/softwareag), you may create a symbolic
link to your $SAG directory to get a valid default search
path:
su
cd /opt
ln -s $SAG softwareag
The following activities must be performed if you are installing a Software AG product for the first time, or if your environment is not yet set correctly due to any other causes.
This section covers the following topics:
You must create one administrator account and one group for all Software AG products when you install your first Software AG product.
Define an administrator account to which all of the Software AG products installed at your site belong. Since all environment definition files for the products are written in Bourne shell syntax, the Bourne (or Korn) shell is recommended as the login shell for the administrator account. This section assumes that the administrator account is called "sag".
Define a group to which the administrator belongs. This section assumes that this group is also called "sag".
Create a login directory for the user "sag" (for example, /opt/softwareag).
Make sure that the group "sag" is defined in the system file /etc/group and the user "sag" is defined in the system file /etc/passwd.
Note:
To perform these steps, use an appropriate system administration
tool.
When upgrading a product, it is strongly recommended that you back up your current product version.
This description assumes that the user "sag" is the administrator for Software AG products. It is recommended to log in as the user "sag".
Before performing the following steps, make sure that the administrator user and group have been created and defined.
![]() To install the contents of the installation medium to disk
To install the contents of the installation medium to disk
Load the installation medium and mount it if this is not done automatically.
| Command | Description |
|---|---|
su - root |
To mount an installation medium you may need to be root. |
mkdir /mount-dir |
You may need to create a mount directory for the installation medium. |
mount platform-specific_mount_options device-name /mount-dir |
Execute the mount command (see the table below for operating system-specific mount commands). |
exit |
Return to "sag" user. |
Platform-specific mount command and options to mount the installation medium as ISO9660 or High-Sierra file system:
| Platform | Mount Command |
|---|---|
| AIX | /etc/mount -v-cdrfs -o ro device-name /mount-dir |
| HP-UX | /usr/sbin/mount -F cdfs -o cdcase device-name /mount-dir |
| Solaris | /usr/sbin/mount -F hsfs -o ro device-name /mount-dir |
| Linux | /bin/mount -t iso9660 -o ro device-name /mount-dir |
Note:
On Solaris, the volume management daemon vold
might be active. This daemon mounts the installation medium
automatically.
Example for Linux:
/bin/mount -t iso9660 -o ro /dev/cdrom /mnt
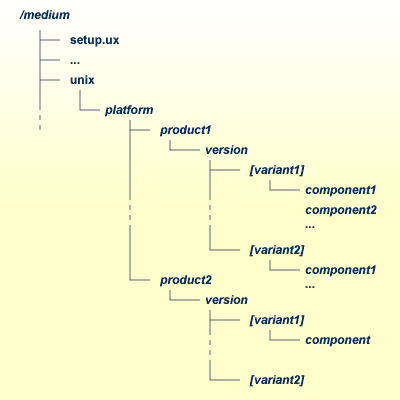
Check the directory structure of the UNIX part of the installation
medium. When you run an ls(1) command on the
installation medium, you will see a structure like the following:
Note:
Depending on the mount options used, the files will be all upper
case or all lower case. If you mount the installation medium as a pure ISO 9660
Interchange Level I CD, you will also see a version number
";1" appended to all files. Please note this for the
following steps and use the correct name format.
For Linux S/390, a single archive is provided for your convenience (for example, for Natural this is the file NATv<version>n.tgz). The following steps can be performed after you have loaded the installation medium on a Windows or UNIX machine that has a network connection to the Linux S/390 system:
Copy the archive file (<file-name>.tgz) that is located in the root directory of the installation medium to a temporary area such as /tmp/cdrom in your Linux S/390 environment, using for example ftp in binary mode.
Unpack the archive using the command tar -xzvf
file-name.tgz.
Read the installation instructions for details on how to start the installation from this media in the file setup.txt in this directory. Instructions of how to proceed after installing the software will be displayed at the end of the installation and also copied onto your hard disk.
Please continue reading the step-by-step installation instructions for the Software AG product being installed.