The Delete function is used to delete single or multiple objects from a source environment.
This section provides instructions for specifying delete options in the Object Maintenance - Delete dialog box.
![]() To delete objects
To delete objects
In the Library list box, enter the name of the library that contains the object(s) you want to delete or select a library from the drop-down list. The default is the current library. The Library list box does not apply to DDMs (data definition modules) in a remote mainframe environment. Therefore, the box disappears when the Views (DDM) check box is selected.
In the DBID (database ID) and FNR (file number) boxes, replace the values if the library is not in the current system file. The default is the current FNAT or FUSER, or FDIC for DDMs on mainframes. In a remote environment, you can specify security information for these files as described in File Security for Remote Environments.
In a remote environment, use the FSEC/FDIC button if you want to specify security information for the system file FSEC or FDIC for XRef data; see File Security for Remote Environments and XRef Considerations.
In the Name box, enter the name of a single object or specify a range of names; see Specifying a Range of Names. The default is asterisk (*), indicating all objects.
In the Type group box, select the type(s) of object by choosing one of the following options:
Select Programming (default) for all types of object (including program and subprogram) except DDM. You can limit the types of object by choosing Object Types and selecting or deselecting the required item(s) from the list provided:
To select list items:
Or:
Press UP ARROW or DOWN ARROW
to go to and select the required item.
Or:
Press and hold down CTRL or
SHIFT and click on multiple non-consecutive or consecutive items
respectively.
Or:
Press SHIFT+UP ARROW or SHIFT+DOWN
ARROW to select multiple consecutive items.
Or:
Choose Select All to select all
items.
To deselect list items:
Press and hold down CTRL and click on a selected item again.
Or:
Choose Deselect All if all
items have been selected.
Or:
Select Views (DDM) for DDMs
only.
In the Code group box, select Source and/or Cataloged to delete all objects for which either the source object or the cataloged object, or both exist. The default is both the source object and the cataloged object.
If Predict is installed, you can select the XREF check box to delete XRef data. See also the section XRef Considerations.
In the User ID box, enter the ID of a user if you want to delete only the objects that were last saved or cataloged by this user. The default is no user ID.
In the Date box, enter a start date to delete
only objects that were saved or cataloged on or after this date. A date must be
entered in the format associated with the preset value in the
Date box. The default date is 0000.00.00 (no
date). The date is given in the format
YYYY.MM.DD
(YYYY = year, MM = month,
DD = day).
If you have specified a date, you can enter a start time in the
Time box to delete only objects that were saved or
cataloged at or after this time. The default time is 00:00 (no
time). The time is given in the format
HH:II
(HH = hours, II =
minutes).
Choose Object List when you have finished specifying object selection criteria.
If you have entered a single name in the Name box, skip the following instructions and proceed with Confirm on delete in Step 11.
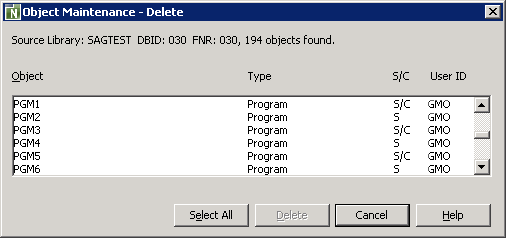
If you have specified a range of names in the Name box, an additional dialog box similar to the example below appears with a list of all matching objects:

The dialog box shows the library location, the number of objects
found and the object names and types. It also indicates whether a source
(S) and/or a cataloged (C) object exists and the ID
of the user who saved and/or cataloged an object.
Select or deselect single or multiple objects by proceeding as described in To select/deselect list items.
Choose Delete to process the selected object(s).
(Cancel exits the dialog box without any action.)
If the Confirm on delete check box has been selected, an additional dialog box appears with a warning message.
Confirm or reject object deletion by choosing one of the following buttons:
Yes to confirm each object deletion individually one after another.
Or:
Yes to All to confirm all object
deletions in one go.
Or:
No to not delete the current
object.
Or:
Cancel to exit the dialog box
without any action.
After all objects have been deleted, the Object Maintenance - Delete dialog box is closed and the Object Maintenance menu appears.