
This document describes step by step how to install Con-nect Teleservices under the operating system VM/CMS.
It covers the following topics:
The installation tape contains the dataset listed in the table below. The notation nnn in the dataset name represents the version number of the product.
| Dataset Name | Contents |
|---|---|
| CMTnnn.INPL | INPL dataset containing the Con-nect Teleservices programs. |
Use the INPL utility to load the dataset CMTnnn.INPL.
The dataset CMTnnn.INPL contains the libraries X-TLXCAE (for the CAESAR system), X-TLXGNT (for the GNT system), and X-TLXTOP (for the TOPCALL system). Depending on the telex box used, the corresponding library must be copied into the libraries SYSCNT2 and SYSCNT2T. Use the SYSMAIN utility to do this. Additionally, the INSTALL program must be invoked to complete the installation.
Define SYSCNT2 as the STEPLIB for SYSCNT2T in the application definition for Natural Security. See Con-nect Teleservices Under VM/CMS.
Once Con-nect Teleservices is installed, run the Con-nect INSTALL program. See Running INSTALL.
The Natural parameter CSIZE must be set to 32KB. Specify this parameter in the Natural parameter module. See the Natural Installation and Operations documentation for additional information on profile parameters.
See also Modify Parameter Modules (Job I080).
It is possible to translate special national characters or any other special characters that might occur in a telex text into those characters required for a telex transmission. Con-nect Teleservices translates these characters according to a translation table prior to sending the telex to the telex box. The translation table, which is shown below with its default characters, is part of the module CONFSRT.
CONFSRT
       ...
       ...
       CDTLX C'Ä',C'AE'
       CDTLX C'Ö',C'OE'
       CDTLX C'Ü',C'UE'
       CDTLX C'ä',C'AE'
       CDTLX C'ö',C'OE'
       CDTLX C'ü',C'UE'
       CDTLX C'ß',C'SS'
       CDTLX C'$',C'DLR'
       CDTLX C'"',C''''
       CDTLX C'^',C''''
       ...
       ...
If you want other characters to be translated, you can modify this table according to your needs. After modification of the table, the module CONFSRT must be assembled and linked to the Natural nucleus.
The following description pertains to an environment comprising the Software AG products VM-PASS and Natural Security.
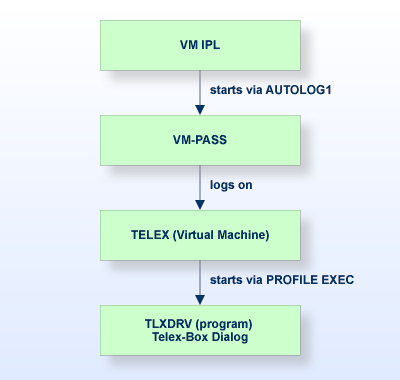
A permanent terminal address for the special "Telex line" that runs from the host via the protocol converter (PROKOR) to the telex box is dedicated to VM-PASS. The VM-PASS online maintenance defines that, when this line is active, the user ID TELEX automatically logs on to VM/CMS. From VM/CMS, this user then logs on to Natural Security, which further specifies that the user directly logs on to the library containing the Telex Driver programs. The user then automatically calls the Telex Driver start program from this library.
The diagram below illustrates this process.
The following sections describe how this is accomplished for specific applications.
In the case of normal telecommunications between a host and terminals, the user has to log on to the system before any other activities can be started. The addresses that are allocated can vary from logon to logon. Such logons are not possible from a Telex device. When generating the system, a permanent terminal address must be reserved for the coaxial port that is allocated to the Telex device. This permanent address is defined in the VM directory for VM-PASS with the following:
DEDICATE raddr vaddr
where "raddr" is the real address and "vaddr" is the virtual address.
For further information, see the example directory given in the VM-PASS System Programmer's Manual, section Installation Notes and Startup Procedure.
When VM is started within the IPL, AUTOLOG1 starts VM-PASS and supplies logon data for the telex user, in this example NATTLX. Therefore, the telex user must be defined as follows:
Start the VM-PASS online maintenance tool as described in the VM-PASS System Programmer's Manual, section The Online Maintenance Tool.
Define the dedicated terminal. Select option 4 (TERMINALS) on the "ONLINE MAINTENANCE -- Main selection" screen. As a result, the following screen is displayed:
---MAINT---------------------------------------------------------------------


                -- ONLINE MAINTENANCE -- Terminal definition --


  Enter the following:


      Terminal identifier ==>018               (1-8) characters
                                               (leave blank for a list)


 If you are defining a new terminal:


      Copy from terminal  ==>               (name of an existing definition)


 Clear--Enter--PF1---PF2---PF3---PF4---PF5---PF6---PF7---PF8---PF9---PF10--
 End    Process            Menu                    Menu
---MAINT---------------------------------------------------------------------
Max.Sess.: 10 |
Enter the terminal identifier in the appropriate field to modify a terminal definition, or if the ID is new, specify an existing terminal definition to be used as a model for the new one.
In this example, "018" is the terminal identifier.
Note:
The same identifier which is specified in the VM directory to
dedicate the line is used here.
---MAINT---------------------------------------------------------------------


              -- ONLINE MAINTENANCE -- Terminal 018 --


    Logon screen      ==>                Blank if no logon is requested
    User identifier   ==>  NATTLX        Assigned user name (when no logon)


    Group name        ==>                Default group name
    Language          ==>  E             Default national language


    Activity level    ==>  MENU          COMPR/MENU/FULL
    Compression level ==>  1             (0,1,2)
    Initial format    ==>    1           Screen format number (1-250)


Clear--Enter--PF1---PF2---PF3---PF4---PF5---PF6---PF7---PF8---PF9---PF10--
 End          Help        Save  Quit  Delete
---MAINT---------------------------------------------------------------------
Max.Sess.: 10 |
Since no logon is required, the "Logon screen" field remains blank.
Enter "NATTLX" in the "User identifier" field as the user definition to be used when the logon screen is bypassed.
Select option 2 (USERS) on the "ONLINE MAINTENANCE -- main selection" screen. As a result, the "ONLINE MAINTENANCE -- User definition" screen is displayed.
---MAINT-----------------------------------------------------------------------


                  -- ONLINE MAINTENANCE -- User definition --


Enter the following:


      User identifier ==>                  (1-8) characters
                                           (leave blank or use a pattern
                                           if you want a list


 If you are defining a new user:


      Copy from user  ==>                  (name of an existing definition)


 Clear--Enter--PF1---PF2---PF3---PF4---PF5---PF6---PF7---PF8---PF9---PF10--
 End    Process            Menu                    Menu
---MAINT-----------------------------------------------------------------------
Max.Sess.: 10 |
Enter "NATTLX" as the user identifier, since it was also specified as the user identifier in the step above.
For further information, see the VM-PASS System Programmer's Manual, section The Online Maintenance Tool, sub-section User Definitions.
Select option 5 (MENU) on the "ONLINE MAINTENANCE -- Mail selection" screen. The menu user defaults definition consists of three screens. Press ENTER to display the second screen (page 7 of 10) as shown below.
.11.MAINT......................................................................
                -- ONLINE MAINTENANCE -- User MBE      --       Pag.  7  of 10


    Start level             ==>  1    Level number activated at logon time
    Max sessions            ==> 10    Maximum number of applications active
    Default msg priority    ==> 2     (0,1,2) Receiving priority

 Flags (specify  Y or N ):


    Key only                ==> Y     Can he use special keys without pass?
    Call any level          ==> Y     Does the jump key call inactive levels?
    Receive mail            ==> N     Will he receive messages?
    Use any application     ==> Y     Can he start any application?
    See broadcast           ==> N     Will he receive the broadcast message?
    Show menu on reconnect  ==> N     Will the act. table appear at reconnect?
    ATTN as suspend key     ==> N     Does ATTN work as suspend key?
    Command transparency    ==> Y


 Clear--Enter--PF1---PF2---PF3---PF4---PF5---PF6---PF7---PF8---PF9---PF10--
 End           Help        Save  Quit  Delete      Prev  Next
.11.MAINT......................................................................
Max.Sess.: 10 |
In the "Start level" field, enter "1" to bypass the Activity Table.
In the "See broadcast" field, enter "N" so that the user does not see the broadcast message when he logs on.
For further information, see the VM-PASS System Programmer's Manual, section The Online Maintenance Tool, sub-section Menu User Defaults.
Define an application menu for NATTLX. Select option 6 (APPLICATIONS) on the "ONLINE MAINTENANCE -- Mail selection" screen.
.11.MAINT......................................................................


                -- ONLINE MAINTENANCE -- User MBE      --       Pag.  9 of 10

    Applications to be showed on the initial menu:

                                                                     Call
 Level id Name     Start data               Stop data                key  Start
 -------- -------- ------------------------ ------------------------ ---- -----
 01       Telex    L NATTLX password


 Clear--Enter--PF1---PF2---PF3---PF4---PF5---PF6---PF7---PF8---PF9---PF10--
 End           Help        Save  Quit  Delete      Prev  Next
.11.MAINT......................................................................
Max.Sess.: 10 |
Specify "01" in the "Level id" column.
Specify "Telex" in the "Name" column.
In the "Start data" column, enter "L NATTLX password".
For further information, see the VM-PASS System Programmer's Manual, section The Online Maintenance Tool, sub-section User Applications Menu.
The user NATTLX is defined in the VM directory. VM-PASS forces the logon for NATTLX when VM-PASS itself is started. Via the PROFILE EXEC of NATTLX, Natural is invoked in order to execute TLXDRV in library SYSCNT2T.
The following is an example how to define NATTLX in the VM directory:
   USER NATTLX password 2M 8M G
    IPL CMS PARM AUTOCR
    CONSOLE 009 3215
    SPOOL 00C 2540 READER *
    SPOOL 00D 2540 PUNCH A
    SPOOL 00E 1403 A
    LINK MAINT 19O 19O RR
    LINK MAINT 19D 19D RR
    LINK MAINT 19E 19E RR
    LINK sagdba 193 193 RR          * adabas mini disk
    LINK sagdba 194 194 RR          * natural mini disk
    MDISK 191 3380 nnnn 2 dddddd MR
Define SYSCNT2 as the STEPLIB for SYSCNT2T in the application definition in Natural Security.
The application SYSCNT2T is created under Library Maintenance (see the Natural Security documentation). SYSCNT2T is the library that contains the Telex Driver programs. The name of the Telex Driver start program must be entered in the input field Startup. In most cases, this will be the supplied program TLXDRV. This program will then be called after each successful logon to this application.
The user NATTLX is subsequently defined under User Maintenance, and SYSCNT2T is entered in the input field Libraries Default (see the Natural Security documentation). This application is automatically called when the user NATTLX logs on to Natural.
The following steps are required in order to install Con-nect Teleservices with/without Natural Security:
Install VM-PASS
Define the telex box address to VM-PASS
Define the user NATTLX to VM-PASS
Define the user NATTLX to VM directory
Create a PROFILE EXEC for user NATTLX to invoke the Natural program TLXDRV in library SYSCNT2T.