
The utility SYSNCP is used to define command-driven navigation systems for Natural applications.
The Natural Command Processor (NCP) consists of two components: maintenance and runtime.The
utility SYSNCP is the maintenance part which comprises all facilities used to define and
control navigation within an application. The PROCESS COMMAND statement (see the
Statements documentation) is the runtime part used to invoke Natural
programs.
The SYSNCP Utility documentation covers the following topics:
Applications which enable users to move from one activity to another activity by using direct commands far exceed in usability the ones which force the user to navigate through menu hierarchies to a desired activity.
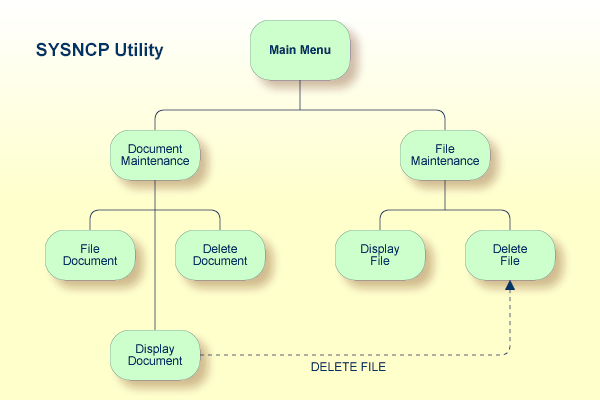
The figure above illustrates the advantage of using direct commands. In an application in which menu hierarchies form the basis for navigation, a user wishing to advance from the Display Document facility to the Delete File facility would have to return to the Main Menu via the document branch and then enter the file branch. This is clearly less efficient than accessing the Delete File facility directly from the Display Document facility.
Below is information on:
The Natural command processor is used to define and control navigation within an
application. It could be used, for example, to define a command DISPLAY
DOCUMENT to provide direct access to the Display Document facility. When
a user enters this command string in the Command line of a screen (for which this
command is allowed), the Natural command processor processes the input and executes the
action(s) assigned to the command.
In contrast to menu-driven applications, the command-driven applications implemented with the Natural command processor take a major step toward object-oriented data processing. This approach has the following advantages:
The design of an application need not depend on the way in which a certain result can be reached, but only on the desired result itself. Thus, the design of an application is no longer influenced by the process flow within its components.
The processing units of an application become independent of one another, making application maintenance easier, faster and much more efficient.
Applications can be easily expanded by adding independent processing units. The resulting applications are, therefore, not only easy to use from an end-user's view, but also easier to create from a programmer's view.
The Natural command processor has the following additional benefits:
Less Coding
Instead of having to repeatedly program lengthy and identically structured
statement blocks to handle the processing of commands, you only have to specify a
PROCESS COMMAND
statement that invokes the command processor; the actual command handling need no
longer be specified in the source code. This considerably reduces the amount of
coding required.
More Efficient Command Handling
As the command handling is defined in a standardized way and in one central place,
the work involved in creating and maintaining the command-processing part of an
application can be done much faster and much more efficiently.
Improved Performance
The Natural command processor has been designed with particular regard to
performance aspects: it enables Natural to process commands as fast as possible and
thus contributes to improving the performance of your Natural applications.
The Natural command processor provides numerous features for efficient and user-friendly command handling:
Flexible Handling of Commands
You can define aliases (that is, synonyms for keywords), and abbreviations for
frequently used commands.
Automatic Check for Uniqueness of Abbreviated Keywords
The command processor automatically compares every keyword you specify in SYSNCP
with all other keywords and determines the minimum number of characters in each
keyword required to uniquely identify the keyword. This means that, when entering
commands in an application, users can shorten each keyword to the minimum length
required by the command processor to distinguish it from other keywords.
Local and Global Validity of Commands
You can specify in SYSNCP whether the action to be performed in response to a
specific command is to be the same under all conditions or situation-dependent. For
example, you can make the action dependent on which program was previously issued.
In addition, you can define a command to be valid under one condition but invalid
under another.
Error Handling for Invalid Commands
You can attach your own error-handling routines to commands or have error input
handled by Natural.
Functional Security
With Natural Security, library-specific and user-specific conditions of use can be
defined for the tables generated with SYSNCP. Thus, for your Natural applications
you can allow or disallow specific functions or keywords for a specific user. This
is known as functional security. See also the section Functional Security in the
Natural Security documentation.
Help Text
In SYSNCP, you can attach help text to a keyword or a command. Then, by specifying
a PROCESS COMMAND ACTION
TEXT statement, you can return command-specific help text to the
program.
Online Testing of Command Processing
If the execution of a command does not produce the intended result, you can find
out why the command was not processed correctly by using the PROCESS COMMAND statement (see
the Statements documentation) and the EXAM* sample test
programs (source form) provided in the library SYSNCP. The endings of the EXAM-*
program names appear as abbreviations at the top border line of the relevant action
windows (for example, EXAM-C appears as C).
 To test a command processor at runtime
Enter the direct command EXAM to list all test
programs. The Demonstrate PROCESS COMMAND Statement
window is displayed.
Enter function code O in the Code field to
open a processor.
Enter the name of the processor.
Choose any of the functions codes listed(for example, C for
CHECK) to apply command actions.
Enter function code Q to close the processor.
The Natural command processor consists of two parts: a development part and a runtime part:
The development part is the utility SYSNCP, which is described in this section. With the utility SYSNCP you define commands (as described below) and the actions to be performed in response to the execution of these commands. From your definitions, SYSNCP generates decision tables which determine what happens when a user enters a command. These tables are contained in a Natural member of type Processor.
The runtime part is the statement PROCESS
COMMAND, which is described in the
Statements documentation. This statement is used to invoke
the command processor within a Natural program. In the statement, you specify the
name of the processor to be used to handle the command input by a user at this
point.
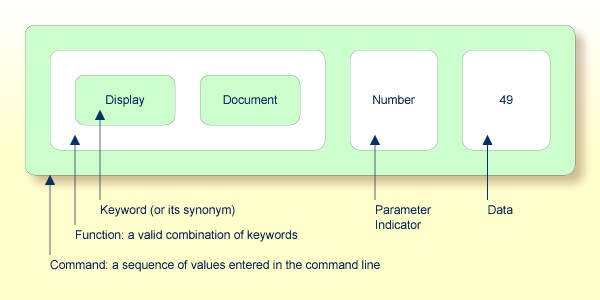
A command is any sequence of values entered in the Command line which is recognized and processed by an application. Commands can contain up to three elements:
Function:
One or more valid keywords. For example, MENU or DISPLAY
DOCUMENT.
Parameter Indicator:
Optional. A keyword which introduces command data.
Command Data:
Information to be sent to a function. Command data can be alphanumeric or numeric,
for example, the name or the number of the file to be displayed.
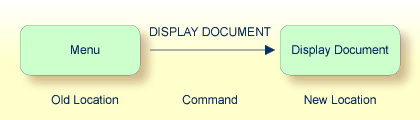
Commands are always executed from a situation within an application; the position where this situation is reached is referred to as a location. Commands take the user from one location to another location; thus, each command can be viewed as a vector:
The location from which a certain command can be issued can be restricted on a system-wide or user-specific basis. On a system-wide basis, for example, the functions specified within commands can be local or global. A global function can be issued from any location while a local function can only be issued from specified locations. Restrictions can be placed on keywords and functions, however, if Natural Security is active in your environment.
The utility SYSNCP is used to create and maintain command processors. A command processor contains decision tables which determine what happens when a user enters a valid command.
The creation of a command processor is a cumulative operation involving several steps, from header definition, which establishes general defaults for the processor, to keyword definition, function definition and the linking of actions to functions. Special editors are provided by SYSNCP for the purpose of specifying keywords, functions and actions.
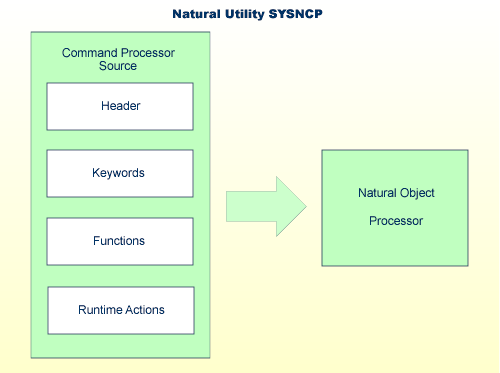
The end product of command processor development is a complex command processor source,
which, when cataloged, generates a Natural object of type processor. Whenever this
object is referenced by the Natural statement PROCESS COMMAND, the runtime
system of the Natural command processor is triggered.
The following is a summary of the steps necessary to create a command processor.
To create a command processor
Verify/Modify the Session Profile.
SYSNCP itself uses a Session Profile which contains various parameters which control how SYSNCP is to perform certain actions and how information is to be displayed. Desired modifications can be made and the resulting profile can be saved with a given user ID. See the section Session Profile.
Initialize the Command Processor.
The name of the command processor and the library into which it is to be stored are specified.
Define Global Settings (Header).
Various global settings for the command processor are defined. For example, descriptive text for keywords during editing, minimum and maximum length for keywords, in which sequence keywords are to be processed at runtime, runtime error-handling, and whether PF keys can be used at runtime to invoke functions. See the section Header Records.
Define Keywords.
Each keyword which is to be processed by the command processor is defined
together with an indication as to whether the keyword is to be entered as the
first, second or third entry of a command. Keyword synonyms can also be defined as
well as parameter indicators. User text can be defined for each keyword. This text
can subsequently be read at runtime using the PROCESS COMMAND ACTION
TEXT statement. See the section Keyword Maintenance.
Define Functions.
Functions are defined by validating keyword combinations. A function can be defined as local (can only be invoked from a specific location within an application) and/or global (can be invoked from anywhere within an application). See the section Function Maintenance.
Define Runtime Actions.
The actions to be taken by the command processor when a command is issued at runtime are specified. Example actions are: fetch a Natural program, place a command at the top of the Natural stack, place data at the top of the Natural stack, change contents of the Command line. See the section Runtime Actions.
Catalog Command Processor.
The resulting source is cataloged as a Natural object (type Processor) in the
designated Natural library. The command processor can now be invoked by a Natural
program using the PROCESS COMMAND statement. See the section
Processor
Cataloging.
To invoke the SYSNCP utility
Enter the system command SYSNCP.
The menu is displayed:
18:22:53 ***** NATURAL SYSNCP UTILITY ***** 2000-05-22
User SAG - Processor Source Maintenance -
Code Function
S Select Processor
N Create New Processor
H Modify Header
K Define Keywords
F Define Functions
R Define Runtime Actions
C Catalog Processor
A Administrator Services
? Help
. Exit
Code .. _ Name .. SAGTEST_ Library .. SYSNCP__
Logon to SYSNCP accepted.
Command ===>
Enter-PF1---PF2---PF3---PF4---PF5---PF6---PF7---PF8---PF9---PF10--PF11--PF12---
Help Cmd Exit Last List Flip Canc |
From this menu, you can invoke all functions necessary to create and maintain a command processor. To invoke a function, enter the code letter in the Code field.
Note
When you invoke the SYSNCP utility or restart SYSNCP, the user exit NCP-USR1 is
invoked for dynamic customization purposes: see the program NCP-USR1 delivered in the
Natural system library SYSNCP.
For help on individual input fields (and also on some output fields) in SYSNCP, place the cursor on the field and press PF1.
The Select Processor function results in a list of all existing command processor sources with related information. If Natural Security is installed, only those sources are listed which can be cataloged to a library to which you are allowed to log on. These restrictions do not apply to those users who have administrator status.
To invoke the Select Processor function
In the menu, enter function code
S in the Code field.
Press ENTER.
The following information is provided for each processor:
| Name | The name of the command processor. |
| Library | The name of the Natural library for which a processor is created. When the processor is cataloged, it is stored in this library. |
| User ID | The ID of the user who created the processor. |
| Date | The date the processor was created. |
| Status | The stage of development of the processor. For possible status values, see Current Status in the section Header Records. |
| Cat | Indicates if the processor has been cataloged. |
Note
With the user exit NCP-SELX (delivered in the Natural system library SYSNCP),
you can limit the display to certain processors.
In the Ac field, enter any character to select a processor.
The menu is displayed, where the name of the selected processor is automatically placed in the Name field.
If you enter a question mark (?) in the Ac field, a window opens listing other possible options.
The name and library name of a command processor can be one to eight characters long. It can consist of upper-case alphabetical characters (A - Z), numeric characters (0 - 9) and the special characters: "-", "/ ", "$", "&", "#", "+" and "_".
The header maintenance facility defines various global settings for a command processor.
These definitions are collectively referred to as a header. Seven header maintenance
screens are provided for creating and modifying headers. Header settings for a command
processor can be updated at any stage of development (see the following section). After
the settings have been modified, the status of a command processor is always set to
Header (see also Current Status).
Below is information on:
To create a new command processor
In the menu, enter function code
N (Create New Processor) in the Code field,
the name of the command processor to be created, and
the
name of the Natural library in which the command processor is to be later
cataloged.
Press ENTER.
The first header maintenance screen is displayed.
The first header maintenance screen and the following ones are filled with default values that can be edited.
The Modify Header function is used to maintain an existing header; that is, to modify the various header settings for a given command processor.
To modify an existing header
In the menu, enter function code
H (Modify Header) in the Code field,
the name of the corresponding command processor, and
the
name of the library into which this command processor has been cataloged.
Press ENTER.
The first header maintenance screen is displayed.
Modify any input field in the header maintenance screens described below.
Press ENTER to confirm modifications.
Seven different screens are available for the definition and maintenance of a processor header (for the definition of a header, see the previous section).
To navigate between the header maintenance screens
Use PF8 (forward) or PF7 (backward).
Each of the screens contains the following information:
When you select the Modify Header function (as described above), the Processor Header Maintenance 1 screen is displayed:
16:40:19 ***** NATURAL SYSNCP UTILITY ***** 2000-05-04
User SAG - Processor Header Maintenance 1 -
Modify Processor Name SAGTEST Library SYSNCP DBID 10 FNR 32
Created by SAG Date 2000-04-29 Current Status Init
Keyword Runtime Options:
------------------------
First Entry used as ....... Action__________
Second Entry used as ....... Object__________
Third Entry used as ....... Addition________
Minimum Length ............. _1
Maximum Length ............. 16
Dynamic Length Adjustment .. -
Keyword Sequence ........... 123_____
Alternative Sequence ....... ________
Local/Global Sequence ...... LG______
Processor Header with name SAGTEST for library SYSNCP has been added.
Command ===>
Enter-PF1---PF2---PF3---PF4---PF5---PF6---PF7---PF8---PF9---PF10--PF11--PF12---
Help Cmd Exit Last List Flip - + Canc |
Various attributes which are to apply for the keywords defined for the command processor are entered on this screen.
| Field | Explanation | ||||||
|---|---|---|---|---|---|---|---|
| First Entry used as | A descriptive text which is to be associated with all keywords which are
entered as the first entry (entry type 1) when defining a keyword sequence.
For example, if the first keyword of a keyword sequence is to represent the
action to be performed ( The first four characters of the text entered in this field appear under the column heading Use in the Keyword Editor as described in the section Keyword Maintenance. |
||||||
| Second Entry used as | A descriptive text which is to be associated with all keywords which are
entered as the second entry (entry type 2) when defining a keyword sequence.
If, for example, the second keyword of a keyword sequence is to represent
the object to be used ( The first four characters of the text entered in this field appear under the column heading Use in the Keyword Editor as described in the section Keyword Maintenance. |
||||||
| Third Entry used as | A descriptive text (TITLE, PARAGRAPH, etc.)
which is to be associated with all keywords which are entered as the third entry
(entry type 3) when defining a keyword sequence.
The first four characters of the text entered in this field appear under the column heading Use in the Keyword Editor as described in the section Keyword Maintenance. |
||||||
| Minimum Length | The minimum length permitted when defining a keyword. Valid values are 1 - 16 characters. The default is one character. | ||||||
| Maximum Length | The maximum length permitted when defining a keyword. Valid values are 1 - 16 characters. The default is 16 characters. | ||||||
|
Dynamic Length
Adjustment |
The following values are permitted:
|
||||||
| Keyword Sequence | The sequence in which keyword entries are to be processed at runtime.
Possible values are 1, 2, 3 and
P (for parameter indicator); the default sequence is
12, which means first the first keyword entry and then the second
keyword entry. See also the E field described in the section
Keyword Maintenance.
|
||||||
| Alternative Sequence | An alternative sequence in which keywords are to be processed at runtime in the event that the default sequence (specified above) results in an error during runtime. | ||||||
| Local/Global Sequence | This option specifies the order of command validation to be performed at
runtime. Possible values are:
The default validation sequence is |
Further keyword attributes can be entered on the Processor Header Maintenance 2 screen:
| Field | Explanation | ||||
|---|---|---|---|---|---|
| Header 1 for User Text | These two fields are used to enter a descriptive text which
appears in the Keyword Editor above the column reserved for user text. This text
is also output during runtime when the TEXT option is specified
with the PROCESS
COMMAND statement as described in the
Statements documentation.
|
||||
| Header 2 for User Text | |||||
| Prefix Character 1 | This field and the next three are used to attach a hexadecimal prefix to
keywords. This enables the processing of internal keywords which cannot be
represented by a normal keyboard. When the command processor is cataloged, all
prefix characters in keywords are replaced by the hexadecimal values specified.
If a non-blank character is entered in one of the Prefix Character fields, the specified character is replaced by the hexadecimal value specified in the Hexadecimal Replacement field. |
||||
| Hex. Replacement 1 | The value specified in this field replaces the character specified in the field Prefix Character and is used as a prefix for a keyword at runtime. | ||||
| Prefix Character 2 | See above Prefix Character 1. | ||||
| Hex. Replacement 2 | See above Hex. Replacement 1. | ||||
| Keywords in Upper Case | This option specifies whether keywords are to be translated to upper case
in the Keyword Editor and the application:
|
||||
| Unique Keywords | This option specifies whether keywords within the processor must be
unique:
|
Miscellaneous options can be entered on the Processor Header Maintenance 3 screen:
| Field | Explanation | ||||||||
|---|---|---|---|---|---|---|---|---|---|
| Invoke Action Editor | This option specifies whether the Runtime Action Editor is to be activated
from the Function Editor (see the sections Runtime Action
Editor and Define
Functions). Possible values are:
Note |
||||||||
| Catalog User Texts | This option specifies whether user texts are to be cataloged with the
command processor:
|
||||||||
| Security Prefetch | This option specifies whether security checking is to be performed when
the command processor is initially invoked during runtime or at each command
evaluation. Possible values are:
If option |
||||||||
| Command Log Size | Commands processed at runtime can be stored in a command log area by the
command processor. Specify in the input field the number of KBs storage space
allocated to command logging:
|
||||||||
| Implicit Keyword Entry | This option specifies whether a keyword of type 1 is to be retained as an
implicit keyword for all subsequent commands. Possible values are:
|
||||||||
| Command Delimiter | This option specifies the character used to separate commands if more than
one command is specified in the Command line. At runtime, only the first command
will be executed.
Example:
|
||||||||
| PF-Key may be Command | This option specifies whether commands can be allocated to PF keys: if the
command processor receives at runtime a command line which contains all blanks,
it checks if a PF key has been pressed by the user. Possible values are:
For more information on the system variables |
The attributes to be entered on the Processor Header Maintenance 4 screen specify how command data are handled for a function; command data are optional.
Options are:
| Field | Explanation | ||||||||
|---|---|---|---|---|---|---|---|---|---|
| Data Delimiter | Specifies the character to be used to precede data. Default data delimiter
is the number sign (#).
Example:
|
||||||||
| Data Allowed | Specifies if data input is allowed at runtime. Possible values are:
Example of
|
||||||||
| More than one Item Allowed | Only applies if the option Data Allowed is set to
Y. Specifies whether more than one data string is permitted.
Possible values are:
Example:
As long as uniqueness is guaranteed, the data delimiter can be omitted. Example:
|
||||||||
|
Maximum Length |
Only applies if the option Data Allowed is set to
|
||||||||
| Item Must be Numeric | Only applies if the option Data Allowed is set to
Y. Specifies whether each data value must be an integer value:
|
||||||||
| Put to Top of Stack | Only applies if the option Data Allowed is set to
Y. Specifies where data is to be placed:
|
||||||||
| If Error, Drop all Data | Only applies if the option Data Allowed is set to
Y or N. Specifies the reaction to a data evaluation
error:
|
The attributes to be entered on the Processor Header Maintenance 5 screen specify how to handle runtime errors:
| Field | Explanation | ||||||||||
|---|---|---|---|---|---|---|---|---|---|---|---|
| General Error Program | The name of the program which is to receive control when an error is
detected during runtime processing by the command processor. The Natural stack
contains the following information when this program is invoked:
If no error program and no specific error handling is specified (see below),
the program with the name as contained in the Natural system variable
|
||||||||||
| Keyword not found | Indicates whether an action has been specified that is to be performed if a keyword could not be found. | ||||||||||
| Keyword missing | Indicates whether an action has been specified that is to be performed if the keyword type is missing. | ||||||||||
| Keyword Sequence Error | Indicates whether an action has been specified that is to be performed in the case of a keyword sequence error. | ||||||||||
| Command not defined | Indicates whether an action has been specified that is to be performed in the case of an undefined command. | ||||||||||
| Data disallowed | Indicates whether an action has been specified that is to be performed in the case of disallowed data. | ||||||||||
| Data Format/Length Error | Indicates whether an action has been specified that is to be performed in the case of a format/length error. | ||||||||||
| General Security Error | Indicates whether an action has been specified that is to be performed if an error is detected during a general security check. | ||||||||||
| Keyword Security Error | Indicates whether an action has been specified that is to be performed if an error is detected during a keyword security check. | ||||||||||
| Command Security Error | Indicates whether an action has been specified that is to be performed if an error is detected during a command security check. |
The Processor Header Maintenance 6 screen contains only output fields which report statistical data about the keywords specified for a command processor.
The following statistical information is provided:
| Field | Explanation |
|---|---|
| Entry n Keywords | The number of keywords of type n defined in the command processor (not including synonyms). |
| Entry n Keywords + Synonyms | The sum of keywords of type n and their assigned synonyms. |
| Highest IKN for Entry n | The largest Internal Keyword Number for the keyword of type n. |
| Possible Combinations | The number of possible combinations for keywords defined. |
| Cataloged Functions | The number of keyword combinations currently cataloged. |
The Processor Header Maintenance 7 screen contains only output fields which report the time and the date when parts of the command processor were executed or modified.
Keywords are the basic components for defining functions. Before it is possible to define keywords, the header maintenance records must be created (see the section Header Records).
Keywords used in commands are created with the Define Keywords function and the Keyword Editor. The Keyword Editor is similar to existing Natural editors except that lines of the editor are broken up into separate fields. Most of the editor commands (see the relevant section) and line commands (see the relevant section) which are used in the Natural program editor can also be used in the Keyword Editor.
To invoke the Keyword Editor
In the menu, enter
function code K (Define Keywords) in the Code
field.
Press ENTER.
The Keyword Editor screen is displayed.
The Keyword Editor screen is shown below. Several keywords have already been defined to serve as examples for this section.
09:42:39 - SYSNCP Keyword Editor - 2000-05-04
Modify Keywords Name SAGTEST Library SYSNCP DBID 10 FNR 32
I Line E Use Keyword IKN ML Comment
- ---- - ---- ---------------- ---- -- ----------------------------------------
1 1 Acti MENU 1004 1
2 1 Acti DISPLAY 1002 2
3 S Syno SHOW 1002 1
4 1 Acti DELETE 1001 2
5 S Syno PURGE 1001 1
6 S Syno ERASE 1001 1
7 1 Acti FILE 1003 4
8 P Parm NAME 4002 2
9 2 Obje FILE 2001 4
10 P Parm NUMBER 4001 2
11 2 Obje DOCUMENT 2003 2
12 1 Acti INFORMATION 1005 1
13
14
- ---- - ---- ----- All ------ ---- -- ----------------------------------------
Command ===>
Enter-PF1---PF2---PF3---PF4---PF5---PF6---PF7---PF8---PF9---PF10--PF11--PF12---
Help Cmd Exit Last List Flip -1 +1 Top Bot Info Canc |
Enter in the Keyword Editor all the keywords which you want to have in your command language. These can be entered in any order desired, except synonyms, which must immediately follow the keywords they are related to. To each keyword you assign a type which specifies to which part of command syntax the keyword belongs. Rules of command syntax for a command processor are specified in the processor header; see Keyword Runtime Options - Header 1 in the section Header Records. For example, you can specify whether a keyword is to be of type 1 (entered in first position in a command), type 2, type 3, a synonym for another keyword or a parameter indicator.
Note
The command language created with the Natural Command Processor has strict syntax
requirements. However, the variety of keyword types and sequences, synonyms and others
enables the creation of a wide range of commands for demanding applications.
In the example above, the keywords DELETE and DISPLAY are
defined as keywords of type 1. As specified in the processor header, these keywords
denote actions. The keyword DOCUMENT is defined as a keyword of type 2 and
it denotes an object. The keyword FILE, however, is defined as both type 1
and type 2, and it can, therefore, denote an action or an object, depending on where it
is positioned in the command. It is possible to compose the two keyword types to make
commands, such as DELETE FILE and FILE
DOCUMENT.
You can save the keywords you have entered by issuing the
SAVE or STOW command from the Command line. In
addition to saving the keyword definitions in source form, the STOW command
performs a consistency check on them. Once a keyword is stowed successfully, it is given
an internal keyword number (IKN) which is used at runtime to evaluate a command.
Synonyms are always linked to a master keyword and always take the IKN of their
master.
Each line in the Keyword Editor contains the following fields:
| Field | Explanation | ||||||||||||||
|---|---|---|---|---|---|---|---|---|---|---|---|---|---|---|---|
| I | Output field. An information field which can contain the following values:
|
||||||||||||||
| Line | Output field. The line number of the editor. | ||||||||||||||
| E | Specifies the entry type for a keyword; that is, the position the keyword
is to be entered in a command: first, second or third position, synonym or
parameter indicator.
For instance, in the Keyword
Editor screen example above the keyword
The field takes any of the following characters as input:
|
||||||||||||||
| Use | Output field. The value displayed is determined by the value entered in
the preceding E field:
|
||||||||||||||
| Keyword | Enter the keyword to be defined. Embedded blanks are not permitted. If you
have specified in the processor header that keywords can only be upper case,
then keywords are always translated to upper case, regardless of how they are
entered. Otherwise, the case remains as entered.
The maximum and minimum length of keywords depends on the settings specified in the header (default: 1 - 16 characters). Keywords must be unique unless specified otherwise in the header. Keyword prefixes can be used as described in Keyword Editor Options - Header 2 in the section Header Records. |
||||||||||||||
| IKN | Output field. The Internal Keyword Number (IKN) is an identifier assigned
to each valid keyword. IKNs are useful for testing and debugging. They are
allocated only when a keyword is successfully stowed (see also the STOW
command under Editor Commands). Each keyword is assigned a
unique IKN, except synonyms, which take the IKN of their master term (see the
Keyword
Editor screen example above:
DISPLAY and
SHOW).
|
||||||||||||||
| ML | Input and output field indicating the minimum length of a keyword. The
field is an input field if S is specified in the Dynamic Length
Adjustment field of the processor header as described
in Keyword Runtime Options - Header 1 in the section
Header Records. In this case, you must specify the number
of characters which must be entered for the keyword. For all other input, this
field contains the minimum number of characters of a keyword a user must specify
to avoid ambiguity with other keywords.
For instance, in the Keyword
Editor screen example above, keyword
|
||||||||||||||
| Comment | Enter free text for a keyword. There are no input restrictions. The user
text is included in the cataloged command processor if the field Catalog User
Texts is set to Y in the header
definition as described in Miscellaneous Options - Header 3
in the section Header Records. It can be read at runtime
using the TEXT option of the PROCESS COMMAND
statement. The header text appearing at the top of this column is controlled by
the header definition fields Header for User Text 1 and
Header for User Text 2.
|
In the Command line of the Keyword Editor, you can enter the following commands:
| Command | Function |
|---|---|
| ADD | Adds ten empty lines to the end of the editor. |
| CANCEL | Returns to the menu. |
| CHECK | Tests the keyword source for consistency. |
| EXIT | Returns to the menu. |
| HELP | Displays valid escape characters and other useful processor settings. |
| INFO | Displays information on the keyword on which your cursor is positioned. |
| LET | Undoes all modifications made to the current screen since the last time ENTER was pressed. |
| POINT | Positions the line in which a line command .N is
entered to the top of the current screen.
|
| RECOVER | Returns keyword source that existed before last
SAVE/STOW.
|
| RESET | Deletes the current X and Y line markers.
|
| SAVE | Keyword source is saved. |
| SCAN | Scans for the next occurrence of the scan value. |
| STOW | Keyword source is stowed and Internal Keyword Numbers (IKNs) are generated for valid keywords. |
Editor positioning commands are the same as the ones provided for the Natural program editor. For more information, see the description of the program editor in the Editors documentation.
The last line of the editor contains an output field which informs you of where your display is located in the editor. The following output values are displayed:
| Top | Editor is currently positioned at the top of the keyword source. |
| Mid | Editor is currently positioned at the center of the keyword source. |
| Bot | Editor is currently positioned at the bottom of the keyword source. |
| Emp | Editor is currently empty. |
| All | The entire source is contained on the current screen. |
Line commands in the Keyword Editor are the same as in the Natural program editor with
the exception of the commands .J and
.S, which cannot be used.
Each command is entered beginning in the E field; the remaining part of the command is entered in the Keyword field, as illustrated in the screen below:
09:42:39 - SYSNCP Keyword Editor - 2000-05-04
Modify Keywords Name SAGTEST Library SYSNCP DBID 10 FNR 32
I Line E Use Keyword IKN ML Comment
- ---- - ---- ---------------- ---- -- ----------------------------------------
1 1 Acti MENU 1004 1
2 1 Acti DISPLAY 1002 2
3 S Syno SHOW 1002 1
4 . Acti i(3)TE 1001 2
5 S Syno PURGE 1001 1 |
Caution
When you move (.M) or copy
(.C) lines, ensure that individual keywords are always
moved or copied together with their synonyms.
When you delete (.D) lines, the corresponding keywords and
any functions containing these keywords will not be deleted from the database until you
issue the STOW editor command. As long as you do not issue
the STOW command, these functions will still be displayed
within the Function Editor.
Functions are composed of the keywords entered in the Keyword Editor. Before it is possible to define functions, the keywords must be successfully stowed (see the section Keyword Maintenance).
Use the Define Functions function and the Function Editor to specify functions and compose valid commands which can be accessed from a specific location.
To invoke the Function Editor
In the menu, enter function code
F (Define Functions) in the Code field.
Press ENTER.
The Function Editor screen is displayed.
The Function Editor displays all possible combinations of the keywords stowed in the Keyword Editor.
The screen below shows the Function Editor with keywords used as examples in the Keyword Editor screen in the section Keyword Maintenance:
09:45:53 ***** NATURAL SYSNCP UTILITY ***** 2000-05-04
User SAG - Function Editor -
Edit Global Combinations Name SAGTEST Library SYSNCP DBID 10 FNR 32
Global
I Ac Action Object Addition Global Local Any Loc
- -- ---------------- ---------------- --------------- ------ ----- -------
DELETE
DELETE DOCUMENT Yes
DELETE FILE Yes
DISPLAY
DISPLAY DOCUMENT Yes
DISPLAY FILE Yes
FILE
FILE DOCUMENT Yes
FILE FILE Yes
INFORMATION Yes
INFORMATION DOCUMENT
INFORMATION FILE
Repos: ________________ ________________ ________________ ------ ----- -------
Command ===>
Enter-PF1---PF2---PF3---PF4---PF5---PF6---PF7---PF8---PF9---PF10--PF11--PF12---
Help Cmd Exit Last List Flip + Top Loc Loc+ Canc |
You have to validate each keyword combination that you want to designate as a valid function in your application. A keyword combination can be validated as a global function, local function or both. A global function can be invoked from anywhere in an application, whereas a local function can only be invoked from a specific location within an application.
Two fields in the upper left corner of this screen indicate the current validation mode (local or global) and the location for which keyword combinations can currently be validated. In the screen above, the text Edit Global Combinations indicates that global mode is active. If the local mode were active, the text Edit Local Combinations would appear here. In the screen above, the text Global appears below this text. This indicates that global validation can be performed for all of the combinations listed. In local mode, in this field the name of the location appears for which local validation can be performed (for example, Local DISPLAY FILE).
The Function Editor contains the following columns:
| Column | Explanation | ||||||||||||||||||||
|---|---|---|---|---|---|---|---|---|---|---|---|---|---|---|---|---|---|---|---|---|---|
| I | Output field. The following values are output as a result of function
editing:
|
||||||||||||||||||||
| Ac | Action to be taken. The following values can be entered:
|
||||||||||||||||||||
| Action | These three columns are used to display all possible
combinations of currently defined keywords.
The text which appears at the top of each keyword column is controlled by the fields First Entry used as, Second Entry used as and Third Entry used as as specified in the processor header (see Keyword Runtime Options - Header 1 in the section Header Records). |
||||||||||||||||||||
| Object | |||||||||||||||||||||
| Addition | |||||||||||||||||||||
| Global | If the function has been defined as a global command, Yes
appears in this field.
|
||||||||||||||||||||
| Local | If the functionhas been defined as a local command, Yes
appears in this field for the current location (only displayed in local
mode).
|
||||||||||||||||||||
| Any Loc | Any Location. If the function has been defined as a local command anywhere
else within the processor, Yes appears in this field for any other
location.
|
In the Command line of the Function Editor, you can enter the following commands:
| Command | Function |
|---|---|
| ANY ON | Enable the column Any Loc. |
| ANY OFF | Disable the column Any Loc (the column will be filled with question marks). This allows for faster scrolling in the Function Editor. Moreover, the third repositioning field is available. Also, processing-in-progress information windows will not be displayed. |
| FIELD | Display keyword-specific combinations. |
| GLOBAL | Activate global mode. |
| LOC | Position to next location group. |
| LOC+ | Position forward by one location. |
| SINGLE ON | Display only single-word functions. |
| SINGLE OFF | Display all possible combinations. |
| TOP | Position to top of list. |
The direct command QUICK-EDIT enables you to quickly define
local/global functions, as well as the corresponding runtime actions, by entering
keywords or IKNs directly. This may be helpful for extremely large command processors.
Note, however, that the location from which the command can be issued is not verified
and navigation may not function correctly at runtime.
To understand the concept of local and global functions, you have to picture each valid
keyword combination as a location in your application (for example, a location called
Display File). In the Function Editor, you specify the commands which can be issued from
this location, as well as from which locations this location can be reached using the
command DISPLAY FILE.
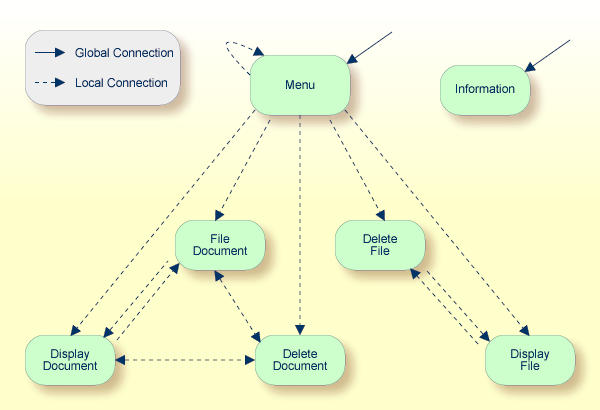
In the sample application above, the Menu and Information locations are the only locations which have been designated as global. Thus, they can be accessed directly from all of the remaining locations in the application. All locations have been designated as local to the location Menu, except Information. The only way to get from the location Display File to Display Document is via Menu.
The Function Editor operates in two modes: global and local. From global mode you can validate global functions and from local mode you can validate global and local functions. Global mode is the default mode. You can determine whether the editor is in global or local mode by the output field above the I field in the editor. If the editor is in global mode, then Global is displayed. If the editor is in local mode, then the location for which local functions are to be validated is displayed. Below is a general procedure for validating global and local functions for an application.
To validate global and local functions
With the Function Editor in global mode, enter VG (validate global)
in the Ac field next to the corresponding action to validate
all global functions.
Press ENTER.
The Runtime Action Definition screen appears.
Press PF3 to return to the Function Editor.
Yes appears under the column heading Global
beside the validated functions.
Enter +L in the Ac field for each global
function validated in the previous step, to switch to local mode.
Press ENTER.
Enter VL (validate local) in the Ac field for
each function that is to serve as a location for this global function.
Press ENTER.
The Runtime Action Definition screen appears.
Press PF3 to return to the Function Editor.
Yes appears under the column heading Local
beside the validated functions.
To validate local functions for a local location: Enter +L
(invoke local mode) in the Ac field for each location
validated in the previous step, to validate all local functions which are to be
used from this location.
Press ENTER.
Enter VL (validate local) in the Ac field for
each function that is to serve as a local function for the current location.
Press PF3 to return to the Function Editor.
Yes appears under the column heading Local
beside the validated functions.
Note
If in the command processor header (Processor Header Maintenance
3) the field Invoke Action Editor is set to
Y, in addition, the window Runtime Action Definition
(see Runtime Action
Editor in the section Runtime Actions) is
displayed for each action.
Once valid keyword combinations have been identified as either local or global functions in the Function Editor, it is possible to link each function with one or more runtime actions. Runtime actions consist of one or more steps which are to be carried out whenever a function is issued.
Below is information on:
There are two different locations in SYSNCP from which you can define runtime actions: the Function Editor (see the section Function Maintenance) and the Result Editor. The Result Editor is explained in this section, including how to specify runtime actions for a function.
To invoke the Result Editor
In the Processor Source Maintenance menu, enter function
code R (Define Runtime Actions) in the Code
field.
Press ENTER.
The Result Editor screen is displayed:
09:47:03 ***** NATURAL SYSNCP UTILITY ***** 2000-05-04
User SAG - Result Editor -
List defined combinations Name SAGTEST Library SYSNCP DBID 10 FNR 32
I Ac Location Command Result
- -- -------------------------------- -------------------------------- --------
< Global > MENU KR
< Global > INFORMATION SF
DELETE FILE DISPLAY FILE SF
DELETE DOCUMENT DISPLAY DOCUMENT SF
DISPLAY FILE DELETE FILE SF
DISPLAY DOCUMENT DELETE DOCUMENT SF
DISPLAY DOCUMENT FILE DOCUMENT SF
FILE DOCUMENT DELETE DOCUMENT SF
FILE DOCUMENT DISPLAY DOCUMENT SF
MENU DELETE FILE KCS
MENU DELETE DOCUMENT KCCS
MENU DISPLAY FILE KRCS
Repo ________________________________ ________________________________ --------
Command ===>
Enter-PF1---PF2---PF3---PF4---PF5---PF6---PF7---PF8---PF9---PF10--PF11--PF12---
Help Cmd Exit Last List Flip + Top Loc-- Loc+ Canc |
The Result Editor contains all of the local and global functions specified in the Function Editor. Each line in the editor represents the location from which a command can be issued (Location field), the command itself (Command field) and an abbreviated summary of the action to be carried out when the command is issued (Result field).
The fields of the screen are explained in detail in the table below:
| Field | Explanation | ||||||
|---|---|---|---|---|---|---|---|
| I | Output field. Information on the last action carried out on this line. | ||||||
| Ac | Action to be taken. The following values can be entered:
|
||||||
| Location | Output field.
The location within the application from which the
command (see Command field below) can be issued. If the
function is global, then |
||||||
| Command | Output field. The command.
The contents of the Location and Command fields may be truncated if very long keywords are used. |
||||||
| Result | Output field.
Contains an abbreviated summary of the action to be performed when the command is issued. The first character represents the Keep Location information (see the following section); for all other characters, see the Runtime Action Definition table in the following section. |
The Runtime Action Editor is used to define the actions to be taken when a command is issued from a specific location. The editor can only be invoked for functions which have been defined as global or local functions. The editor can be invoked either from the Function Editor or the Result Editor.
To invoke the Runtime Action Editor from the Function Editor
In the Ac field, enter EG (edit global) for
global functions.
Or:
In the Ac field, enter EL (edit local) for
local functions.
Press ENTER.
To invoke the Runtime Action Editor from the Result Editor
In the Ac field, enter ED.
The Runtime Action Definition window is displayed:
Runtime Action Definition
Location .... DISPLAY DOCUMENT
Command ..... DELETE DOCUMENT
Keep Location .... S
Data allowed ..... Y More than one .... N Max. Length ...... 99
Numeric .......... N TOP of STACK ..... Y Error: Drop ...... Y
A Runtime Action Definition
- ----------------------------------------------------------------
F DE-PGM__________________________________________________________
_ ________________________________________________________________
_ ________________________________________________________________
_ ________________________________________________________________
_ ________________________________________________________________
_ ________________________________________________________________
_ ________________________________________________________________
_ ________________________________________________________________ |
Actions are always associated with an origin and a destination. The origin is the location from which the command is issued, and the destination is the command itself. Thus, it is possible to link different actions to a command based on the context in which it is used.
In the Runtime Action Editor, you also specify whether the location is to remain the same after the actions have been carried out, or whether the command itself is to become the new current location.
Actions are specified by entering a single-letter code in the left column of the
editor. Enter any parameters accompanying an action in the field next to the code. If
the characters /* are entered in this field, all subsequent input is
considered a comment. If you omit a required parameter, you will be prompted for
input.
The sequence in which actions are performed at runtime is determined by the order of
entry in the editor (from top to bottom). Thus, if a FETCH is
specified, all of the actions specified below it are not to be performed.
The Runtime Action Editor contains the following fields:
| Field | Explanation | ||||
|---|---|---|---|---|---|
| Location | Output field. The location from which the command is issued. If the
function is defined as global, the field shows < Global
>.
|
||||
| Command | Output field. Command for which actions are to be specified. | ||||
| Keep Location | Specifies whether the current or a new location is to be active once the
actions have been performed. A value in this field only affects commands with a
specified EXEC option. Possible values are:
Note |
||||
| Other Options | All other options are related to the handling of parameters provided with
this command sequence. For further information, see Command Data Handling -
Header 4 in the section Header
Records.
To activate the header defaults of these options, enter an asterisk (*). |
To define runtime actions
Invoke the Runtime Action Definition window as described earlier.
In the field A, enter an action code and the corresponding action in the field opposite to it:
| Code | Runtime Action Definition |
|---|---|
| V | Default value. No runtime action is specified. |
| T | Text which can be read at runtime using the TEXT or
GET option of the PROCESS COMMAND
statement.
|
| M | Modify command line. The data are placed in the command line. |
| C | Command. This command is placed at the top of the Natural stack. If
an asterisk (*) is specified here, the name of the program which issued
this PROCESS COMMAND statement is put on top of the stack
(STACK TOP COMMAND '*PROGRAM'). (*)
|
| D | Data. These data are placed on top of the Natural stack. (*) |
| F | Natural program name. The program is invoked with a
FETCH statement. (*)
|
| S | Natural STOP statement. The statement is executed at
runtime. (*)
|
| E | The value specified in this line is to be moved immediately into the
system variable *ERROR-NR.
|
| R | A return code is entered in the DDM field RETURN-CODE as
described in PROCESS
COMMAND in the Statements
documentation.
|
| 1 to 9 | A text string. This value is entered into the multiple DDM field
RESULT-FIELD as described in PROCESS COMMAND in the
Statements documentation.
|
| * | Comment line. |
* These actions are only performed with the EXEC option of the
PROCESS COMMAND statement.
Press PF3 to leave the Runtime Action Definition window.
Note
The user exit NCP-REAM allows you to use some or all of the above codes. The user
exit NCP-REEM allows you to modify the line that follows the heading of the Runtime
Action Definition table. The user exit NCP-REDM allows you to define default values for
runtime action definitions (if you use this user exit, see also Invoke Action
Editor in the section Header Records). All
user exits mentioned above are delivered in the Natural system library SYSNCP.
Once you have specified runtime actions for all of the functions you want to use in your command processor, you should catalog the command processor. Cataloging a command processor generates a Natural object of type Processor.
To catalog a command processor
In the menu, enter function code
C (Catalog Processor) in the Code field,
the name of the command processor to be cataloged,
and the
name of the Natural library in which the command processor is to be cataloged.
Press ENTER.
Note
If you have Natural Security installed, you have to allow the use of your command
processor as described in the Natural Security documentation in the
section Functional
Security.
SYSNCP provides facilities for the administration of command processors. Only system administrators, as defined in Natural Security, are authorized to access these services.
To access the administrative services
In the menu, enter function code
A (Administrator Services) in the Code
field.
Press ENTER.
The Administrator Services screen is displayed:
   09:49:11                ***** NATURAL SYSNCP UTILITY *****           2000-05-04
   User SAG                    - Administrator Services -

                        Code   Function

                         S     Select Processor
                         C     Copy Processor Source
                         D     Delete Processor Source
                         P     Print Source/Object/NCP-Buffer
                         U     Unload Processor to Work File 3
                         L     Load Processor from Work File 3
                         F     Freeze Processor Source
                         R     References from Natural Security
                         ?     Help
                         .     Exit

                 Code .. _     Name .. SAGTEST_  Library .. SYSNCP__


   Command ===>
   Enter-PF1---PF2---PF3---PF4---PF5---PF6---PF7---PF8---PF9---PF10--PF11--PF12---
Help Cmd Exit Last List Flip Canc |
Note
If you do not have Natural Security installed, be aware that all other users have
administrator status.
Below is information on:
See the section Processor Selection.
In copying processor sources, you have the choice of copying the entire processor or only selected sources (header, keywords, functions, runtime action definitions).
To copy a command processor
In the menu, enter function code
C in the Code field.
Press ENTER.
The Copy Processor Source window is displayed to provide source and target information:
                            Copy Processor Source

                   Source           Target

     Name ........ SAGTEST_         ________
     Library ..... SYSNCP__         SYSNCP__
     DBID ........ 10___            10___
     FNR ......... 32___            32___
     Password ....
     Cipher Key ..

Replace ..... NO_ |
In the Source fields, enter the name of the processor to be copied, and the library, database ID (DBID) and file number (FNR) in which the processor is stored. The default values correspond to the processor specified in the Administrator Services menu.
In the Target fields, enter the name of the processor to be copied to, and the library, database ID (DBID) and file number (FNR) into which the processor is to be copied.
In the Cipher Key field, enter the appropriate password and/or cipher key if the source and/or target file is protected by a password and/or cipher key.
In the Replace field, enter YES if you want to
overwrite a processor in the target environment. The default for this field is
NO.
Press ENTER.
The following window is displayed to select sources:
                              Copy Processor Source

      Mark  Copy                           Source  Target
      ----  -----------------------------  ------  ------
       _    Header ......................   yes      no
       _    Keywords ....................   yes      no

       _    Functions ...................   yes      no
            Runtime Action Definitions ..   no       no


     Source Name SAGTEST     Library SYSNCP    DBID 10    FNR 32
     Target Name TEST2       Library SYSNCP    DBID 10    FNR 32

Replace ... NO |
In the appropriate Mark fields, enter any character to select the sources you want to copy.
Press ENTER.
This function is used to delete processor sources.
To delete a command processor
In the menu, enter function code
D in the Code field.
Press ENTER.
The Delete Processor Source window is displayed.
Specify the name of the processor to be deleted, and the library, database ID and file number in which the processor is stored. If the file is protected by a password and/or cipher key, you also have to enter the appropriate password and/or cipher key.
Press ENTER.
The following window is displayed to select the sources to be deleted:
                         Delete Processor Source

        Mark  Delete                          Available
        ----  -----------------------------  ---------
         _    Header ......................    yes
         _    Keywords ....................    yes
         _    Functions ...................    yes
         _    Runtime Action Definitions ..    yes


Name SAGTEST Library SYSNCP DBID 10 FNR 32 |
To the right of each processor source (header, keywords, functions, runtime action definitions) is a field that indicates whether the source exists. As command processor creation is a cumulative activity, you cannot delete a source without deleting all sources which are based on it. Thus, for example, in the screen above, you cannot delete the source of the functions without also deleting the source of the runtime action definitions.
In the appropriate Mark fields, enter any character to select each source indicated as Available.
Press ENTER.
In addition to processor sources, you can also print the processor object and the NCP.
To print a command processor item
In the menu, enter function code
P in the Code field.
Press ENTER.
The Print Source/Object/NCP-Buffer window is displayed.
Specify the name of the processor to be printed, and the library, database ID and file number in which the processor is stored. If the file is protected by a password and/or cipher key, you also have to enter the appropriate password and/or cipher key.
Press ENTER.
The following window is displayed to select items for printing:
                      Print Source/Object/NCP-Buffer

        Mark  Print                          Available
        ----  -----------------------------  ---------
         _    Header ......................  yes
         _    Keywords ....................  yes

         _    Functions ...................  yes
         _    Runtime Action Definitions ..  yes

         _    Processor Object ............  yes
              NCP-Buffer ..................  no

              Printer .....................  ________


Name SAGTEST Library SYSNCP DBID 10 FNR 32 |
To the right of each processor source (header, keywords, functions, runtime action definitions) is a field that indicates whether the item exists.
Possible input values for the Printer field are the logical
printer ID, VIDEO or SOURCE; see also
DEFINE
                                                  PRINTER
in the Statements
documentation.
In the appropriate Mark fields, enter any character to
select the items you want to have printed and enter the logical printer name or
the value VIDEO or SOURCE in the
Printer field.
Press ENTER.
To unload a command processor
In the menu, enter function code
U in the Code field.
Press ENTER.
The Unload Processor to Work File 3 window is displayed:
                      Unload Processor to Work File 3

                   Source            Target

     Name ........ SAGTEST_
     Library ..... SYSNCP__          SYSNCP__
     DBID ........ 10___
     FNR ......... 32___
     Password ....
     Cipher Key ..

Report ...... NO_ |
In the Source fields, enter the name of the processor to be unloaded, the library, database ID, and file number in which the processor can be found; the default value is the processor specified in the menu. Enter the appropriate password and/or cipher key if the file is protected by a password and/or cipher key.
In the Report field, enter YES if you want a
report to be produced. Default is NO. You do not have to use a file
extension. If you wish to use an extension, you must use the file extension
".sag".
Press ENTER.
When the processor is unloaded, all processor sources (header, keywords, functions, runtime action definitions) are written to Work File 3.
Note
Use the Object Handler to transfer command
processors from one hardware platform to another.
To load a command processor
In the menu, enter function code
L in the Code field.
Press ENTER.
The Load Processor from Work File 3 window is displayed for loading processors from Work File 3 to a Natural library:
           Load Processor from Work File 3

     Replace existing processors .. N
Produce load report .......... NO_ |
In the Replace existing processors field, enter
Y or N (default is N) to specify whether
existing processors with the same name are to be replaced by the processor to be
loaded.
In the Produce load report field, enter YES
(default is NO) if you want a report to be produced.
Press ENTER.
Note
Input for the processor name and the library into which the processor is to be
loaded is taken from the work file.
You can freeze a processor in its current state to prevent users from modifying it further.
To freeze a command processor
In the menu, enter function code
F in the Code field.
Press ENTER. The Freeze Processor Source window is displayed.
Specify the name of the processor to be frozen, and the library, database ID and file number in which the processor is stored. If the file is protected by a password and/or cipher key, you also have to enter the appropriate password and/or cipher key.
Press ENTER.
In the following window, specify with Y or N whether
modification of the processor sources is to be allowed or not. Default is
Y.
Press ENTER.
This function is only available if Natural Security is active in your environment. It is used to delete functional security references from Natural Security.
If functional security is defined for a processor in Natural Security, references are created automatically. These references are stored in the FNAT/FUSER system files along with the processor sources, not in FSEC.
To invoke References from Natural Security function
In the menu, enter function code
R in the Code field.
Press ENTER.
The Delete References window appears.
Specify the name of the processor, and the library, database ID and file number in which the processor is stored. If the file is protected by a password and/or cipher key, you also have to enter the appropriate password and/or cipher key.
Press ENTER.
In the following window, you can delete main references, function references and auxiliary references.
For further information on functional security for command processors, refer to the section Functional Security in the Natural Security documentation.
A session profile is a collection of user-definable defaults which determine how the SYSNCP screens appear or how SYSNCP reacts to input. In a session profile, for example, you can determine which command processor you want as default for a session or which colors you want assigned to screen attributes. In SYSNCP, there is a standard session profile called STANDARD which is issued to all new users. You can create several different session profiles and activate them as required.
Administrators for SYSNCP can access and modify any session profile in SYSNCP. Other users can access all session profiles, but can modify only those session profiles which are created under their user ID or which have the same name as their user ID.
To define or modify a session profile
Issue the PROFILE command from the Command line of the
menu.
The first of three session profile maintenance screens is displayed.
Below is information on:
The standard profile STANDARD or the value of the system variable
*USER is taken as default for the profile name.
If you are defining a new session profile, the parameters/attributes are defaults. You can modify these defaults as required and save them by entering the new name and pressing PF5.
The field Session Profile Name on each profile screen is both an input and output field. Thus, it is possible to define, read or save another profile from any of these screens by entering its name in the Profile Name field and pressing PF5 or PF4, respectively.
On the first profile maintenance screen, you can modify the following fields:
| Field | Explanation | ||||
|---|---|---|---|---|---|
| Apply Terminal Control 1 | These fields can be used to enter the parameters of a
SET CONTROL statement to be issued by SYSNCP at startup.
For
example, when you enter |
||||
| Apply Terminal Control 2 | |||||
| Default Processor Name | The default command processor name to be used for this session. | ||||
| Default Processor Library | The Natural library to be used to store a command processor. | ||||
| Cancel Reaction | Specifies whether a warning is to be issued whenever the requested
modification is not completed and the CANCEL command
is issued. Possible values are:
|
||||
| Clear Key Allowed | Specifies whether clear key is allowed:
|
||||
| Default Cursor Position | Specifies placement of the cursor:
|
||||
| Exec/Display Last Command | Specifies action to be taken as a result of the
LAST command:
|
On the second profile maintenance screen, you can assign colors to various screen attributes, or overwrite existing color assignments.
By specifying the following color codes, you can assign the following colors:
| Code | Color |
|---|---|
| BL | Blue |
| GR | Green |
| NE | Neutral |
| PI | Pink |
| RE | Red |
| TU | Turquoise |
| YE | Yellow |
For color assignments to screen attributes, see also the terminal command %= in the
Terminal Commands documentation.
The following attributes can be specified on the third profile maintenance screen:
| Field | Explanation |
|---|---|
| Message Line Position | The line on which messages are to be displayed. The value 21 is
recommended. See also the terminal command %M in the Terminal
Commands documentation for more information.
|
| Text for PF5 Key | The PF5 function key is reserved for global (session-wide) use. The text to be displayed on the PF-key line for PF5 can be entered in this field. |
| Command for PF5 Key | The PF5 function key is reserved for global (session-wide) use. The command to be executed when PF5 is pressed can be entered in this field. |
In addition, the screen displays when and by which user this profile was last modified.
