Using the Main, Create, Edit, and Details Forms
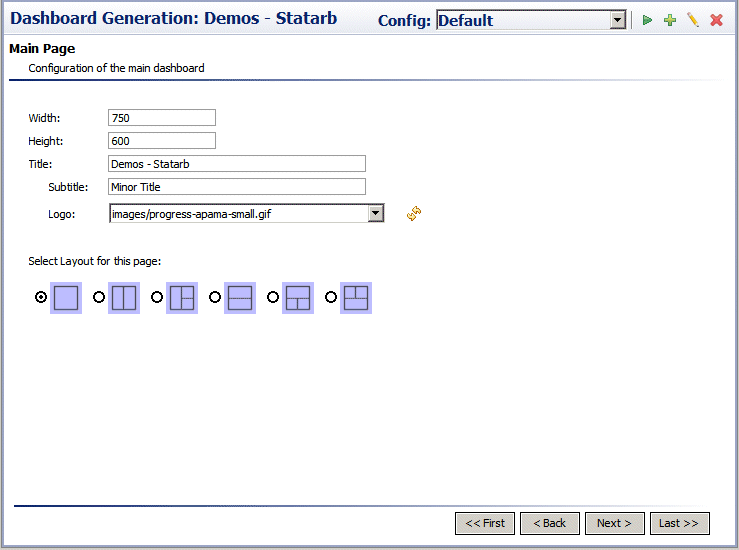
These forms allow you to specify information about each dashboard to be generated (as specified in the Select pages section of the Introduction form), including height, width, titles, logo, and layout.
One of these forms appears when you press Next in the Introduction form, and when you press Next in the layout configuration form for the previous dashboard page (main, create, or edit).
For each dashboard, the wizard includes a form with the following editable components:
 Width
Width: Specify the width of the dashboard window in pixels.
 Height
: Specify the height of the dashboard window in pixels.
 Title
Title: Enter the title of the dashboard window. The title appears in the top, left portion of the window. This field is optional; you can leave it empty.
 Subtitle
: Enter the subtitle of the dashboard window. The subtitle appears beneath the
Title. This field is optional; you can leave it empty.
 Logo
Logo: Select a graphic file. The dropdown list includes all supported graphic files in the
dashboard\images folder under your project folder. Supported formats include
GIF,
JPG, and
PNG.The logo appears in the top, right portion of the generated dashboard. After you import or create a new graphic file, click on the icon next to the dropdown menu in order to refresh its contents. This field is optional; you can leave it empty.
 Layout
: Click the radio button for the desired layout. Each section of a dashboard’s layout contains one visualization object (table, bar graph, or pie chart) or one form, as specified in the layout configuration forms.

