Defining custom launch configurations
In many cases you may want to create custom launch configurations, for example to run your applications with a subset of the monitors in your project or if your application relies on an IAF adapter. Note that the Apama Workbench perspective is targeted at creation of simple applications and so does not provide much support for projects with multiple launch configurations; if you need the power of multiple launch configuration we recommend use of the Apama Developer perspective. To create a launch configuration:
1. In the Project Explorer view, select the project you want.
2. If you are using the Apama Developer perspective, select Run >
Run Configurations from the Apama Studio menu. The Create, manage, and run configurations wizard starts. The wizard has four tabs, the Apama Project tab, the Components tab, the Environment tab, and the Common tab. 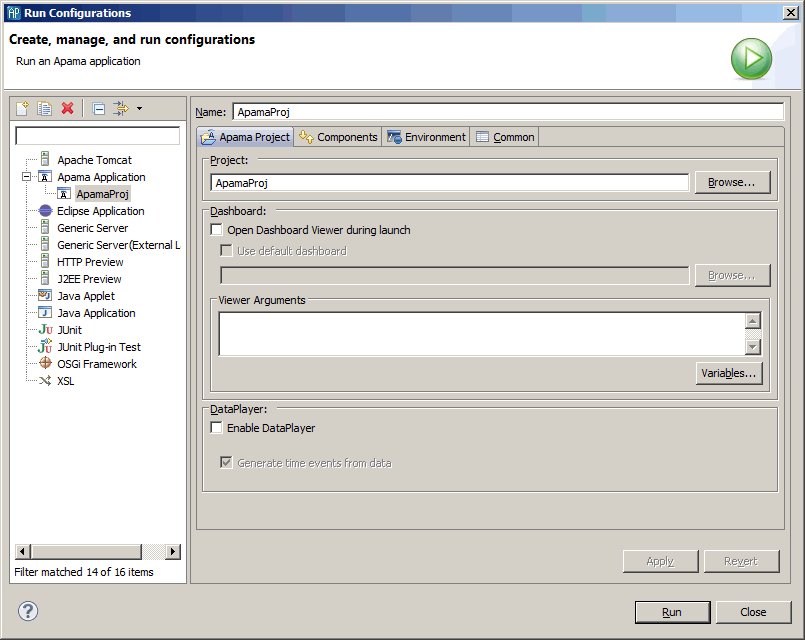
If you are using the Apama Workbench perspective, select the project of interest in the Workbench Project view and then click the Edit button just above the Start, Stop, and Restart buttons in the launch control panel. This allows the default launch configuration for the project to be edited. Creating multiple launch configurations is not recommended for Workbench perspective users
3. In the wizard’s Name field assign a name to the launch configuration
4. On the Apama Project tab fill in the following information:
 Project
 — The project field specifies the project to launch.
Dashboards — This contains information about launching a dashboard when the project runs. It contains the following fields:
Open Dashboard Viewer during launch — Specifies whether or not the Dashboard Viewer should be launched when running the project. The default is to run the Dashboard Viewer.
Use default dashboard — The default dashboard is the dashboard project in the dashboards directory of the project. You can launch another dashboard by disabling the default dashboard and specifying the project relative path of the dashboard to launch.
viewer Arguments — Specify any arguments to be added to the end of the command line for the dashboard viewer process.
5. The Components tab lists the components that are needed by the project such as additional correlators or external processes. You can add and remove components, edit their specifications, or change the order in which they are started. 
You specify information on this tab as follows:
Up — Moves the component up in the order in which it starts.
Down — Moves the component down in the order in which it starts.
Edit — Allows you modify the settings for the component.
Remove — Removes the component from the launch configuration
Add — Allows you to add a correlator or an external process to the launch configuration. To add a component, click the
Add button and select the type of component you want to add.
Restore Default — Sets the launch configuration to use the default launch configuration.
6. The Environment tab lists any additional environment variables needed to run any of the processes started by this launch configuration. 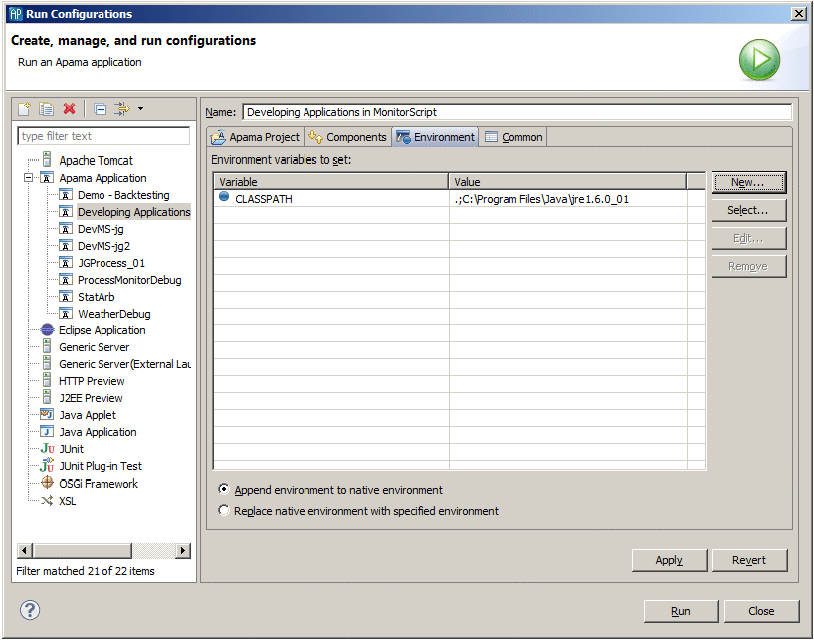
The provide information here in the following ways:
New —Specify a new environment variable.
Select — Select an environment variable from the list of Eclipse environment variables.
Edit —Modify the value of an environment variable.
Remove — Remove an environment variable from this configuration.
Apama recommends that you append new environment settings to the native environment as otherwise it will be necessary to manually specify the standard Apama environment variables in order for the process to start correctly.
Note that to add a suffix or prefix to an existing environment variable, a new environment variable of that name should be created, and the existing value specified as part of the variable’s value, for example, PATH=${env_var:PATH};C:\my path.
7. The Common tab specifies additional attributes for running this launch configuration. 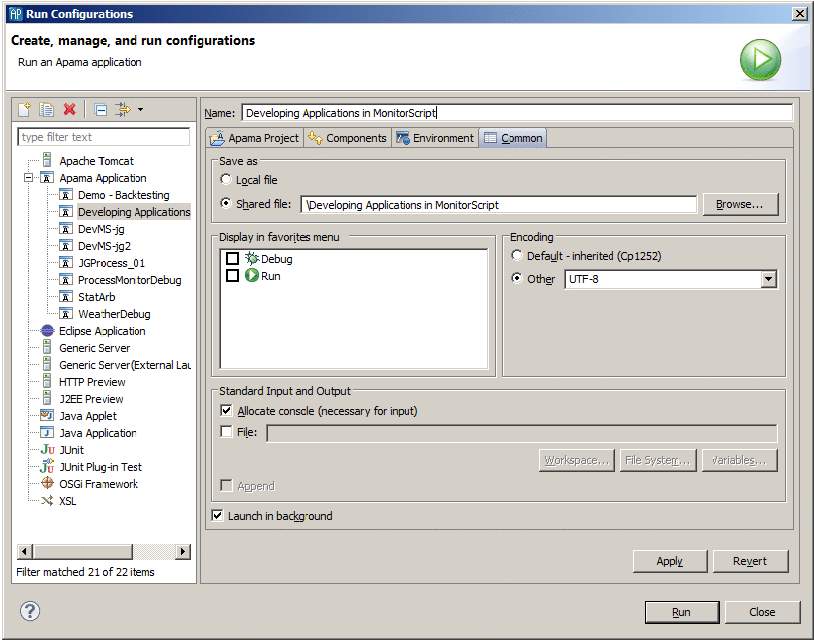
This tab displays the following fields:
Save as  Local file
Shared file — Click
Browse to navigate to and select a location that is available to all users sharing this project.
Display in favorites menu Select this checkbox to display this configuration as a choice in the drop-down menu of the Run button in the Apama Studio toolbar.
Console encoding — The default encoding for output to the console is
Cp1252. To encode console output in a different format, click
Other and select the encoding you want. For example,
UTF-8.
Standard Input and Output Allocate Console (necessary for input) — For a correlator launch configurations, there are no reasons not to allocate a console. Allocating a console does not affect performance.
File — If you want to capture correlator output in a file, navigate to and select a file to contain the correlator output.
Append — When you capture correlator output in a file, indicate whether you want to append the output to the specifies file.
Launch in background — The default is that the correlator runs as a background process.
Copyright © 2013
Software AG, Darmstadt, Germany and/or Software AG USA Inc., Reston, VA, USA, and/or Terracotta Inc., San Francisco, CA, USA, and/or Software AG (Canada) Inc., Cambridge, Ontario, Canada, and/or, Software AG (UK) Ltd., Derby, United Kingdom, and/or Software A.G. (Israel) Ltd., Or-Yehuda, Israel and/or their licensors.