Using popup dialogs for commands
For the Create and Edit commands you might not want to integrate the input fields with the main dashboard. They might, for example, occupy space that is better used for display information about running scenarios. An alternative is to place the input fields in separate dialog windows. In this case, the main dashboard contains Create and Edit buttons. Clicking them displays the appropriate dialogs where users enter the parameters for the command in the input fields and then click the OK button to perform the command. You can set up popup dialogs like this in Dashboard Builder.
1. Open tutorial-create-popup.rtv by selecting Create Instance Popup from the tutorial main page.
2. Double click on the Test label to display the dashboard in a new window such that the control objects are enabled.
Here the dashboard contains a Create button but no fields for setting the input variables.
3. Click on the Create button. This will display a dialog window with the fields for creating a scenario instance.
This dialog is really just another dashboard, in this case tutorial-create-form.rtv. The Create button displays this dialog by performing a drilldown and displaying tutorial-create-form.rtv in a new window.
4. Select the Create button object and double click on the actionCommand property in the Object Properties panel.
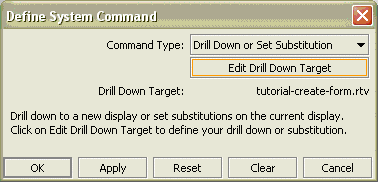
The command is defined to perform the Drill Down or Set Substitution system command. (Note that system commands are not supported for dashboards deployed as applets.)
5. Click on the Edit Drill Down Target button..
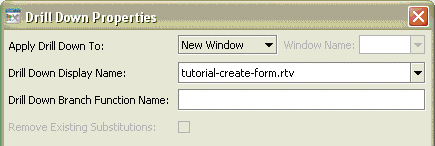
The drilldown is set to display tutorial-create-form.rtv in a new window. This gives it the behavior of a popup dialog.
The dashboard for the popup dialog was created in Dashboard Builder.
6. Open the file tutorial-create-form.rtv.
You can now select objects in the form and examine their properties in the property panel. The settings are very similar to those in the previous create instance example. The dashboard contains the variables $instrument and $clipSize which are bound to the text fields. The actionCommand property on the OK button is defined to perform the create operation using the values of these variables.
What is different is that when OK is pressed, the command will be performed and the dialog window closed. The option to close the window is set in the closeWindowOnSuccess property.
7. In the Builder window, select the OK button object.
8. Here the closeWindowOnSuccess property is enabled. If this property is enabled, the dashboard closes the window that performed the command if the command completes successfully. If the command generates an error, the window will not be closed.
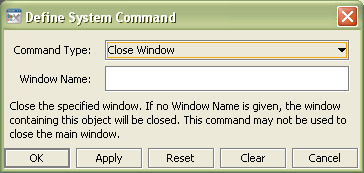
9. The Cancel button also has a command associated with it. To see this, select the Cancel button object and in the Object Properties panel, double click on the actionCommand property..
Here the command is set to close the window.
Copyright © 2013
Software AG, Darmstadt, Germany and/or Software AG USA Inc., Reston, VA, USA, and/or Terracotta Inc., San Francisco, CA, USA, and/or Software AG (Canada) Inc., Cambridge, Ontario, Canada, and/or, Software AG (UK) Ltd., Derby, United Kingdom, and/or Software A.G. (Israel) Ltd., Or-Yehuda, Israel and/or their licensors.


