Specifying correlators
To create a dashboard for a scenario or DataView in the Dashboard Builder, you first need to specify the correlator in which the scenario or DataView is running.
1. From the Tools menu select Options.
2. In the tab list on the left of Applications Options dialog select Apama.
The Applications Options dialog is shown below.
The Correlator subtab displays the correlators known to the Builder. Initially only the default correlator for the localhost will be known. For each correlator the following fields are specified
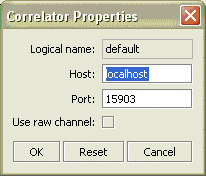
 Logical name
 – The name that will be used to refer to the correlator. This name cannot be changed once a correlator has been added.
Host – The host of the correlator. (
Note: Non-ascii characters are not allowed in host names.)
Port – The port of the correlator.
Raw channel – Option to use the raw channel for communication with the correlator. By default the data channel is used.
3. Select the entry for localhost and click on the Edit button.
The Correlator Properties dialog allows you to specify the properties of a correlator.
4. Click Cancel to close the Correlator Properties dialog.
If you are using the tutorial dashboard, do not change the properties of the default correlator unless you have loaded the tutorial scenario in a correlator running on a different host or on a different port.
5. Use the Add button to add a new correlator and the Delete button to delete the selected correlator.
Copyright © 2013
Software AG, Darmstadt, Germany and/or Software AG USA Inc., Reston, VA, USA, and/or Terracotta Inc., San Francisco, CA, USA, and/or Software AG (Canada) Inc., Cambridge, Ontario, Canada, and/or, Software AG (UK) Ltd., Derby, United Kingdom, and/or Software A.G. (Israel) Ltd., Or-Yehuda, Israel and/or their licensors.