Recreating the Object Grid sample
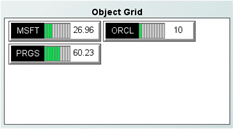
The Dashboard Builder tutorial includes an example of the Object Grid, which you can view by double-clicking Object Grid on the tutorial main page. This displays the file tutorial-object-grid.rtv.
To recreate this sample, create a new dashboard and perform the following steps:
1. Add an Object Grid to the dashboard and attach its valueTable property to the tutorial scenario as follows.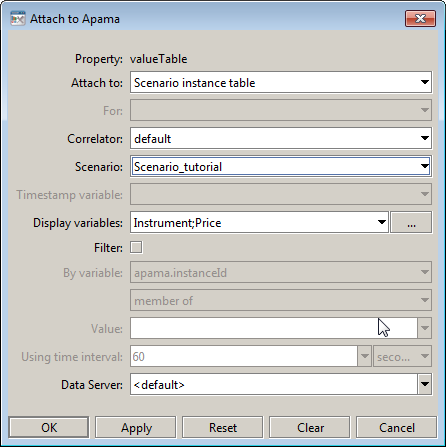
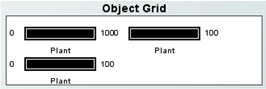
The grid object will update and display as follows:
Unless you have separately created or deleted instances of the tutorial scenario, there will be three instances of the scenario and the grid will display three instances of the object. The objects do not show any values from the tutorial scenario because none of their properties have been bound to it in the Icon Properties dialog.
2. Select the grid object and double click on the iconProperties property to display the Icon Properties dialog. In the dialog select obj_label14 as the Icon Class Name.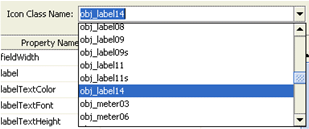
3. In the Icon Properties dialog click in the Map column of the value property and select the type Column. Click in the Property Value column and select Price.
This sets the value property of each instance of the object to the value of the Price variable in the corresponding instance of the tutorial scenario.
4. Similarly for the label property, set the Map column to Column and select Instrument as the value.
The dashboard should now appear similar to the Object Grid tutorial.
Copyright © 2013
Software AG, Darmstadt, Germany and/or Software AG USA Inc., Reston, VA, USA, and/or Terracotta Inc., San Francisco, CA, USA, and/or Software AG (Canada) Inc., Cambridge, Ontario, Canada, and/or, Software AG (UK) Ltd., Derby, United Kingdom, and/or Software A.G. (Israel) Ltd., Or-Yehuda, Israel and/or their licensors.